Bulk Upload Shipments v3.0
- Laura Lyonette (Unlicensed)
Commercial and in Confidence
The information contained in this document is confidential. No part of this document may be reproduced, disclosed to any third party, or issued in any form or by any means without the express written permission of InterSoft Systems & Programming Ltd.
Contents
1 Document Controls
2 Table of Figures
3 Introduction
4 Create a Bulk Mailing Template
4.1 Add Bulk Mailing Template
4.2 Selecting fields for the Bulk Mailing Template
4.2.1 Adding a default value to a selected field
4.2.2 Bulk Mailing Templates
5 Uploading Bulk Mailing Shipments
5.1 Upload New Data File
5.2 Data File does match the Upload Template
5.3 Bulk Mailing File with Errors
5.4 Processed to Bulk Mailing
5.5 Bulk Mailing Multi-Piece Shipments
5.6 Bulk Mailing File Uploaded to Bulk Mailing - File with Errors
5.7 Bulk Mailing File Uploaded to Unprocessed
6 Appendix 1 – Glossary
7 Appendix 2 – Quick Reference Guides
7.1 Add a Bulk Mailing Template
7.2 Upload New Data File
7.3 Setting Default Values in Bulk Mailing Templates
Create Bulk Mailing Template
Add Default Values to Fields
Using Default Values in Bulk Mailing Files
8 Appendix 3 – Frequently Asked Questions (FAQs)
9 Appendix 4 – Enhancement Group and Description
10 Appendix 5 – List of Common Errors and Resolution
11 Appendix 6 – Creating Multiple Items Within a Single Shipment
Table of Figures
Figure 1- Bulk Mailing Templates
Figure 2- Add Bulk Mailing Template
Figure 3- Conditional Field Error
Figure 4- Field Selection for the Bulk Mailing Template
Figure 5- Default Values
Figure 6- Default Value for the Shipment Service Field
Figure 7- Bulk Mailing Templates
Figure 8- Example CSV (opened with notepad)
Figure 9- Example MPS File
Figure 10- Shipment Processing Screen
Figure 11- Upload New Data File Button
Figure 12- Upload New Data File Screen
Figure 13- Upload file does not match error
Figure 14- Errors on Data File
Figure 15- Error Column on Data file
Figure 16 - Print Labels from Bulk Mailing Screen
Figure 17- Multi-Piece Shipment Integrated Label
Figure 18- Print Labels/Download Errors from Bulk Mailing Screen
Figure 19- Bulk Mailing file Uploaded to Unprocessed
Introduction
Bulk Mailing is a feature in the Intelligent Shipper System that enables Customer User role to create shipments by uploading a shipment data file. You can either create a single piece shipment or a multi-piece shipment using this functionality. This guide instructs Customer users how to use the "Bulk Upload Shipment" process within Intelligent Shipper.
Create a Bulk Mailing Template
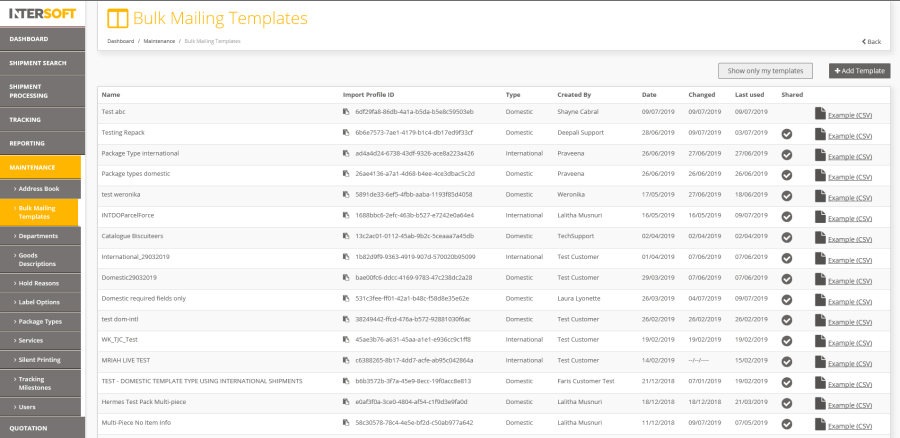
Figure 1- Bulk Mailing Templates
Before uploading bulk shipments, you will need to setup a bulk mailing template in Intelligent Shipper to match the format of the shipment data file you will be uploading.
To create a bulk mailing template, complete the steps below:
- Navigate to the Maintenance menu
- Click on Bulk Mailing Templates
- And click Add Template
This will then take you to the Add Bulk Mailing Template screen.
Add Bulk Mailing Template
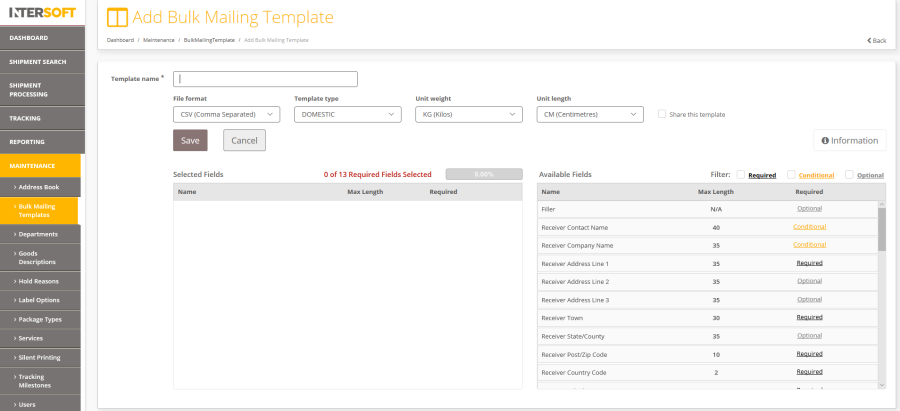
Figure 2- Add Bulk Mailing Template
In the Add Bulk Mailing Template screen:
- A template name is required
- Specify the format of the file which you will be uploading. Intelligent Shipper supports CSV (Comma Separated), PIPE Separated and ASCII fixed length file formats.
- There are 2 types of template. Domestic and International. International template has extra required fields needed to send shipments abroad.
- The available Units of weight are: KG(Kilos), G(Grams).
- The available Units of length are: CM(Centimetres), MM(Millimetres).
- The option to share this template with other team members is available.
- The newly created template cannot be saved unless all required fields are selected
- All required fields must be selected. A progress bar indicates if all required fields have been selected. This bar should be at 100% before a template can be saved.
- If a Conditional field is selected, then it may require other fields. E.g. Item Description requires item value and weight. In this case, if the relevant conditional fields are not selected then it will display an error as shown below.
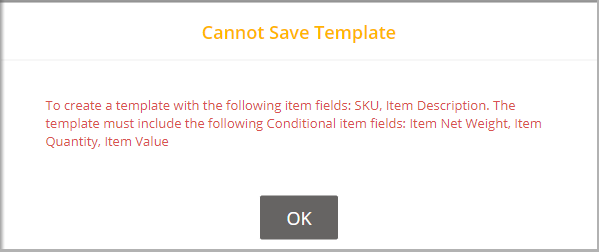
Figure 3- Conditional Field Error
- Optional fields are truly optional, if they are not select there is no impact to template functionality
- A newly created Bulk Mailing Template may be saved once all required fields have been selected
- Click on the back button to go back the Bulk Mailing Templates screen
Selecting fields for the Bulk Mailing Template
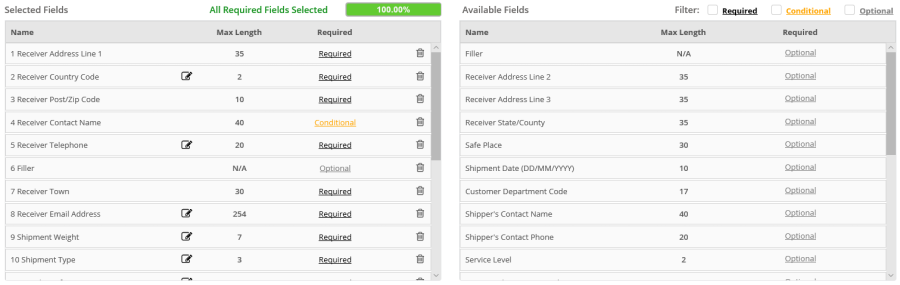
Figure 4- Field Selection for the Bulk Mailing Template
- From the Available Fields table, as fields are selected these will move across into the Selected fields table.
- "All required fields selected" progress bar in the example above is now Green and 100% indicating the template can now be saved.
- The order of the upload file must match the order of the template that has been saved i.e. if the shipper's reference is in the first column in the template then the same must be given as the first column in the upload file.
- Fillers can be used for any fields that will be given in the upload file but are not in the available field list. For e.g. "upload date" is not available in the available field list but if it will be used in the upload file then a "Filler" field can be used. The filler can also be used to pass blank values, so that you do not need to manually edit your upload file before uploading it.
Adding a default value to a selected field

Figure 5- Default Values
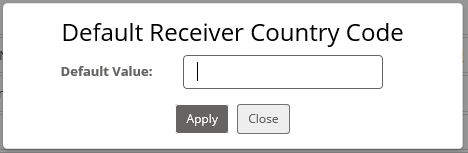
- A default value can be added by clicking on the icon in the image above. On clicking the icon, the Default Value option appears as below in the Shipment Service example. The default value will be used as a replacement if the corresponding field value is left blank in the upload file. Please note that the field name must still be provided in the upload file and cannot be taken out from the upload file even if there is a default value.

Figure 6- Default Value for the Shipment Service Field
You can enter the default value in the field provided.
- For the "Number of Pieces" field the default value must be set to a value between 1 and 9.
On clicking the "Save" button, if the given value is not within the range an error is returned, "Number of pieces must range between 1 and 9". In this scenario, you can correct the number of pieces entered and re-try the "Save" button.
- Likewise, in the Shipment Service field only valid services can be entered as default value.
On clicking the "Save" button, if the given service code is invalid an error is returned,
"The shipment service code is not valid". In this scenario, you can correct the shipment service entered and re-try the "Save" button.
NOTE: Valid services mean the service codes assigned in the Intelligent Shipper to your account. The assigned service codes can be found in the "Maintenance->services" section of the Intelligent Shipper.
Bulk Mailing Templates
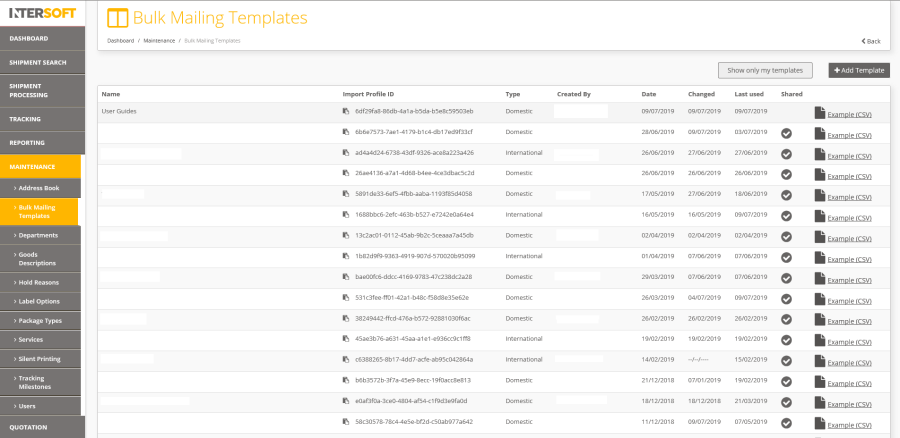
Figure 7- Bulk Mailing Templates
The recently created template will be displayed on the Bulk Mailing Templates screen. You can download a sample file for the template, to compare this to your shipment data file and ensure the template matches the file you will be uploading.
To download a sample file:
- Find your template
- Click on Example (CSV)
- An example csv will be provided. You can compare this against the shipment data file you will be uploading to ensure that the two file formats match. NOTE: If the shipment data file you upload does not match the bulk mailing template, then the system will display an error when you try and upload the file.

Figure 8- Example CSV (opened with notepad)
Bulk Mailing Multi-Piece Shipment Template
Intelligent Shipper allows you to create multi-piece shipments. These are shipments that contain more than one piece (package) that are all shipped to the same destination address. E.g. If one order is split across multiple packages. If the upload file contains the same shipper reference number and has the number of pieces greater than 1, then it identifies as a multi-piece shipment. 
Figure 9- Example MPS File
In the above example multi-piece shipment file
- It uses the same shipper reference number
- The number of pieces is greater than 1
Uploading Bulk Mailing Shipments
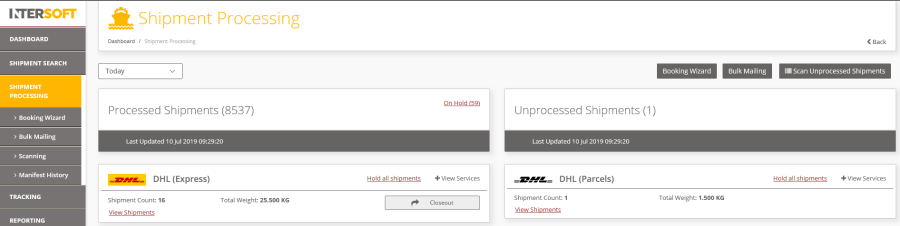
Figure 10- Shipment Processing Screen
- Click on the Bulk Mailing button on the Shipment Processing screen
Upload New Data File
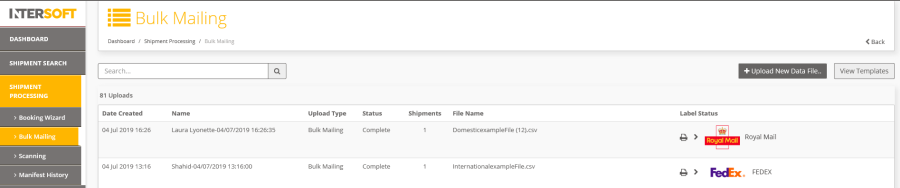
Figure 11- Upload New Data File Button
Click on Upload New Data File to open the screen. 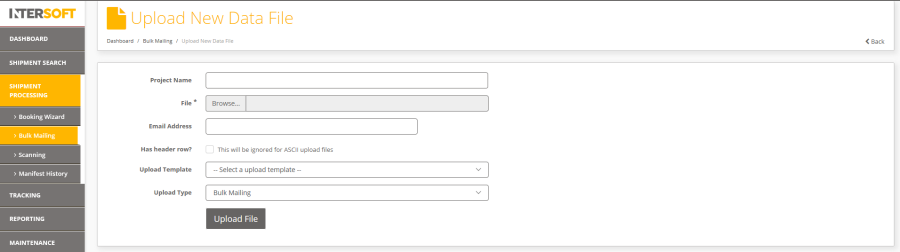
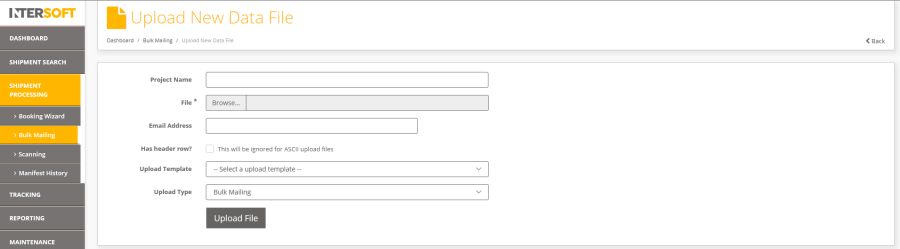
Figure 12- Upload New Data File Screen
In the Upload New Data File screen:
- Enter a Project Name, this field is not required, but if provided the project name will be displayed on the Dashboard->Shipment Processing->Bulk Mailing where you can download the labels generated.
- Browse the file to be uploaded.
- If an email address is provided, then an email notification will be sent confirming the file was successfully processed.
- If the file has headers, select the 'Headers' tick box. By default, the header row will be ignored for ASCII upload files.
- Select the Bulk Mailing template used to create the (.CSV/PIPE separation/ASCII fixed length) file. The uploaded file must match a bulk mailing template in Intelligent Shipper.
- The "Upload Type" can be Unprocessed or Bulk mailing.
- If you have chosen to upload the shipments as Unprocessed - labels will not be generated. These shipments can be scanned later to produce labels.
- If Bulk Mailing is selected then shipments will be processed, and labels will be produced on upload.
- Click on "Upload file".
Data File does match the Upload Template

Figure 13- Upload file does not match error
On clicking upload file, if the file chosen does not match the Upload template, an error is returned, "The uploaded file does not match the bulk mailing template selected." In this scenario, you can:
- Select the correct template for your file
- Update your file to match the template
- Add a new Bulk Mailing Template.
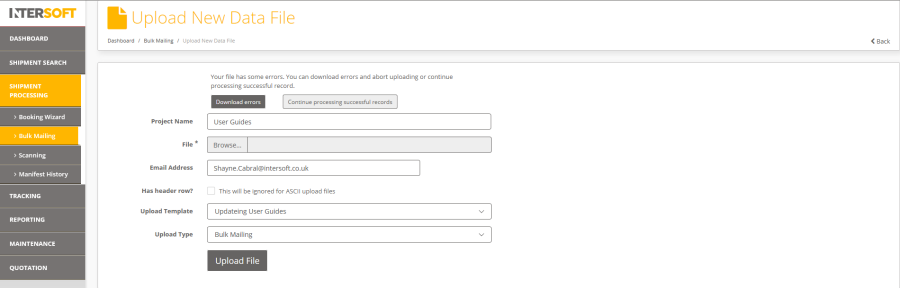
Figure 14- Errors on Data File
If the file contains errors the following message will be displayed: "Your file has some errors. You can download errors and abort uploading or continue processing successful records" will be displayed.
- Click on "Download errors" to download the file detailing the list of errors encountered and upload again
- Click on "Continue processing successful records" to process records that were successfully uploaded.
Bulk Mailing File with Errors
![]()
Figure 15- Error Column on Data file
The file made available provides the data originally entered but includes a column at the end that to error descriptions that allows you to correct any errors.
Processed to Bulk Mailing

Figure 16 - Print Labels from Bulk Mailing Screen
If the bulk mailing file had no errors, on upload, you can simply print/download the labels generated by clicking the printer/agent icon.
NOTE: If silent printing is configured, the label will print as soon as these are generated.
Bulk Mailing Multi-Piece Shipments
- If the bulk mailing file had multi-piece shipments, then a label is produced per piece within the shipment with an individual barcode number and with same shipper reference number on each label. It also generates a unique consignment number for the shipment.
- In the bulk mailing file, the service requested for the shipment must be valid for multi-piece service and the number of pieces must range between 1 and 9.
- On processing a multi-piece shipment file, if the Item information is provided then the items will be distributed out across the pieces ensuring at least 1 item is assigned to each piece. If there are any remaining items, they are distributed randomly across the pieces. If an integrated label format is being used, then the order information section of the label produced for each will show the items that have been distributed to each piece – see example below.
- The weight of each piece is calculated by the shipment dimensions divided by the number of pieces. If the shipment weight is greater than the total weight of all items, then it will create a piece with no items and sets the difference between the "shipment weight" and "total item weight" as the "package weight" for the piece and it will assign the items between remaining pieces.
- Please refer to the online help center to see the list of carriers that support multi-piece shipments.
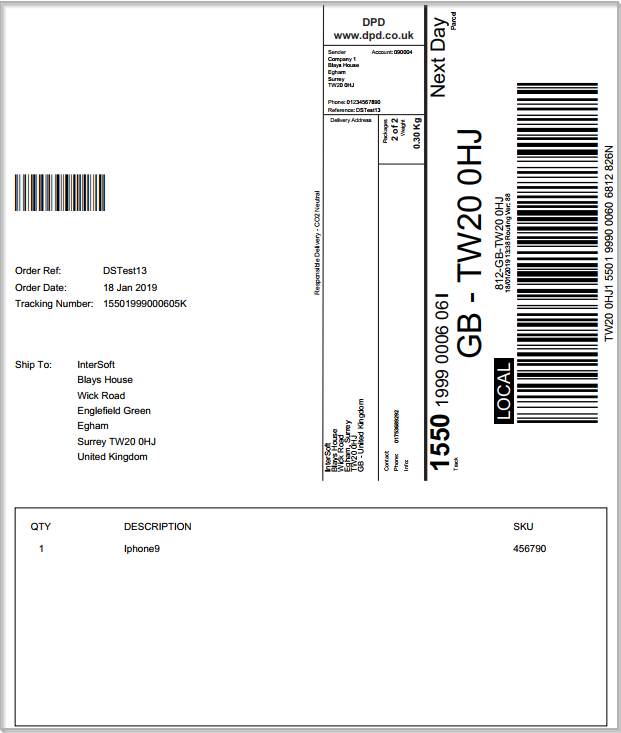
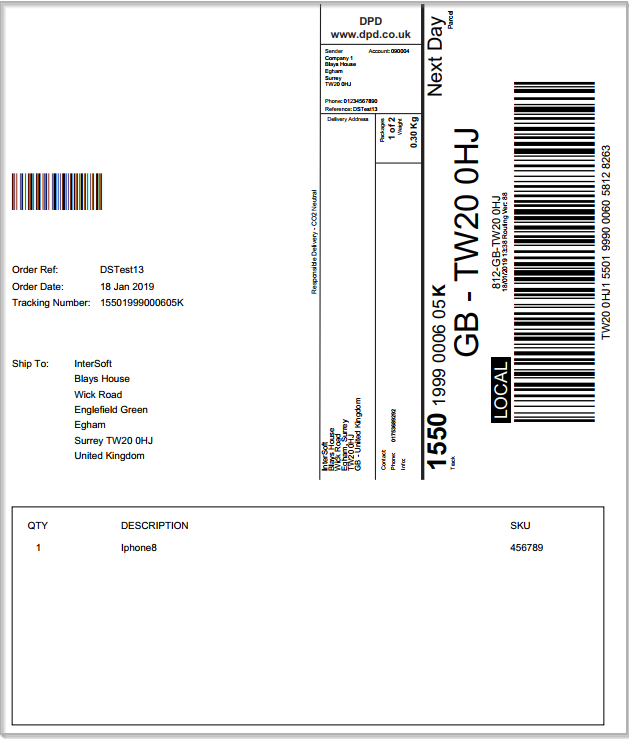
Figure 17- Multi-Piece Shipment Integrated Label
Bulk Mailing File Uploaded to Bulk Mailing - File with Errors

Figure 18- Print Labels/Download Errors from Bulk Mailing Screen
If the file contained errors and the option to process successful records was chosen, you can:
- Print/download the labels generated.
- Download the errors.
Based on the download errors, the original upload file can be corrected and re-uploaded for the shipments that failed to upload.
Bulk Mailing File Uploaded to Unprocessed
![]()
Figure 19- Bulk Mailing file Uploaded to Unprocessed
If the upload type Unprocessed was chosen, the record will feature in the Bulk Mailing list with a status of complete.
To understand how labels can be generated for unprocessed shipments please refer to the "Shipment Scanning User Guide".
Appendix 1 – Glossary
Term | Definition |
Bulk Mailing (Upload Type) | Shipments will be processed, and labels will be produced on upload. |
Unprocessed (Upload Type) | Shipments will be uploaded; however, labels will not be generated. These shipments can be scanned later to produce labels. |
Multi-Piece Shipment | A Shipment that contains more than one package/piece which is sent to the same destination. |
Customer User | The core users of the system who will be creating, processing and closing out shipments. This user role will be assigned to a customer account. Please check the user roles manual for further reference. |
Appendix 2 – Quick Reference Guides
Please see the quick reference list for bulk mailing.
Add a Bulk Mailing Template

To create a new template, in the Add Bulk Mailing Template screen:
- A template name is required
- The sample file can be downloaded in the formats: CSV (Comma Separated), PIPE Separated and ASCII fixed length
- There are 2 types of template. Domestic and International. International template has extra required fields needed to ship shipments abroad.
- The available Units of weight are: KG(Kilos), G(Grams).
- The available Units of length are: CM(Centimetres), MM(Millimetres).
- The option to share this template with other team members is available.
- The newly created template cannot be saved unless all required fields are selected
- All required fields must be selected. A progress bar indicates if all required fields have been selected. This bar should be at 100% before a template can be saved.
- If a Conditional field is selected, then it will require other fields. I.e. Item Description requires item value and weight
- Optional fields are truly optional, if they are not select there is no impact to template functionality
- A newly created Bulk Mailing Template may be saved once all required fields have been selected
- Click on the back button to go back the Bulk Mailing Templates screen
Upload New Data File
To upload a Bulk Mailing file, in the Upload New Data File screen:
- Enter a Project Name, this field is not required, but if provided the project name will be displayed on the Dashboard->Shipment Processing->Bulk Mailing where you can download the labels generated.
- Browse the file to be uploaded.
- If an email address is provided, then an email notification will be sent confirming the file was successfully processed.
- If the file has headers, select the 'Headers' tick box.
- Select the Bulk Mailing templated used to create the .CSV file. The uploaded file must match a bulk mailing template in Intelligent Shipper.
- The "Upload Type" can be Unprocessed or Bulk mailing.
- If you have chosen to upload the shipments as Unprocessed - labels will not be generated. These shipments can be scanned later to produce labels.
- If Bulk Mailing is selected then shipments will be processed, and labels will be produced on upload.
- Click on "Upload file".
Setting Default Values in Bulk Mailing Templates
When creating a Bulk Mailing Template in Intelligent Shipper, it is possible to set default values for some fields. If a default value is set, then when a Bulk Mailing file is imported and the field is left blank in the file then Intelligent Shipper will automatically populate the shipment record with the default value set for the field. This allows you to set commonly used values as default values in the template, reducing the manual editing needed to prepare a Bulk Mailing template.
This guide instructs Customer role users how to set default values when creating Bulk Mailing Templates, so that these can be used when importing Bulk Mailing files.
Create Bulk Mailing Template
To add a new Bulk Mailing Template, navigate to Maintenance > Bulk Mailing Templates and select the 'Add Template' button. 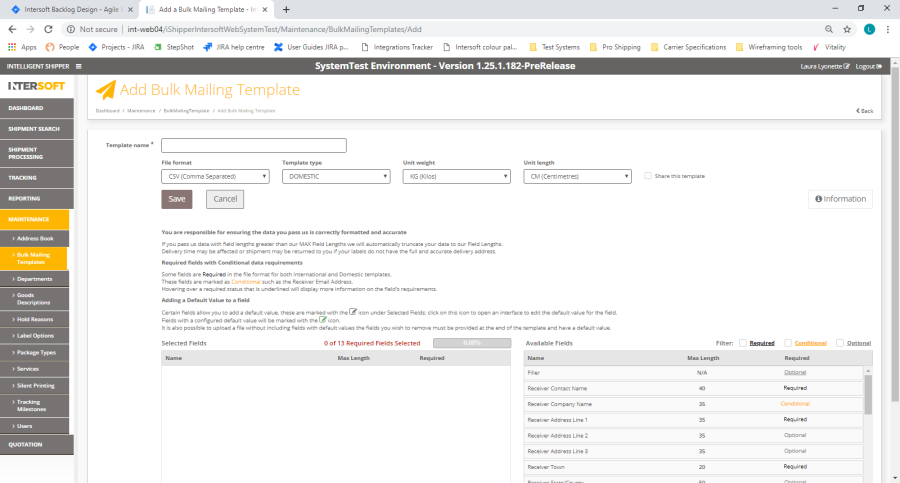
Complete the following steps to create the new template:
- Enter a template name. This is a required field.
- Specify the format of the file you will be uploading. Intelligent Shipper supports CSV (Comma Separated), PIPE Separated and ASCII fixed length file formats.
- Select the required template type, Domestic or International. The International template has some additional required fields that are needed for customs purposes.
NOTE: If you want to upload a file containing both domestic and international shipments then use the International template. All required fields will need to be populated for both domestic and international shipments.
- Select the required weight unit: KG(Kilos) or G(Grams).
- Select the required unit of length: CM(Centimetres) or MM(Millimetres).
- Select whether to share the template with other team members. If this box is ticked then the template will be available to all users for your customer account, if the box is unticked the template will only be available to yourself.
- Add fields to the template by clicking on the field in the Available Fields list. As fields are added to the template, they will be removed from the Available Fields list and added to the Selected Fields list.
- As fields are added to the template, they will be removed from the Available Fields list and added to the Selected Fields list.
- All Required fields must be selected. A progress bar indicates if all required fields have been selected. This bar must be at 100% before a template can be saved.
- If a Conditional field is selected, then it may require other fields to be added to the template. E.g. Item Description requires Item Value and Weight. In this case, if the relevant conditional fields are not selected then an error message will be displayed.
- Optional fields are truly optional, if they are not select there is no impact to template functionality
- Fillers can be used for any fields that will be given in the upload file but are not in the available field list. For e.g. "upload date" is not available in the available field list but if it will be used in the upload file then a "Filler" field can be used. The filler can also be used to pass blank values, so that you do not need to manually edit your upload file before uploading it.
- The order of the upload file must match the order of the template that has been saved i.e. if the shipper's reference is in the first column in the template then the same must be given as the first column in the upload file.
- Once all the necessary fields have been added to the Selected Fields list, click the 'Save' button to save the Bulk Mailing Template.
Add Default Values to Fields

For fields where a default value can be set, an Edit icon is displayed in the Selected Fields list as shown in the image above. To add a default value to a field, complete the following steps:
- Click the Edit icon and a window will open as shown in the image below.
- Enter the default value required for the field and click Apply.
- The window will close and the default value will be saved.
- Repeat steps 1-3 for all fields you want to set a default value for.
Using Default Values in Bulk Mailing Files
When preparing a Bulk Mailing file for upload, if a field has a default value set then this can be left blank in the upload file, even if it is a required field. The column header must still be included in the file, else an error will be generated when you try and upload the file.
When the Bulk Mailing file is uploaded, if a field that has been left blank in the template has a default value set then the shipment record will be populated with this default value.
NOTE: If a required field does not have a default value set and is left blank in the Bulk Mailing file, then an error will be generated when the file is uploaded.
Appendix 3 – Frequently Asked Questions (FAQs)
The table below contains responses to some questions that users frequently ask relating to the Bulk Mailing functionality.
No | Question | Answer |
1 | What if customer is shipping domestic and international destinations? | You should create two templates; one for domestic and one for international. If you cannot split the data, you must create an international template and include both domestic and international shipments in it. Be aware that if you choose this option you must provide item information for domestic shipments, as it is required in International template. |
2 | What if I am using Royal Mail Tracked Services but customer does not get SMS or Email notification? / What if I want to use SMS or Email notifications with Royal Mail Tracked Services? | You must add a column in your file with the correct enhancement code and map the template file with the correct phone number/ Email address. Please see enhancements codes in the Appendix 4 section. |
3 | What if I am shipping multiple items in an order and getting an error message similar to "Value of Goods cannot be less than Item Value" and "Total Weight cannot be less than Item Net weight"? | Total weight must be equal to the sum of the item weight of all items in the order, or greater than the sum of the item weight; if you are also including packaging weight in the total weight. |
Appendix 4 – Enhancement Group and Description
The table below lists the Royal Mail enhancement codes that can be used in the Service Enhancement Code fields in the bulk mailing template.
Code | Description | Enhancement Group | Comments |
1 | Consequential Loss £1000 | Consequential Loss Insurance | A maximum of 4 enhancements are allowed by Royal Mail. |
2 | Consequential Loss £2500 | Consequential Loss Insurance | |
3 | Consequential Loss £5000 | Consequential Loss Insurance | |
4 | Consequential Loss £7500 | Consequential Loss Insurance | |
5 | Consequential Loss £10000 | Consequential Loss Insurance | |
6 | Recorded | Recorded Signed for Mail | |
11 | Consequential Loss £750 | Consequential Loss Insurance | |
13 | SMS Notification | Tracking Notifications | |
14 | E-Mail Notification | Tracking Notifications | |
16 | SMS & E-Mail Notification | Tracking Notifications | |
22 | Local Collect | Local Collect | |
24 | Saturday Guaranteed | Saturday Guaranteed |
Appendix 5 – List of Common Errors and Resolution
- Bulk Mailing file stuck in "Processing" state
When a bulk mailing file appears to become stuck in the 'Processing' state for a longer duration of time, it is most likely due to international shipments being created within a domestic type Bulk Mailing Template (or vice versa). An example of the screenshot is given below. ![]()
If this occurs, please contact techsupport@intersoft.co.uk for assistance.
- Error Message - "Your file has some errors. You can download errors and abort uploading or continue processing successful record"
The following message occurs when you have errors in the file. 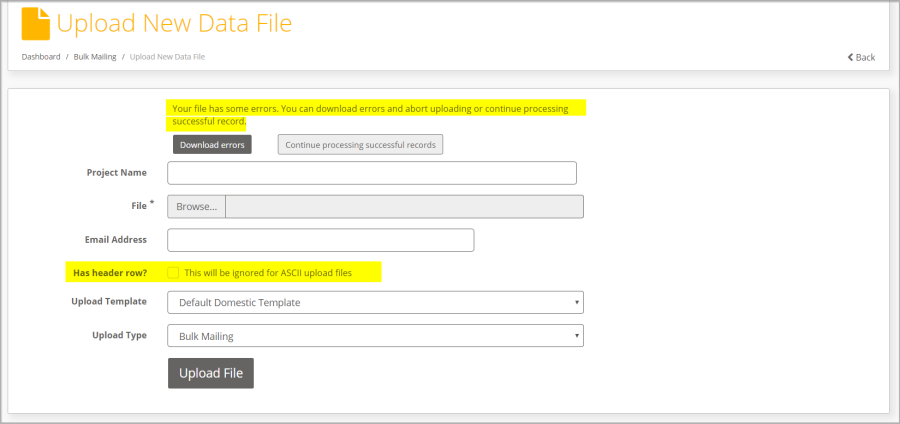
This is due to the option "Has the header row" has not been ticked while uploading the bulk mailing file and your file contains a header row. An example of the header row is given below. ![]()
To resolve this error, please ensure that this setting is enabled before attempting to process a bulk mailing file.
- Error Message – "The upload file does not match the bulk mailing template selected"
The following error in the screenshot can occur for numerous reasons, a possible scenario is Your bulk mailing upload file doesn't match the column headers and layout compared to your upload template that was setup initially. 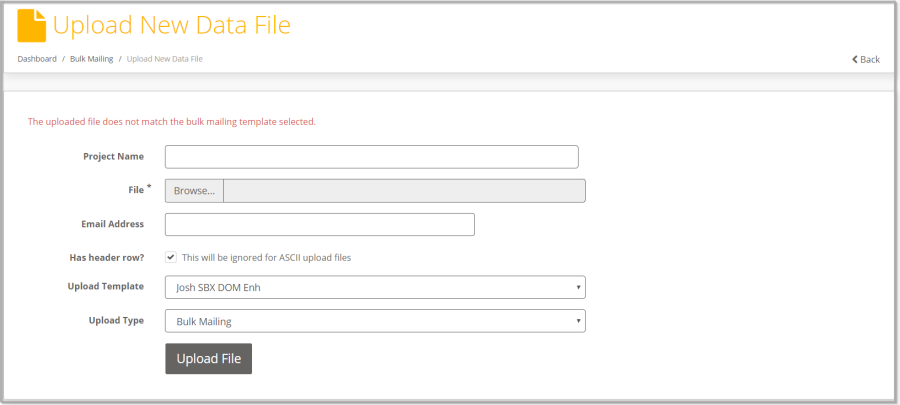
In this case check your bulk mailing template and see if the upload file matches the setup template.
There are also other common errors when
- You are attempting to upload a bulk mailing file which is not an acceptable format (E.g. Common mistake is to upload an Excel workbook .xls file rather than an acceptable CSV format file)
- The file you are attempting to upload is in an acceptable format (CSV/PIPE separated/ ASCII fixed length)
You can find the bulk mailing template under Shipment Processing->Bulk Mailing->Click on View Templates. Alternatively, you can also view this under Maintenance-> Bulk Mailing Template. An example screenshot is given below. Click on "Example (CSV)" to generate an example of your desired upload template. 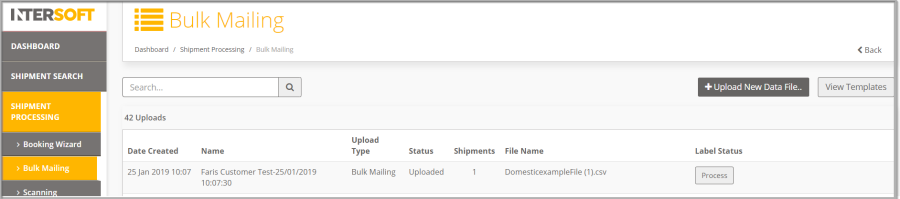

Note: It is advisable to paste your shipment data into an example template CSV file in order to ensure no errors occur due to template mismatches.
- Error Message – "The service is not a valid service for these shipment contents to this destination"
To resolve this error, please check the following.
- The service/service code used in the upload file is available for the destination country.
- The value of goods is within the acceptable limit for the service requested.
- The package dimensions are within the acceptable limit for the service requested.
Appendix 6 – Creating Multiple Items Within a Single Shipment
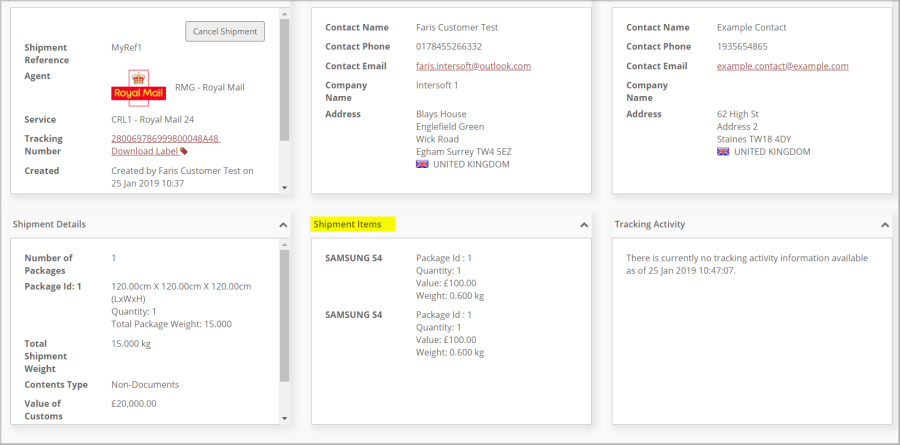
To create multiple items within a single shipment, ensure that the items listed in your bulk mailing file have the same "Shipper's reference" ![]()
The created shipment can be viewed in the "Shipment Items" section of Intelligent Shipper. You can see from below that multiple items are created in a single shipment reference.