Services Setup Manual v1.0
- Laura Lyonette (Unlicensed)
Commercial and in Confidence
The information contained in this document is confidential. No part of this document may be reproduced, disclosed to any third party, or issued in any form or by any means without the express written permission of Intersoft Systems & Programming Ltd.
Contents
1 Document Controls
2 Table of Figures
3 Introduction
4 Add and Configure Services
4.1 Add New Service
4.2 Limits & Service Exceptions
4.2.1 Service Limits
4.3 Destinations
4.3.1 Add Service Destinations
4.3.2 Configure Service Destinations
4.4 Pricing Zones
4.4.1 Add Pricing Zone
4.4.2 Configure Pricing Zone
4.5 Customers
5 Add Service Translations
5.1.1 Add Service Translation
6 Troubleshooting Errors due to Incorrect Service Setup
7 Appendix 1 – Glossary
8 Appendix 3 – Frequently Asked Questions (FAQs)
Table of Figures
Figure 1: Add Services button
Figure 2: Add Service Screen
Figure 3: Service Added
Figure 4: Service Limits & Exceptions tab
Figure 5: Service Limits
Figure 6: Filter buttons on Add Service Destination screen
Figure 7: Close Add/Remove and Delete Destination buttons
Figure 8: Service Destinations list
Figure 9: Configure Service Destination
Figure 10: Service Destination Configured
Figure 11: Add Zone button
Figure 12: Add new Pricing Zone
Figure 13: New Pricing Zone added
Figure 14: Configure Pricing Zone
Figure 15: Edit Zone Description and delete destination from Pricing Zone
Figure 16: Edit Zone Description
Figure 17: Delete Zone and Back to List buttons
Figure 18: Destinations added to Pricing Zone
Figure 19: Add Customer button
Figure 20: Add Customer to Service
Figure 21: Select customer(s)
Figure 22: Customers added to Service
Figure 23: Select label integration
Figure 24: Add Service Translation button
Figure 25: Add Service Translation screen
Figure 26: Select service
Figure 27: Service Translation added
Introduction
In order to onboard a customer, Intelligent Shipper must be configured with the services that customer will need to use. Services must be added by a System Administrator level user and assigned to the relevant customer account(s). Customers will be able to see a read-only list of the services assigned to their account, but will not be able to change or remove any of the services that have been assigned to them. This manual instructs System Administrators how to add and configure services ready for customers to use the system.
Add and Configure Services
To setup services in Intelligent Shipper, the System Administrator first needs to create the services that are required and configure them for use.
Add New Service
To add a new service, select Maintenance from the left-hand menu and then Services. The Services screen will be displayed, containing a list of all services available in the system.
To add a new service, click the "Add Services" button. The Add Service screen will then open. 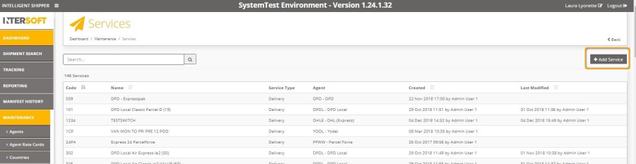
Figure 1: Add Services button
The table below describes the fields on the Add Services screen and how to complete these.
Field Name | Description | Optionality (M/C/O) | Validation Rules |
|---|---|---|---|
Service Type | Select from a list of the following values:
| Mandatory | Select from drop-down list. |
Service Code | Define a unique code for the service. This code will be used when creating shipments via API and bulk mailing to specify the service to be used for the shipment. | Mandatory | 3 - 4 alphanumeric characters. |
Description | Enter a description for the service. | Mandatory | Maximum 60 alphanumeric characters. |
Dim Rate | If the service can be charged by dimensional weight (or volumetric weight) as well as actual weight then enter the dimensional weight for the service, else leave this field blank. | Optional | N/A |
Agent | To assign a default agent to the service, select the required agent from the list. Enter an agent name and click "Select Agent" or leave the text box blank and click "Select Agent" to see a list of all available agents. If assigned, the default agent will be used for the service unless a customer routing override or routing exception overrides the default agent. Once an agent has been selected, the button text will update to "Change Agent". | Optional | Select agent from drop-down list or leave blank if a default agent is not required. |
Pricing | Sets whether the service should be displayed in the Booking Wizard and Quotation screens if there is no customer pricing setup for the service in the Customer Rates Cards screen. If you will not be setting up any customer pricing in the system then always tick this box. If you will be setting up customer pricing in the system, then use this tick box to select whether the service should be displayed if customer pricing has not been added for the service in the Customer Rate Cards screen. | Optional | N/A |
Lowest Cost Routing | If a default agent is not assigned to the service, then tick this box to enable lowest cost routing. When the service is selected, the system will then identify and use the lowest cost agent available. | Optional | N/A |
Returns Portal | Select whether the service will be available in the Returns Portal. Only tick this box if the Service Type is Return Service and you are using the Intersoft Returns Portal. | Optional | N/A |
Destinations | Tick the boxes to select whether all countries and routing exceptions should be assigned to the service by default. If the boxes are not ticked you can add countries and routing exceptions to the service manually once the service has been created, as described in the Destinations section. | Optional | N/A |
Default Transit Days To | Enter the default number of transit days taken to deliver shipments using the service. When a destination is added to the service, the number of transit days for that service destination will be set to the default. This can then be changed to the appropriate number of transit days for that destination, as described in the Configure Service Destinations section. | Optional | N/A |
Customers | Select whether to assign the service to all customer accounts in the system. If this box is not ticked the service can be assigned to customers manually once the service is added, as described in the Customers section. | Optional | N/A |
Customer Zoning | Select the number of pricing zones that are needed for the service. The zones will be created automatically when the service is saved and can then be configured, as described in the Pricing Zones section. | Optional | N/A |
Once the service details have been entered, click the "Add Services" button. 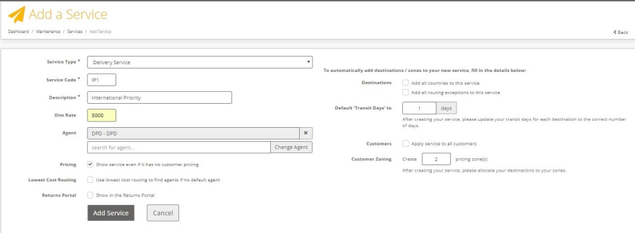
Figure 2: Add Service Screen
The service will be created and the following tabs will be displayed:
- Limits & Service Exceptions - allows you to set maximum limits for weight and dimensions, and for exceptions to be triggered if weight, value or dimensions are over a certain threshold.
- Destinations - select the destinations the service will be available to and configure each destination.
- Pricing Zones - set the pricing zones available for a service and assign each destination to a zone.
- Customers - make the service available to customer accounts.
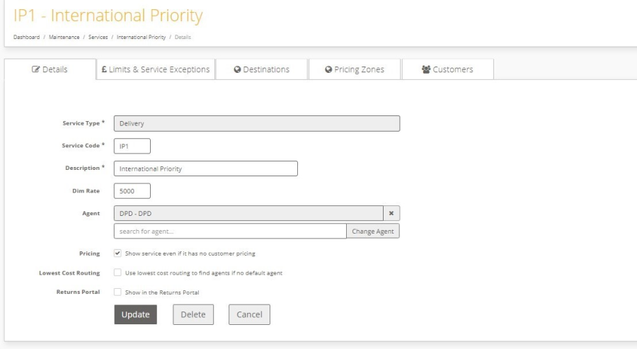
Figure 3: Service Added
Limits & Service Exceptions
The Limits and Service Exceptions tab allows you to set the maximum weight and dimensions allowed for the service, and to set exceptions to be triggered if a shipment using the service is over specific weight, value or dimensions thresholds.
Service limits are optional, and if set will be used when creating shipments to determine if the service is available for a shipment. E.g. If the weight of a shipment is greater than the maximum weight set for a service, then the service will not be available for that shipment.
Service exceptions are optional, and allow you to set the following actions to be triggered if a shipment exceeds the specified thresholds:
- Service switch - select another service for the system to switch to if the threshold is exceeded. E.g. If a shipment is over a certain value, it can be switched to a service that offers a higher amount of compensation.
- Charge extra - add a surcharge onto the shipment for exceeding the threshold E.g. Add an extra charge for shipments over a certain weight.
NOTE: Either a service switch or a charge can be set for a single threshold (weight, value or dimensions); it is not possible to set both.
For more information on how to set service exceptions, see the Configure Routing Options Manual. 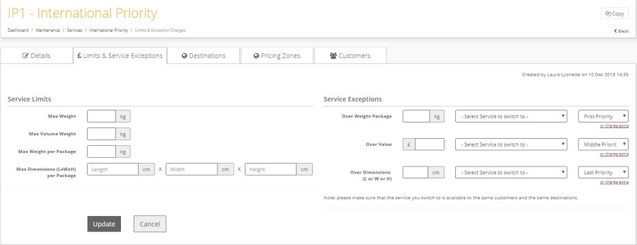
Figure 4: Service Limits & Exceptions tab
Service Limits
To set service limits, complete the following steps:
- If the service has a maximum weight limit, enter the maximum weight that can be shipped using the service.
NOTE: If a default agent has been set for the service, ensure that the maximum weight set for the service is less than or equal to the maximum weight accepted by the agent. If the service maximum weight exceeds the maximum weight accepted by the agent, or if a maximum weight is not set for the service, then an error may be returned when creating shipments if the shipment weight exceeds the maximum weight the agent will accept.
- If the service has a volumetric weight restriction, enter the maximum volumetric weight that can be shipped using the service.
- If the service supports multi-package shipments, enter the maximum weight that is allowed for each package in the shipment.
- If the service has a restriction on package size, enter the maximum length, width and height dimensions allowed per package in cm.
- Click the "Update" button to save the changes. If you select the "Cancel" button before selecting "Update" the data will not be saved.
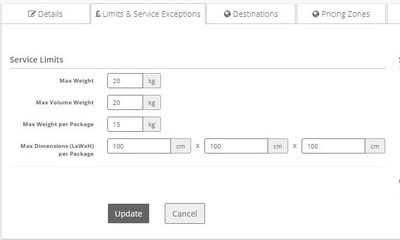
Figure 5: Service Limits
Destinations
Add Service Destinations
For a service to be used, the destinations that service is available to must be configured in the Destinations tab. When Destinations is selected, the system will display a list of available destinations on the left-hand side of the screen. This list contains the countries and routing exceptions that have been configured in the corresponding maintenance screens.
The buttons in the top-right corner of the screen can be used to filter the list of destinations by countries or routing exceptions, and to filter the list of countries by European or Rest of World (non-European) countries.
The "Add All" button will add all destinations in the list to the service. 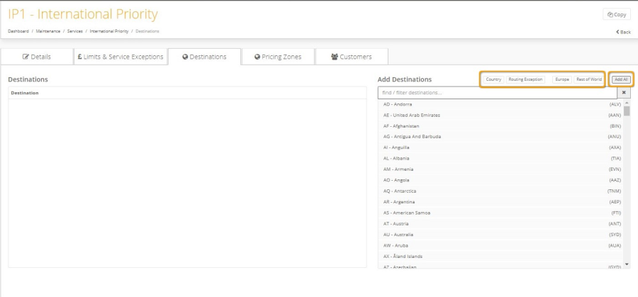
Figure 6: Filter buttons on Add Service Destination screen
To add destinations to the service individually, complete the following steps:
- Click on the destination in the Add Destinations list. The destination will be added to the service, moved to the Destinations list on the left-hand side of the screen and removed from the available destinations list. Repeat this to add all required destinations to the service.
- Destinations that have been added to the service can be removed by selecting the delete icon in the "Destinations" list.
- To close the Add Service Destinations screen, click the "Close Add/Remove" button.
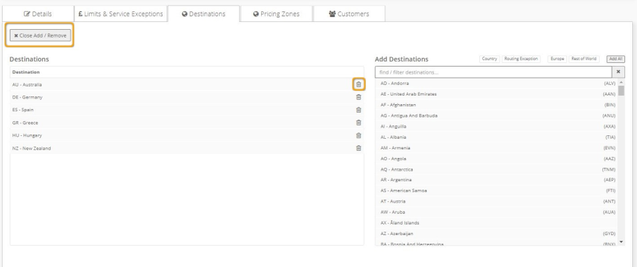
Figure 7: Close Add/Remove and Delete Destination buttons
Configure Service Destinations
Once the Add Service Destinations screen is closed, the system will display a list of all destinations that have been added to the service.
The following values will be entered for each destination by default:
- Transit days - if the Default Transit Days field was populated when the service was created, then each destination will be automatically populated with the default value. This can be changed from the default if needed.
NOTE: The service destination transit days will be used to calculate the estimated arrival date displayed for the service in the Booking Wizard and Quotation screens. If you are using the Service Availability API, the number of transit days set for the service destination will be returned in the Service Availability Response.
- Default gateway code - If a default gateway has been selected for the country in the Countries screen, each destination will be automatically populated with the default gateway code for that country. This can be changed from the default if needed.
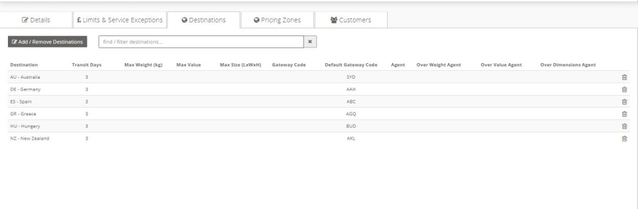
Figure 8: Service Destinations list
The Service Destinations then need to be configured to set the correct number of transit days, weight, value and dimensions limits, gateway code and agent for that destination. When shipments are created, this information will be used to determine if the service is valid for the shipment. If the Service Destination is not configured, the service default values will be used to validate the shipment instead.
NOTE: If the maximum weight, value and dimensions limits will vary per destination then it is essential that Service Destinations are configured to ensure that shipments are validated correctly.
To configure a Service Destination, click on that row in the list. The screen will then update to display day entry fields as shown in Figure 9.
To configure a service destination, complete the following steps:
- Enter the number of transit days for the destination if a service default has not been set or change from the default if needed.
- Enter the maximum weight for the destination, if different from the service default.
- Enter the maximum shipment value that will be accepted for the destination.
- Enter the maximum length, width and height dimensions that will be accepted for the destination in cm.
- Select the country gateway code from a drop-down list of available gateways (entry points) if a default has not been set for the country or change the gateway code from the country default if needed.
- If a default agent was entered when the service was created, the Agent field will be populated with the service default. If a default agent was not entered, or if this needs changing, select the service destination agent from the drop-down list.
- Agent overrides can be setup to trigger the system to switch to a different agent if the shipment is over certain weight, value and dimensions thresholds. See the Configure Routing Options Manual for more information on how to setup agent overrides.
- Click the "Update" button to save the changes. If you select the "Cancel" button before selecting "Update" the data will not be saved.
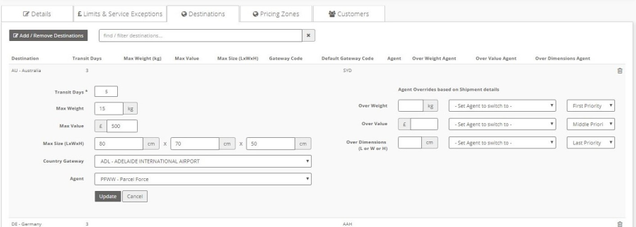
Figure 9: Configure Service Destination
- The values will be saved and the service destinations list will be updated to show the configuration entered for the service destination.
- Repeat these steps to configure all Service Destinations.
- A destination can be removed from the service by selecting the delete icon for that service in the Service Destinations list.
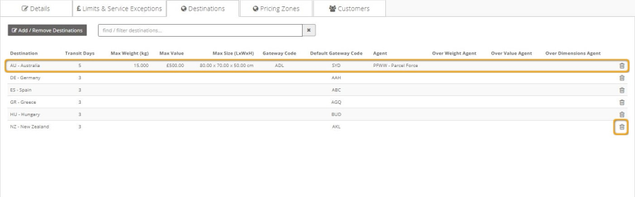
Figure 10: Service Destination Configured
Pricing Zones
A Pricing Zone is a group that countries and/or routing exceptions can be added to for pricing purposes. Once destinations have been added to the service, Pricing Zones then need to be setup and each Service Destination added to a Pricing Zone. This is required in order for the service to be available for use in the system.
If customer pricing is being used, the zones entered in the Pricing Zones tab will be available for selecting when adding tariffs in the Customer Rate Cards screen. If customer pricing is not being used, then pricing zones are only needed to make the service available for use in the system.
If a number was entered in the Pricing Zones field when the service was created, then that number of pricing zones will have been created for the service by default and will be listed in the Pricing Zones tab.
If the Pricing Zones field was left blank when the service was created, then there will not be any pricing zones listed in the screen.
Add Pricing Zone
- To add a new pricing zone, click the "Add Zone" button.
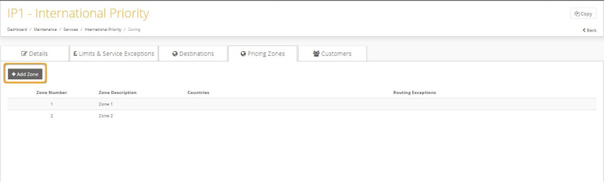
Figure 11: Add Zone button
- Data entry fields will be displayed as shown in figure 12.
- Define a zone number to identify the zone. This is a mandatory field and allows a maximum of 10 characters.
- Enter a description to identify the zone. This is a mandatory field and allows a maximum of 100 characters.
- Click "Add Zone" to save the new pricing zone. If you select the "Cancel" button before selecting "Update" the data will not be saved.
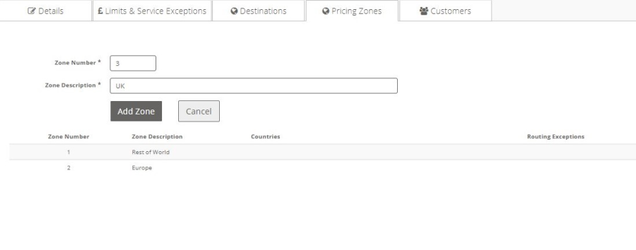
Figure 12: Add new Pricing Zone
- The new zone will be saved and will be added to the Pricing Zones list.

Figure 13: New Pricing Zone added
Configure Pricing Zone
Once a pricing zone has been created, it needs to be configured. To configure a pricing zone, complete the following steps:
- Click on that pricing zone in the list. The screen will update to show the Edit Pricing Zone screen.
- The right-hand side of the screen will contain an Available Destinations list. This list contains the countries and routing exceptions that have been configured in the corresponding maintenance screens.
- The buttons in the top-right corner of the screen can be used to filter the list of destinations by countries or routing exceptions, and to filter the list of countries by European or Rest of World (non-European) countries.
- The "Add All" button will add all destinations in the list to the pricing zone.
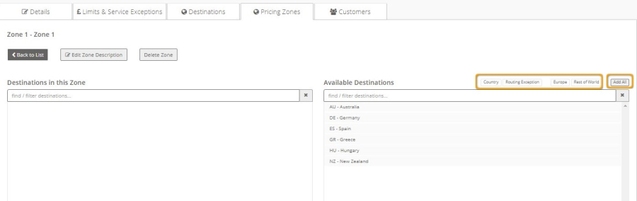
Figure 14: Configure Pricing Zone
- To add destinations to the zone individually, click on the destination in the Add Destinations list. The destination will be added to the zone, moved to the Destinations in this Zone list on the left-hand side of the screen and removed from the Available Destinations list. Repeat this to add all required destinations to the zone.
- Destinations that have been added to the zone can be removed by selecting the delete icon in the Destinations in this Zone list.
- To edit the description of a pricing zone, select the "Edit Zone Description" list.
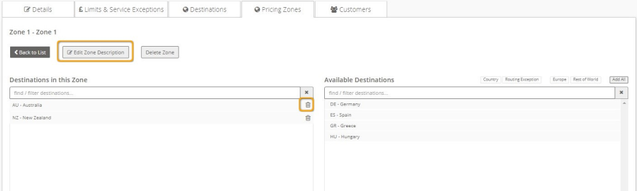
Figure 15: Edit Zone Description and delete destination from Pricing Zone
- The Zone Description field will be displayed.
- To edit the description, update the text and click the "Update Description" button. If you select "Close" before selecting "Update" the data will not be saved.
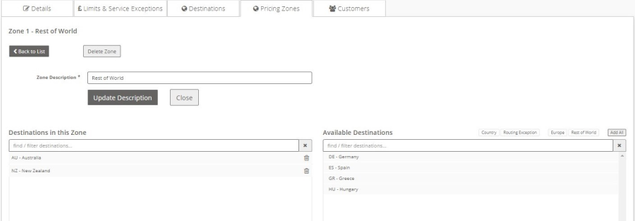
Figure 16: Edit Zone Description
- To remove a pricing zone from the service, select the "Delete Zone" button. This will remove the pricing zone from the list.
- To close the Edit Zone screen, select the "Back to List" button.
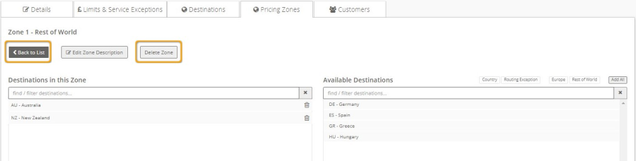
Figure 17: Delete Zone and Back to List buttons
- The system will return to the Pricing Zones list, and the destinations added to the pricing zone will be displayed.
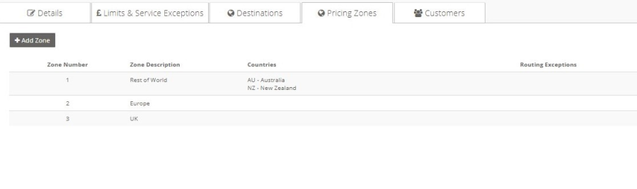
Figure 18: Destinations added to Pricing Zone
Customers
Before a customer can use the service, it must be assigned to their customer account. This can be done in the Customers tab of the Services screen. Services can also be assigned to customer accounts in the Services tab of the Customer screen. See the Customer Account Setup manual for more information.
NOTE: Royal Mail services must be assigned to customers via the Customer screen, as this screen has functionality to automatically lookup the services that are enabled for the customer's Royal Mail account from Royal Mail's OBA billing platform. To assign a Royal Mail service to a customer account, see the Customer Account Setup manual.
- To add a customer to the service, click the "Add Customer" button.
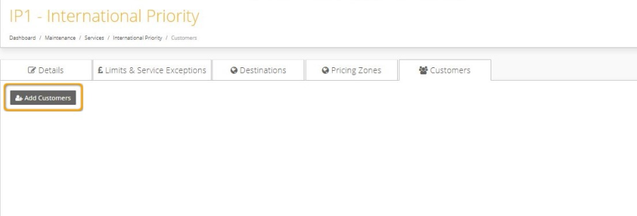
Figure 19: Add Customer button
- A Customers field is then displayed on screen.
- Enter the name of the customer you want to add to the service in the text box and click the "Find Customers" button. Leave the text box blank and click the button to view a list of all customers in the system.
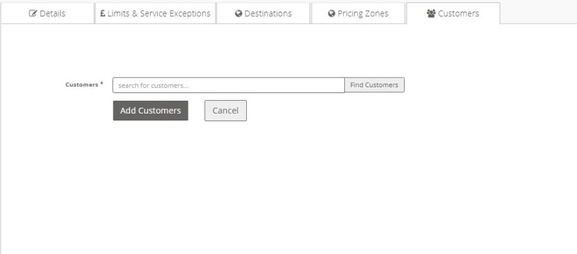
Figure 20: Add Customer to Service
- Select the tick box for the customer(s) you want to add to the service and click "Add Customers".
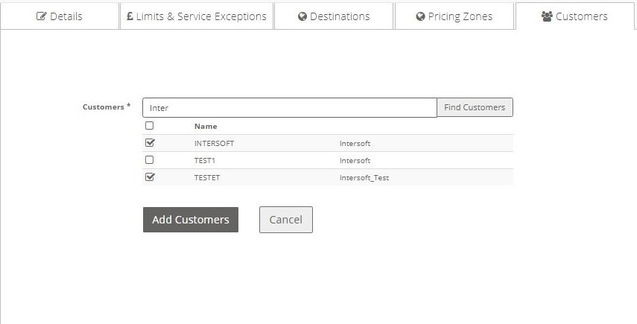
Figure 21: Select customer(s)
- The changes will be saved and the customer(s) will be added to the service. The screen will update to display a list of the customer(s) added to the service.
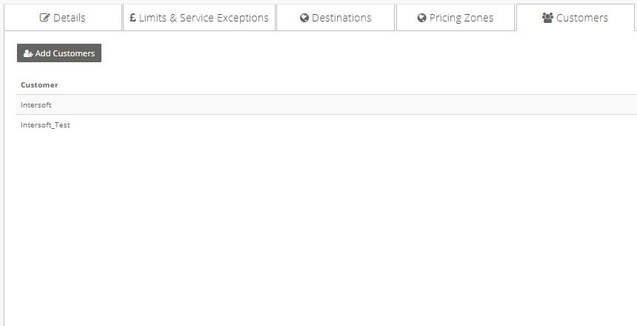
Figure 22: Customers added to Service
The service configuration is then complete and the Services screen can be closed.
Add Service Translations
Once the new service has been added and configured, it must be mapped to a carrier service to setup the label settings that will be used to generate labels for the service. Services are mapped to carrier services in the Service Translations tab of the Label Integration screen.
To access the Service Translations tab, select Maintenance from the left-hand menu and then Integrations.
Select the carrier integration that you want to add the service translation for and then select the label integration from the integration types list. 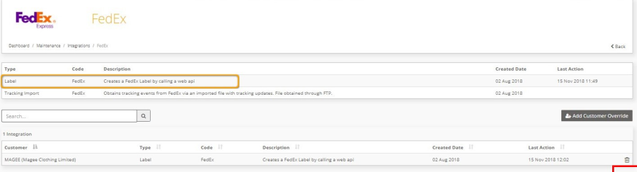
Figure 23: Select label integration
The label integration screen will open. Select the "Service Translations" tab. The Service Translations screen will contain a list of existing service translations for the integration.
Add Service Translation
Click the "Add Service Translation" button to add a new service translation for the integration. 
Figure 24: Add Service Translation button
The screen will update to display the following fields:
- Service - search field for selecting the service name and code entered in the Services screen
- Carrier service code - drop-down list for selecting the carrier service that corresponds to the service.
NOTE: After the Service and carrier Service Code fields, there may be additional fields displayed on screen. This will depend on the carrier and the service options they have available. 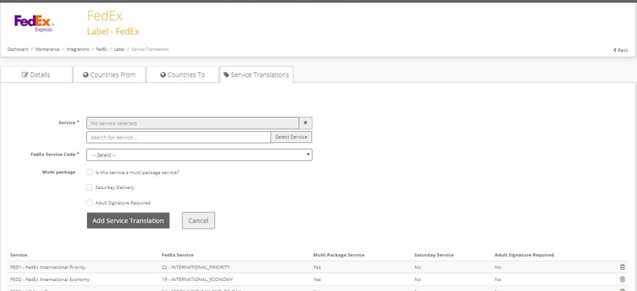
Figure 25: Add Service Translation screen
To add a service translation:
- Enter the name of the service you want to add the service translation for in the Service text field and click "Select Service". A list of services matching the service name will be displayed. To search for all available services, leave the text field blank and click "Select Service". A list of all services in the Services screen that have not yet been added to a service translation for that carrier will be displayed.
- Select the carrier service that will be mapped to the service from the drop-down list.
NOTE: If the carrier service you want to map to the service is not listed, it may be because that service is not yet available in Intelligent Shipper. To request for the service to be added please contact Tech.Support@Intersoft.co.uk .
- Complete any additional carrier fields as required for the service translation.
- Click the "Add Service Translation" button to save the service translation. If the "Cancel" button is selected the changes will not be saved.
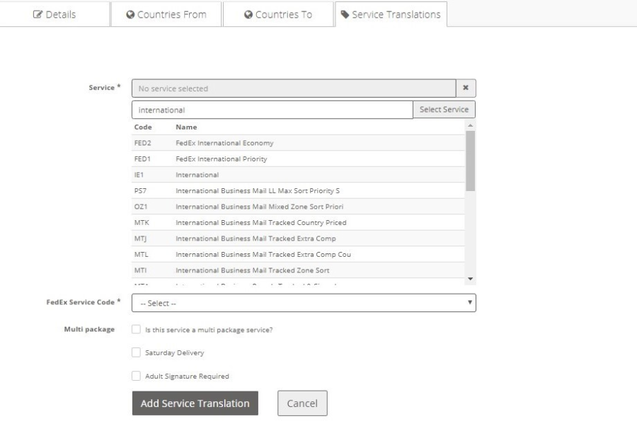
Figure 26: Select service
- The service translation will be added. The service translations list will be displayed again, and the new service translation will be displayed in the list.
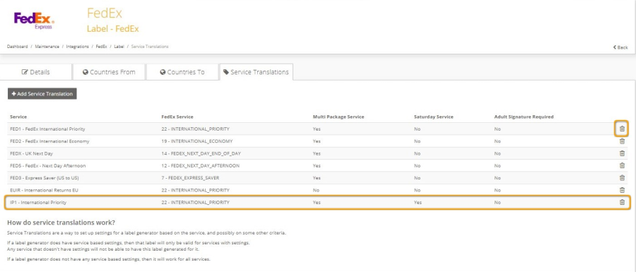
Figure 27: Service Translation added
The service is now mapped to a carrier service, and ready to be used in Intelligent Shipper to create shipments.
To delete a service translation, select the delete icon for that row in the Service Translations list.
Troubleshooting Errors due to Incorrect Service Setup
If a service or service translation has been configured incorrectly, this may cause an error when you attempt to create shipments for that service. If the service has been configured incorrectly, the system will behave as follows depending on the method you are using to booking shipments:
- Bulk mailing – when you try and process the bulk mailing file an errors file will be returned containing the following error for the shipment: "The service is not a valid service for these shipment contents to this destination."
- Booking wizard – depending on the configuration error, the service may not be available for selection in the Booking Wizard screen or when attempting to create a shipment using the service the following error message may be displayed: "The service is not a valid service for these shipment contents to this destination."
- API – an error message will be returned in the API response. See the Intelligent Shipper API – Multi-Piece Shipment Bookings technical guide for a full list of the errors that could be returned in the Create Shipment response.
In any of the above situations, complete the following checks to ensure the service has been correctly configure and update the service as needed to resolve any errors:
- Check that the service has been assigned to the customer account
- Check that a Service Destination exists for the country the customer is trying to ship to
- Check that the Service Destination has been added to a Pricing Zone
- Check that a Service Translation exists for the service
If you complete the above checks and cannot identify any issues with the service configuration, contact Tech.Support@Intersoft.co.uk .
Appendix 1 – Glossary
Term | Definition |
Volumetric weight / Dimensional weight | A pricing technique for commercial freight transport (including courier and postal services), which uses an estimated weight that is calculated from the length, width and height of a package. |