Configure Routing Options v1.0
- Vinay Damagatla
- Laura Lyonette (Unlicensed)
Commercial and in Confidence
The information contained in this document is confidential. No part of this document may be reproduced, disclosed to any third party, or issued in any form or by any means without the express written permission of Intersoft Systems & Programming Ltd.
Contents
1 Document Controls
2 Table of Figures
3 Introduction
4 Configure Service Exceptions
4.1 Default Section
4.2 Setup Service Switches
4.3 Setup Service Charges
5 Configure Agent Overrides
5.1 Routing Exceptions
5.1.1 Add Routing Exception
5.1.2 Set Routing Exception Agent Overrides
5.2 Service Destinations
5.2.1 Add Service Destination
5.2.2 Enter Service Destination Details
5.2.3 Set Service Destination Agent Overrides
5.3 Customer Routing Overrides
5.3.1 Add Customer Routing Override
5.3.2 Set Customer Routing Override Agent Overrides
Table of Figures
Figure 1: Services Screen – Limits and Exceptions tab
Figure 2: Setup Service Switches
Figure 3: Or Charge Extra link
Figure 4: Setup Service Charge
Figure 5: Add Routing Exception Button
Figure 6: Add New Routing Exception
Figure 7: Add Agent Overrides to Routing Exception
Figure 8: Add / Remove Service Destinations Button
Figure 9: Add/Remove Service Destination Screen
Figure 10: Service Destination Added
Figure 11: Enter Service Destination Details
Figure 12: Set Service Destination Agent Overrides
Figure 13: Add Customer Routing Override Button
Figure 14: Add Customer Routing Override
Figure 15: Add Agent Overrides to Customer Routing Override
Introduction
Intelligent Shipper provides the ability to configure flexible routing options by allowing Admin level users to set the system to switch to a different service or agent in certain scenarios. This purpose of this manual to instruct Admin level users how to setup this flexible routing in Intelligent Shipper. For information on how the system will use this routing information to determine the service and agent for a shipment, see the manual Routing Options - Service and Agent Selection.
Configure Service Exceptions
Intelligent Shipper allows Admin level users to set weight, value and dimensions limits on a service, that if exceeded will trigger a service exception to either switch to a different service or charge the customer extra for the shipment. To set service exceptions, select the Maintenance and then Services. Select the service you want to add exceptions for, and the select the "Limits and Exceptions" tab.
Default Section
The Service Exceptions section of the Limits and Exceptions tab allows you to setup some exceptions that will be triggered if a shipment created for that service is over specified weight, value and dimensions thresholds.
There are two types of service exception that can be set on these thresholds:
- Service switch - select another service for the system to switch to if the threshold is exceeded. E.g. If a shipment is over a certain value, it can be switched to a service that offers a higher amount of compensation.
- Charge extra - add a surcharge onto the shipment for exceeding the threshold E.g. Add an extra charge for shipments over a certain weight.
NOTE: Either a service switch or a charge can be set for a single threshold; it is not possible to set both. 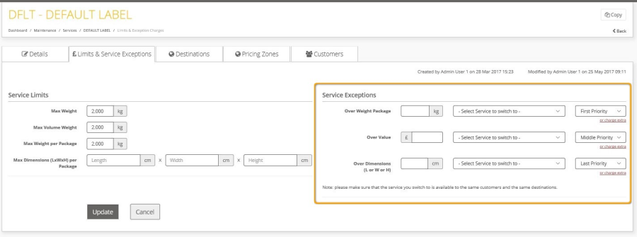
Figure 1: Services Screen – Limits and Exceptions tab
Setup Service Switches
To setup service switches:
- Enter the value you want to set as the threshold for service switching in the text box.
- Select the service you want to switch to from the Services drop-down list. This will contain a list of all services that have been added in the Services maintenance screen.
- Select a priority order for the service switch. If the shipment triggers multiple service switches - e.g. if a shipment is over the weight and value thresholds - then this will determine which of the service switches takes priority. NOTE: The priority field is populated by default, and you can change these default values by selecting your preferred priority from the list.
- Ensure that the service you've selected for switching to is available to the same customers and destinations as the service that is being switched from (i.e. the service currently selected). NOTE: This is an important check, as if the service being switched to is not available to the same customers and destinations as the current service then customer users will receive errors when they try and create shipments.
- Repeat steps 1-4 for all service switches you want to setup. When all service switches have been entered, click the "Update" button to save the service switches.
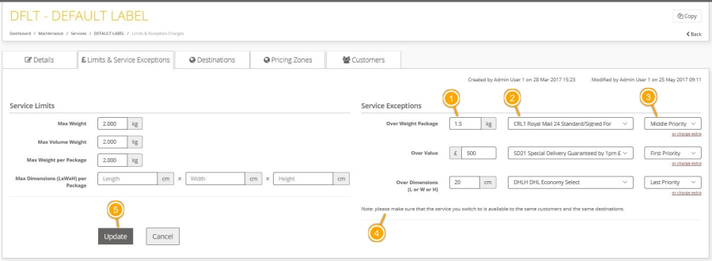
Figure 2: Setup Service Switches
Setup Service Charges
To setup a service charge, select the "or charge extra" link for the service exception you want to set the charge on. A Charge field will then be displayed.
NOTE: Once the"or charge extra" link is selected, the text will change to "or service switch" so that you can change back to a service switch if needed. 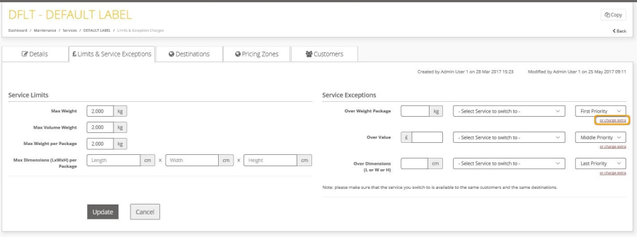
Figure 3: Or Charge Extra link
To setup a service charge:
- Enter the value you want to set as the threshold for charging in the text box.
- Enter the charge that you want to add to the shipment if the threshold is exceeded.
- Repeat steps 1 and 2 for all charges you want to setup. When all charges have been entered, click the "Update" button to save the charges.
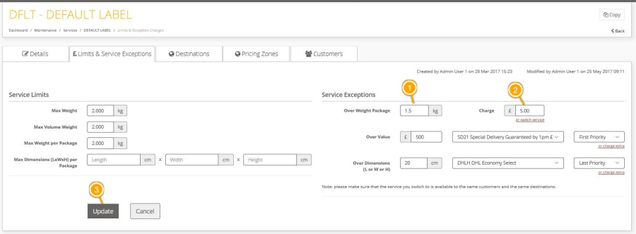
Figure 4: Setup Service Charge
Configure Agent Overrides
There are several maintenance screens where Admin users can set a default agent. When a shipment is created the system will check the shipment details against this setup and the routing logic to determine the shipment agent.
As well as setting default agents, Intelligent Shipper allows Admin level users to set agent overrides based on weight, value and dimensions limits. When these limits are exceeded and either the label or type or service code of the agent set in the override matches that of the default agent, the system will automatically switch to a different agent as set in the agent override. These agent overrides will determine the routing of the shipment, and can be set in the following maintenance screens:
- Routing exceptions
- Service destinations
- Customer routing overrides
Routing Exceptions
Routing Exceptions allow you to set exceptions to the standard logic for selecting a shipment agent on a combination of country, town and post code. For example, if you want to use a different agent to ship to a remote town as the agent(s) you would usually use do not deliver there or have a longer delivery time, you can use a routing exception to do this.
Routing exceptions can have a default agent set that will be selected automatically when the routing exception is triggered, and have agent overrides set which will override the default agent if the weight, value and dimensions thresholds are exceeded.
To setup routing exceptions, select Maintenance > Routing Exceptions. The screen will contain a list of all existing routing exceptions. Select the "Add Routing Exceptions" button and the Add Routing Exception screen will open. 
Figure 5: Add Routing Exception Button
Add Routing Exception
To add a new routing exception:
- Select the country that the routing exception will apply to from the drop-down list.
- Enter the routing exception location details -exceptions can be set for any combination of town and post code or partial post code. To set the routing exception for a partial post code then tick the "Is Partial" box. E.g. If a routing exception is needed to the post code TW20 0HJ then "Is Partial" must be left unticked, but if it is needed for all post codes beginning with TW20 then "Is Partial" must be ticked.
- To set a default agent for the routing exception, select the required agent from the Agent drop-down list. If a default agent is added, then when a shipment triggers the routing exception the default agent will be set as the shipment agent, unless the shipment triggers any agent overrides that have been setup for the routing exception.
- The screen contains some informational text on how routing exceptions work, including the order that will be used to match routing exceptions to shipments if multiple routing exceptions exist. Read this text to help with setting up your routing exception correctly.
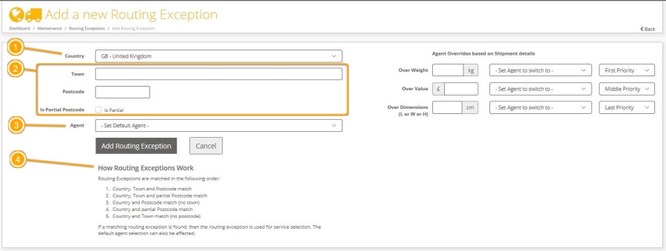
Figure 6: Add New Routing Exception
Set Routing Exception Agent Overrides
As well as setting a default agent for a routing exception, you can also set agent overrides based on weight, value and dimensions thresholds. If a shipment triggers the routing exception and exceeds one of these thresholds, then the agent set in the agent override will be used instead of the default agent.
For example: In the image below, if a shipment is created with a post code that begins TW20 and the shipment weight is under 3kg then the agent selected for the shipment will be Hermes. If the shipment weight is over 3kg then the agent selected for the shipment will be FedEx.
To set agent overrides on the routing exception:
- Enter the value you want to set as the threshold for the agent override in the text box.
- Select the agent you want to switch to from the Agents drop-down list. This will contain a list of all agents that have been added in the Agents maintenance screen. The agent selected must have either the same label type or service code as the default agent, else this will not override the default.
- Select a priority order for the agent override. If a shipment triggers multiple agent overrides- e.g. if a shipment is over the weight and value thresholds set for the routing exception - then this will determine which of the agent overrides takes priority. NOTE: The priority field is populated by default, and you can change these default values by selecting your preferred priority from the list.
- Repeat steps 1-3 for all agent overrides you want to setup on the routing exception. When all agent overrides have been entered, click "Add Routing Exception" to save.
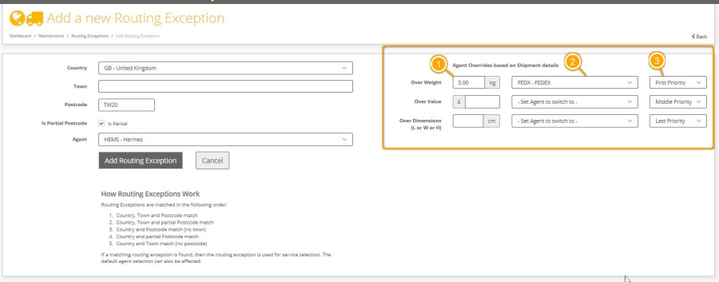
Figure 7: Add Agent Overrides to Routing Exception
Service Destinations
Service destinations allow you to configure settings for each destination that a service is available to, such as the number of transit days shipments take to reach the destination and the maximum weight, length and size that can be shipped to that destination. Similar to routing exceptions, service destinations can have a default agent and/or have agent overrides set on weight, value and dimensions. However, service destinations will only apply to a particular service, where as routing exceptions apply to all services. If a service destination exists, then when determining the shipment agent this will take priority over routing exceptions. Service destinations can be set for either a country or a routing exception.
To add service destinations:
- Select Maintenance > Services and the Services screen will open.
- Select the service you want to add service destinations to from the list of services.
- Select the Destinations tab and a list of destinations added to the service will be displayed.
- To add a new service destination, select the "Add/Remove Destinations" button.
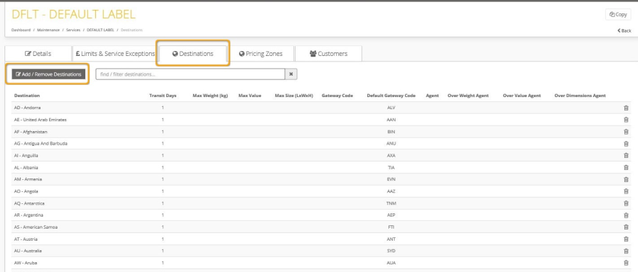
Figure 8: Add / Remove Service Destinations Button
Add Service Destination
The Add/Remove Service Destination screen opens. This displays a list of the countries and routing exceptions that can be added as service destinations, and a list of the destinations that have already been added to the service.
To add a new service destination:
- In the Add Destinations list on the right-hand side of the screen click on the destination you want to add to the service (either country or routing exception).
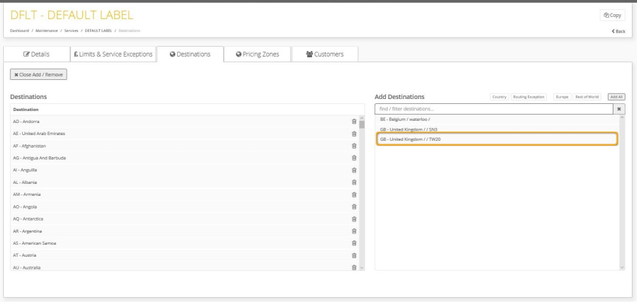
Figure 9: Add/Remove Service Destination Screen
- This will move the service over to the Destinations list on the left-hand side of the screen.
- Click the "Close Add/ Remove" button to close the screen.
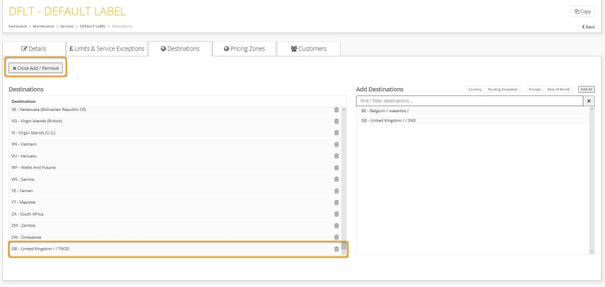
Figure 10: Service Destination Added
- The newly added service destination will then be displayed in the Service Destination list. Click on that row in the service destinations list and the service destination will expand to display more fields.
Enter Service Destination Details
To setup the service destination, enter the following information:
- Number of transit days taken to deliver shipments to the destination. This is a mandatory field.
- Enter the maximum weight, maximum value and maximum size to the destination if required.
- Select a country gateway from the drop-down list if required.
- To set a default agent for the service destination, select the required agent from the Agent drop-down list. If a default agent is added to the service destination, then when a shipment is created to that destination using the selected service then the default agent will be set as the shipment agent. The service destination default agent will take priority over the service default agent but will be overridden if any agent overrides set for the service destination are triggered.
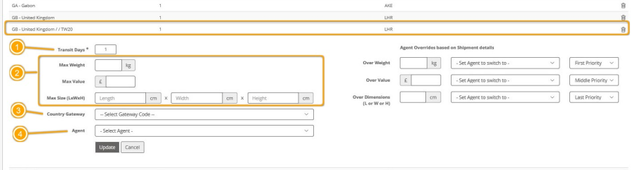
Figure 11: Enter Service Destination Details
Set Service Destination Agent Overrides
As well as setting a default agent for a service destination, you can also set agent overrides based on weight, value and dimensions thresholds. If a shipment is created for the service destination and exceeds one of these thresholds, then the agent set in the agent override will be used instead of the service destination default agent.
For example: In the image below, if a shipment is created for the service Default Label to GB with a post code that begins TW20 and the shipment weight is under 20kg then the agent selected for the shipment will be DPD Domestic. If the shipment weight is over 20kg then the agent selected for the shipment will be FedEx. If a shipment is created to a post code beginning with TW20 for any other service, then the routing exception for post code TW20 will be triggered and the default agent and agent overrides set for the routing exception will be used to determine the shipment agent.
To set agent overrides on the service destination:
- Enter the value you want to set as the threshold for the agent override in the text box.
- Select the agent you want to switch to from the Agents drop-down list. This will contain a list of all agents that have been added in the Agents maintenance screen. The agent selected must have either the same label type or service code as the default agent, else this will not override the default.
- Select a priority order for the agent override. If a shipment triggers multiple agent overrides- e.g. if a shipment is over the weight and value thresholds set - then this will determine which of the agent overrides takes priority. NOTE: The priority field is populated by default, and you can change these default values by selecting your preferred priority from the list.
- Repeat steps 1-3 for all agent overrides you want to setup on the service destination. When all agent overrides have been entered, click "Update" to save.
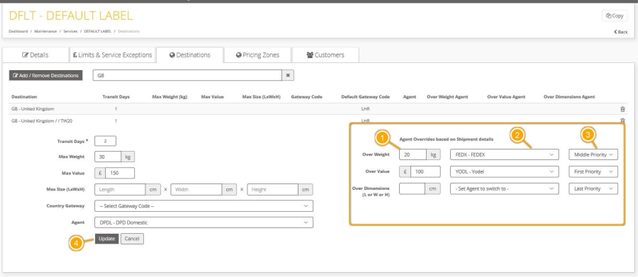
Figure 12: Set Service Destination Agent Overrides
Customer Routing Overrides
Customer routing overrides allow you to set customer-specific routing exceptions. They can be set for a particular service or all services, and similar to routing exceptions allow you to set a default agent for the customer routing override or agent overrides based on weight, value and dimensions thresholds. Customer R#routing overrides will take priority over any routing exceptions and service destinations that have been setup.
To setup a customer routing override, Select Maintenance > Customer Routing Overrides and then select the "Add Customer Routing Override" button. The Add Customer Routing Override screen will be displayed. 
Figure 13: Add Customer Routing Override Button
Add Customer Routing Override
To add a new customer routing override:
- Select the customer you want to set the routing override for. Type the customer name in the text box and click "Change Customer" or leave the text box blank and click "Change Customer" to see a list of all customers.
- If you want the customer routing override to apply to a specific service only then select a service. Type the service name in the text box and click "Change Service" or leave the text box blank and click "Change Service" to see a list of all services. NOTE: If a service is not selected then the customer routing override will apply to all services.
- Select the country that the customer routing override will apply to from the drop-down list.
- Enter the customer routing override location details - overrides can be set for any combination of town and post code or partial post code. To set the routing override for a partial post code then tick the "Is Partial" box. E.g. If a routing override is needed to the post code TW20 0HJ then "Is Partial" must be left unticked, but if a routing override is needed for all post codes beginning with TW20 then "Is Partial" must be ticked.
- To set a default agent for the customer routing override, select the required agent from the Agent drop-down list. If a default agent is added, then when a shipment triggers the routing override the default agent will be set as the shipment agent, unless the shipment triggers any agent overrides set for the customer routing override.
- The screen contains some informational text on how customer routing overrides work, including the order that will be used to match routing overrides to shipments if multiple exist. Read this text to help with setting up your customer routing overrides correctly.
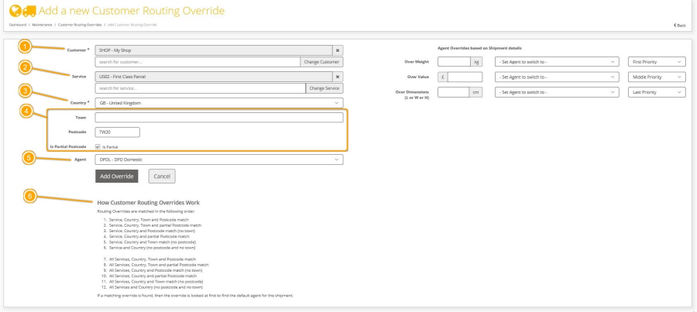
Figure 14: Add Customer Routing Override
Set Customer Routing Override Agent Overrides
As well as setting a default agent for a customer routing override, you can also set agent overrides based on weight, value and dimensions thresholds. If a shipment triggers the customer routing override and exceeds one of these thresholds, then the agent set in the agent override will be used instead of the default agent.
For example: In the image below, if a shipment is created for customer My Shop, service First Class Parcel with a post code that begins TW20 and the shipment weight is under 2kg then the agent selected for the shipment will be DPD Domestic. If the shipment weight is over 2kg then the agent selected for the shipment will be Yodel.
To set agent overrides on the customer routing override:
- Enter the value you want to set as the threshold for the agent override in the text box.
- Select the agent you want to switch to from the Agents drop-down list. This will contain a list of all agents that have been added in the Agents maintenance screen. The agent selected must have either the same label type or service code as the default agent, else this will not override the default.
- Select a priority order for the agent override. If a shipment triggers multiple agent overrides- e.g. if a shipment is over the weight and value thresholds set - then this will determine which of the agent overrides takes priority. NOTE: The priority field is populated by default, and you can change these default values by selecting your preferred priority from the list.
- Repeat steps 1-3 for all agent overrides you want to setup on the customer routing override. When all agent overrides have been entered, click "Add Override" to save.
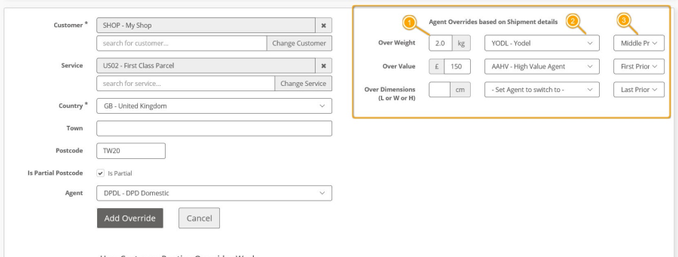
Figure 15: Add Agent Overrides to Customer Routing Override