Customer Account Setup v4.0
- Laura Lyonette (Unlicensed)
- Luke Moyse
- Laura Price
Commercial and in Confidence
The information contained in this document is confidential. No part of this document may be reproduced, disclosed to any third party, or issued in any form or by any means without the express written permission of Intersoft Systems & Programming Ltd.
Document Controls
Version History
Version | Amendments | Date | Author |
|---|---|---|---|
0.1 | First draft | 18/10/2018 | Laura Lyonette |
0.2 | Updated with review feedback | 23/10/2018 | Laura Lyonette |
0.3 | Added section 4 Create New Customer Account | 28/11/2018 | Laura Lyonette |
0.4 | Updated with review feedback | 04/12/2018 | Laura Lyonette |
1.0 | Final version | 07/12/2018 | Laura Lyonette |
1.1 | Section 5 Royal Mail Account Details updated for changes to OBA Access Code request and approval process. | 05/02/2020 | Laura Lyonette |
2.0 | Final version | 21/02/2020 | Laura Lyonette |
3.0 | Updated section 4.1.2 to match updated field names displayed in the system. | 09/09/2020 | Laura Price |
4.0 | Section 5 - updated number of working days for OBA access code to be provided | 18/09/2020 | Laura Price |
Review
Name | Title | Date Reviewed | Version Reviewed |
|---|---|---|---|
Lalitha Musnuri | Senior Test Analyst | 23/10/2018 | 0.1 |
Beata Brewer | Customer Services Manager | 24/10/2018 | 0.2 |
James Thomas | Managing Director | 24/10/2018 | 0.2 |
Lalitha Musnuri | Senior Test Analyst | 03/12/2018 | 0.3 |
Beata Brewer | Customer Services Manager | 06/12/2018 | 0.4 |
Weronika Kucharska | Customer Success Executive | 21/02/2020 | 1.1 |
Referenced Documents
Document Name | Version | Location (e.g. Link to Shared Drive, SharePoint etc.) |
|---|---|---|
User Roles Manual | 5.0 | https://intersoftuk-servicedesk.atlassian.net/wiki/spaces/EST/pages/511803394/User+Roles+Manual+v5.0 |
Contents
1 Document Controls
2 Table of Figures
3 Introduction
4 Create New Customer Account
4.1.1 Add Contacts to Customer Account
4.1.2 Add API Security Details to Customer Account
4.1.3 Add Services to Customer Account
4.1.4 Add Users to Customer Account
5 Add Royal Mail Account Details to Customer Account
5.1 Validate Service Contracts
5.1.1 Service Contracts Validated Successfully
5.1.2 Service Contracts Not Validated
6 Delete Customer Account
7 Appendix 1 – Glossary
Table of Figures
Figure 1: Add Customer button
Figure 2: Add Customer screen
Figure 3: Table of Fields in Add Customer screen
Figure 4: New customer account added
Figure 5: New customer account displayed in Customers list
Figure 6: Add Contact button
Figure 7: Add Contact
Figure 8: New contact listed in Contacts tab
Figure 9: "Set as Primary Contact" link
Figure 10: Primary contact changed
Figure 11: Delete contact icon
Figure 12: Delete contact confirmation message
Figure 13: Contact deleted
Figure 14: Enter API security details
Figure 15: Add services to customer account
Figure 16: Search for service by service name
Figure 17: View a list of all services
Figure 18: Services tab displays list of services added to customer account
Figure 19: Add Users to customer account
Figure 20: Add User screen
Figure 21: New user listed in Users maintenance screen
Figure 22: Edit User screen
Figure 23: Delete user icon
Figure 24: Select Customer from Customers list
Figure 25: Add customer's Royal Mail account details
Figure 26: Request OBA Access Code
Figure 27: OBA Access Code Pending
Figure 28: Royal Mail Account details saved
Figure 29: OBA Access Code added to Royal Mail Account details
Figure 30: Validate Service Contracts
Figure 31: Service Contracts List Updated
Figure 32: Unable to validate service contracts error message
Figure 33: Customer screen Delete button
Figure 34: Delete customer account confirmation message
Introduction
This manual instructs Admin level users how to create a customer account in Intelligent Shipper, so that new customers can be onboarded onto the system. This manual is intended for Administrator level users only.
Create New Customer Account
To create a new customer account, select Maintenance from the left-hand menu and then Customers. The Customers screen will open, containing a list of the customers that have been setup in the system.
To add a new customer, click the "Add Customer" button. 
Figure 1: Add Customer button
The Add Customer screen will open. 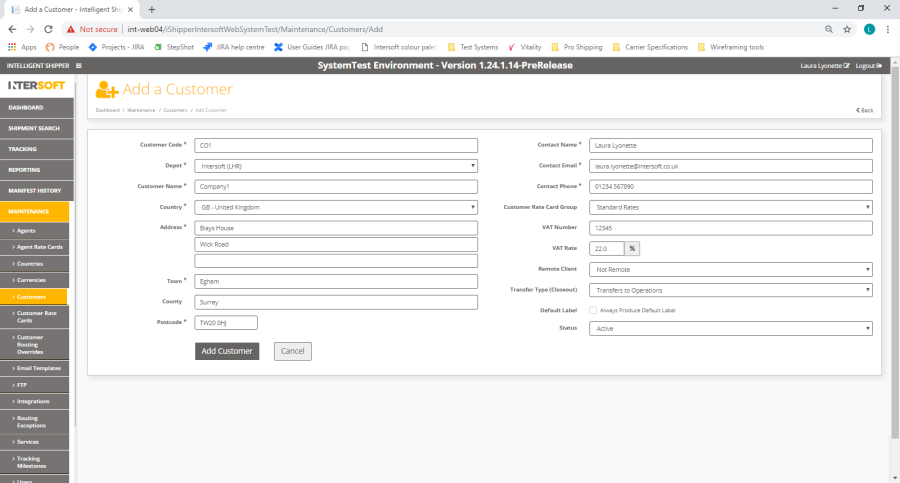
Figure 2: Add Customer screen
The table below described the fields in this screen and how to populate them:
Field Name | Description | Optionality (M/C/O) | Validation Rules |
|---|---|---|---|
Customer code | Define a unique identifying code for the customer. This will be displayed in the system alongside customer name everywhere customer details are displayed. | Mandatory | Maximum 10 alphanumeric characters |
Depot | Drop-down list to select the depot the customer will be using. Currently the only option available for selecting is "Intersoft". | Mandatory | Selection from drop-down list. |
Customer Name | The customer's name. | Mandatory | Maximum 35 alphanumeric characters. |
Country | Select the country the customer is based in from the drop-down list. | Mandatory | Selection from drop-down list. |
Address | Enter the customer's main shipping address. | Mandatory | Maximum 35 alphanumeric characters per field. |
Town | Enter the town of the customer's main shipping address. | Mandatory | Maximum 20 alphanumeric characters per field. |
County | Enter the county of the customer's main shipping address. | Optional | Maximum 50 alphanumeric characters |
Postcode | Enter the postcode of the customer's main shipping address. | Mandatory | Maximum 10 alphanumeric characters. Must be a valid UK postcode. |
Contact Name | Enter the contact name of the primary contact at the customer organisation. The primary contact details may be used as the shipper details, if shipper information is not provided when a shipment is created. | Mandatory | Maximum 100 alphanumeric characters |
Contact Email | Enter the email address of the primary contact at the customer organisation. | Mandatory | Must be in a valid email format e.g. name@customer.co.uk |
Contact Phone | Enter the phone number of the primary contact at the customer organisation. | Mandatory | Maximum 20 alphanumeric characters |
Customer Rate Card Group | If you add your pricing into Intelligent Shipper, this field will contain a drop-down list of the rates cards setup in the Customer Rate Cards screen. Select the required rate card from the list or leave this field blank if you are not using customer rate cards. | Optional | Selection from drop-down list. |
VAT Number | Enter the customer's VAT Number known. If you do not know the VAT number then this can be left blank. | Optional | Maximum 15 alphanumeric characters |
VAT Rate | The VAT Rate the customer pays. This will default to the rate that has been set for the selected Customer Rate Card Group and can be changed if needed. | Optional | Accepts numeric characters only |
Remote Client | Select whether the customer is a remote client from a drop-down list containing the following values:
| Optional | Selection from drop-down list. |
Transfer Type (Closeout) | Selection from a drop-down list containing the following values:
| Optional | Selection from drop-down list. |
Default Label | Tick box to select whether a default label is used. This tick box will only be displayed if the Transfer Type is set as Transfer to Operations. | Optional | N/A |
status | Select the customer's account status from the following drop-down list:
| Optional | Selection from drop-down list. |
Figure 3: Table of Fields in Add Customer screen
Once the screen has been populated with the customer's details, click the "Add Customer" button to create the customer account.
NOTE: If a default clean sweep has been setup in the system, the customer will be added to this automatically. To find out more information about the default clean sweep or to change this, contact Intersoft on Tech.Support@intersoft.co.uk . Clean Sweep will only run on Royal Mail shipments.
The customer account will be created, and the following additional tabs will be displayed:
- Contacts - add a primary contact to the customer account
- API Security - for API customers, enter the credentials the customer will use to connect to the API
- Services - Assign services to the customer account
- Users - Add users to the customer account
- Royal Mail Account - for customers using Royal Mail services, add their Royal Mail account details. This will validate the customer's account details against Royal Mail's billing system, OBA, and return a list of the Royal Mail services the customer can access.
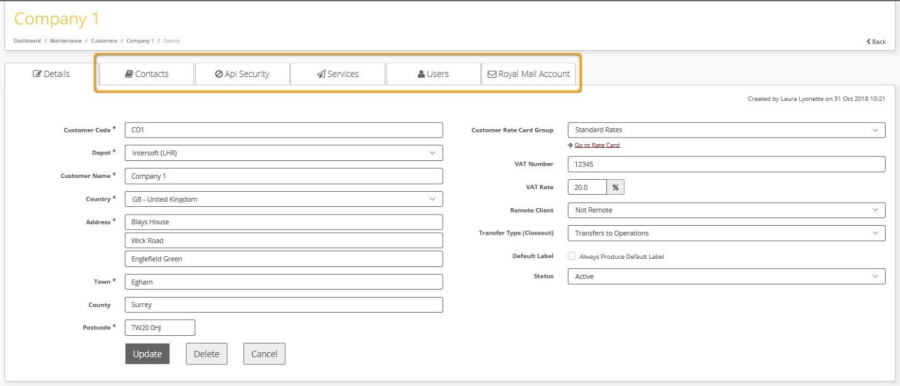
Figure 4: New customer account added
Select the "Back" link on the customer account to return to the Customers screen. The new customer account will be listed. 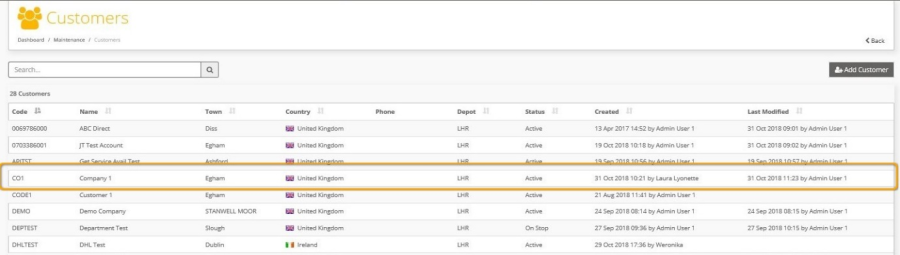
Figure 5: New customer account displayed in Customers list
To edit the customer details, select that customer row in the list and the Edit Customer screen will open.
Add Contacts to Customer Account
Once the customer account has been created, you can add more contacts to the customer account.
To add contacts to the customer account, select the Contacts tab. This will display the primary contact details that were entered when the customer account was created. To add more contacts to the customer account, click the "Add Contacts" button. 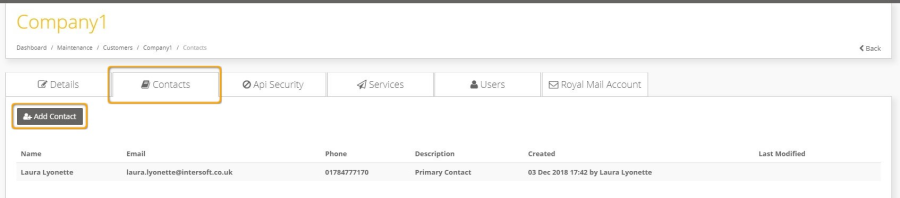
Figure 6: Add Contact button
The screen will update to show contact information fields.
To add a contact to the customer account contact:
- Enter the contact's name. This is a mandatory field.
- Enter the contact's phone number – this optional for all non-primary contacts.
- Enter the contact's email address – this is optional for all non-primary contacts.
- Enter a description for the contact. This is a mandatory field.
- Click the "Add Contact" button.
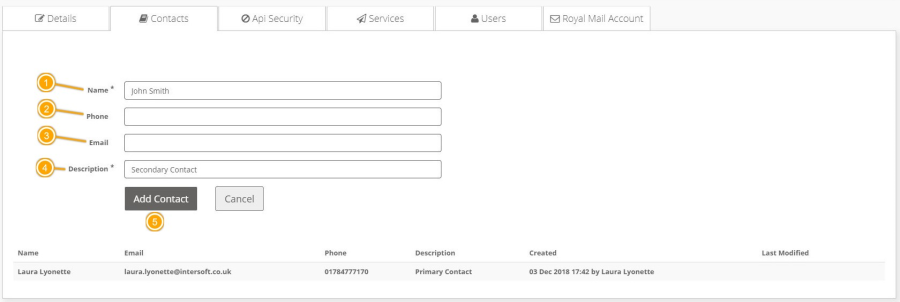
Figure 7: Add Contact
The contact will be saved and listed in the Contacts tab.
To add another contact to the customer account, click "Add Contact" again and enter the contact details. 
Figure 8: New contact listed in Contacts tab
The Contacts tab will list all contacts that have been added for the customer account.
Changing the Primary Contact
The primary contact can be changed to any contact that has all fields entered. To change the primary contact to a different contact
- Ensure the contact you want to set as the primary contact has all fields entered
- Select the "Set as Primary Contact" link for the contact
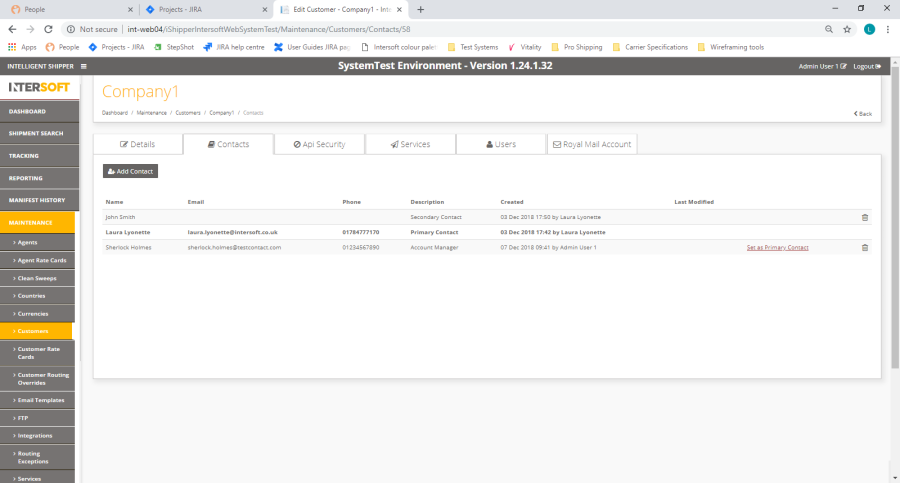
Figure 9: "Set as Primary Contact" link
- That contact will then be set as the primary contact. The "Select Primary Contact" link will be removed from that contact and displayed against all other contacts that have all fields entered, and so could be set as the primary contact.

Figure 10: Primary contact changed
Deleting Contacts
Contacts that are not the primary contact can be deleted from the customer account. To delete a contact from the customer account:
- Select the delete icon for that contact.

Figure 11: Delete contact icon
- A confirmation message will be displayed prompting you to confirm you want to delete the contact. Select the "Delete" button to continue and delete the contact.
NOTE: Selecting the "Cancel" button will cancel the message without deleting the contact. 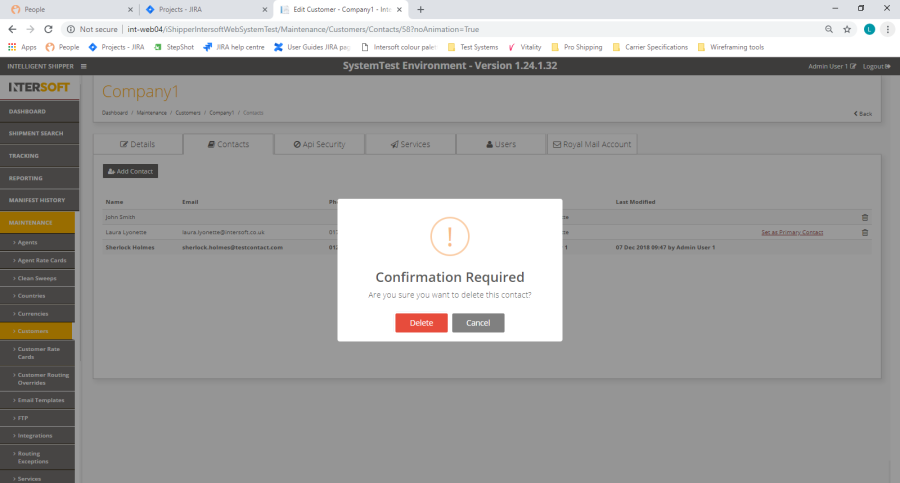
Figure 12: Delete contact confirmation message
- The contact will then be removed from the contacts list.

Figure 13: Contact deleted
NOTE: It is not possible for the primary contact to be deleted.
Add API Security Details to Customer Account
If the customer will be using the system via API, the credentials they will use to access the API need to be added to the customer account.
To add API details to the customer account, select the API Security tab and enter the following information:
- Define a 10-character application ID the customer will use to connect to the API. The customer will need to send this value in the <applicationId> field in the header section of API requests.
- Define a 10-character user ID the customer will use to connect to the API. The customer will need to send this value in the <userId> field in the header section of API requests.
- Define a 10-character password the customer will use to connect to the API. This must contain alphanumeric characters only, not any special characters. The customer will send this value in the <password> field in the header section of API requests.
- Click the Update button. This will save the API details against the customer account, and these details will be used to authenticate the customer account when the customer connects to the API.
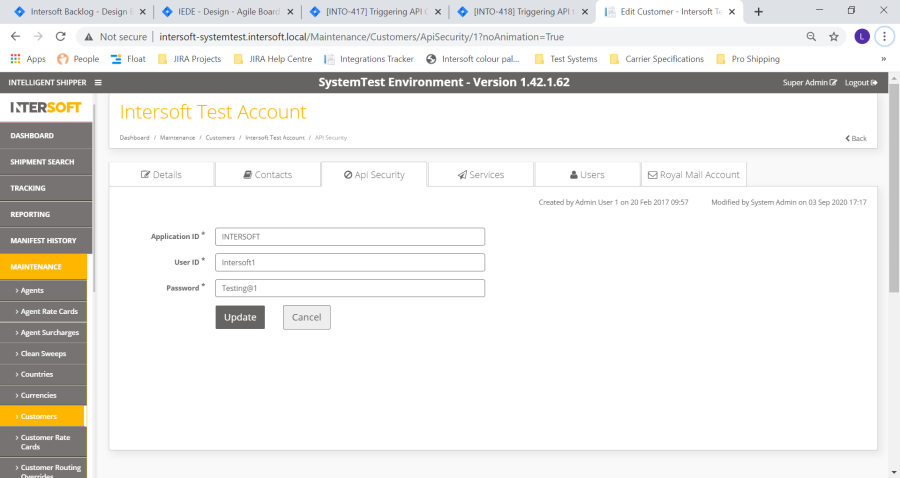
Figure 14: Enter API security details
Add Services to Customer Account
In order for the customer to create shipments, the services the customer will be using need to be added to their account.
If the customer will be using Royal Mail services, these can be automatically looked up once the customer's Royal Mail account details are entered – see Add Royal Mail Account Details to Customer Account for more details.
If the customer will be using non-Royal Mail services, these need to be manually added to the customer account in the Services tab of the customer screen.
NOTE: Services must be added in the Services maintenance screen before they can be assigned to a customer account.
To add services to the customer account, select the Services tab and then the "Add Services" button. 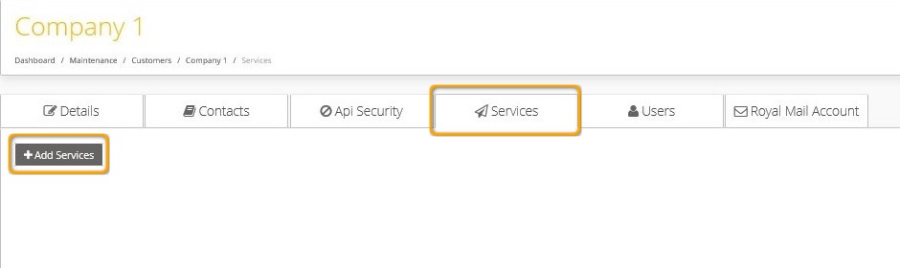
Figure 15: Add services to customer account
The screen will update to display a Services field and "Find Services" button. You can either search for a particular service or view a list of all services available in the system and select which services will be added to the customer account.
To search for a particular service:
- Enter the service name in the Service field
- Click "Find Services". The screen will update to display a list of services matching the service name.
- Tick the box for the services you want to add to the customer account. This will allow the customer to create shipments using that service.
- Select the "Add Services" button. This will add the selected services to the customer account.
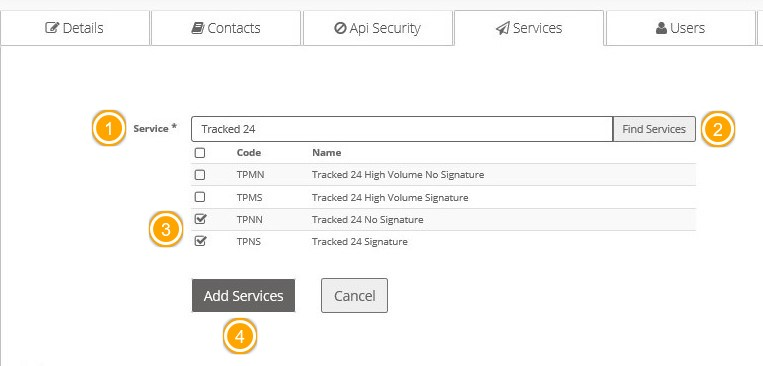
Figure 16: Search for service by service name
To view a list of all services, leave the Service text box blank and click the "Find Services" button.
The screen will then display a list of all services added in the Services maintenance screen.
From here you can tick the box for all services the customer will be using and click "Add Services" to add the services to the customer account. 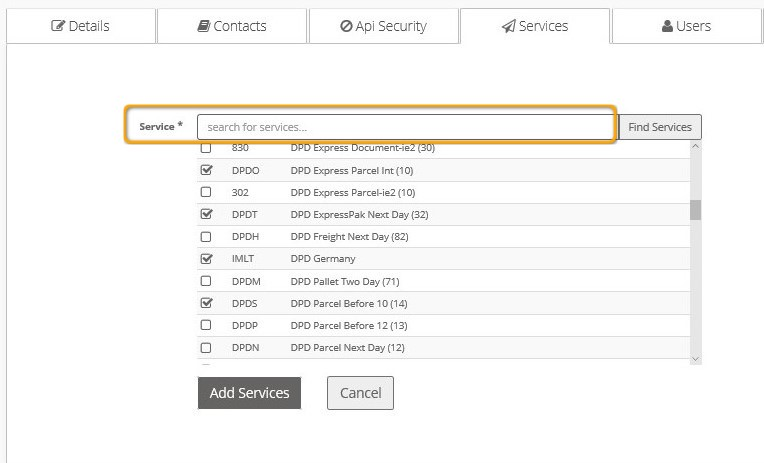
Figure 17: View a list of all services
The Services tab will update to display a list of all services that have been assigned to the customer account.
Services can be removed from the customer account by selecting the delete button for that service. 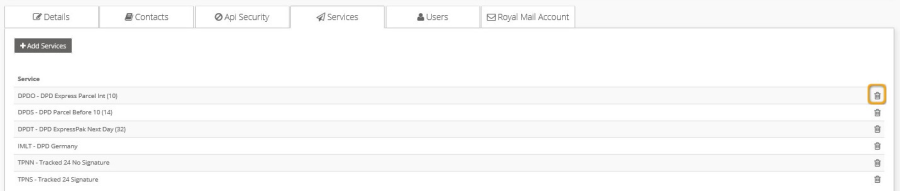
Figure 18: Services tab displays list of services added to customer account
Add Users to Customer Account
Once the customer account has been created, Customer level users can be added to the account. This is an alternative way of adding users to the Users maintenance screen. Users added via the Users tab in the Customer screen will automatically be set as Customer access level and assigned to the customer account.
To add users to the customer account from within the Customer screen, select the Users tab and click the "Add User" button. The screen will update to display data entry fields.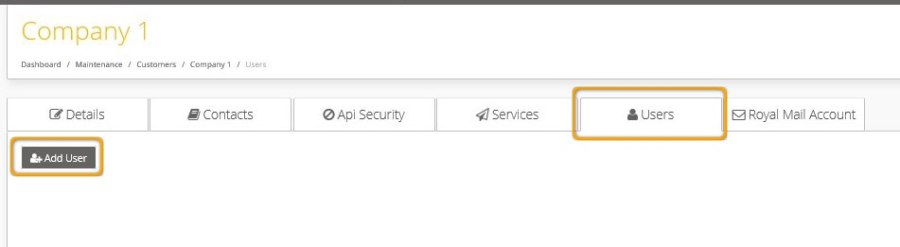
Figure 19: Add Users to customer account
To add a new user account:
- Enter the user's email address. This must be in a valid email address format e.g. example@email.com. This is a mandatory field.
- Enter the user's display name. This is name that will be displayed in the system wherever username is shown. This is a mandatory field.
- The user role will default to Customer and cannot be changed. Accounts for other user levels can be added in the Users maintenance screen.
- Use the tick boxes to select the system functionality the user will be able to access.
NOTE: If the Administrator box is ticked then the user will be set as a Customer Administrator level user rather than a Customer user. All tick boxes will be selected by default and the user will be given Customer Administrator access to the maintenance screens.
See the User Roles Manual for more details on the access Customer and Customer Administrator users have to the system.
- The account will default to the selected customer account and cannot be changed. User accounts for other customers can be added by selecting that customer account, or in the Users maintenance screen.
- Enter the user's contact phone number.
- If the disabled box is ticked, the user will not be able to login using the account until the box is unticked.
- Click the "Add User" button. This will create the new user account and send a confirmation email to the email address set for the user prompting them to confirm their account and set their password.
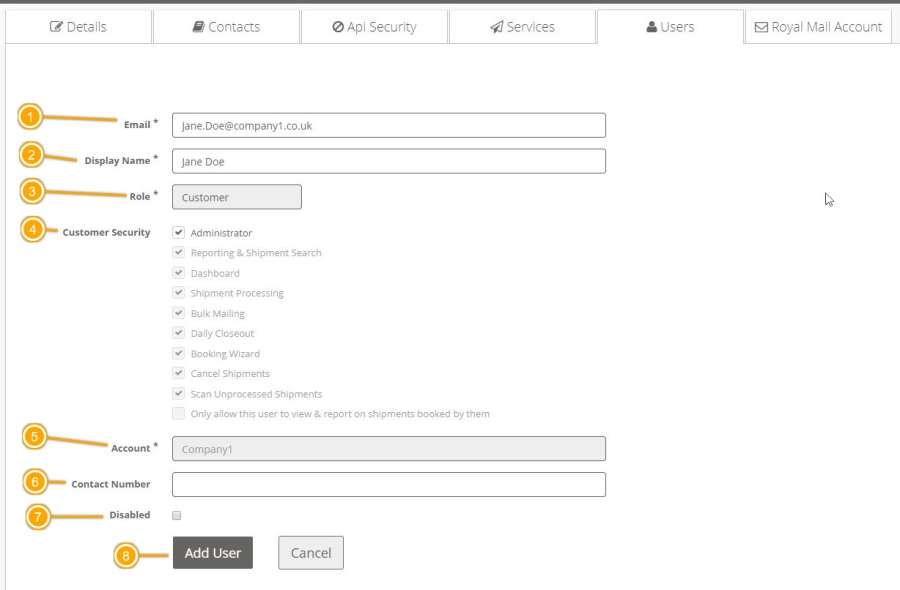
Figure 20: Add User screen
The user will be listed in the Users tab of the Customer screen and also in the Users maintenance screen. Once a user account has been created, it can be edited and deleted. 
Figure 21: New user listed in Users maintenance screen
Edit User Account
To edit the user account, select that user's row in the list and the data entry fields will be displayed again. From here the user's details can be updated and the confirmation email can also be resent if needed.
NOTE: A customer account must have at least one Customer Administrator user assigned. Therefore, if only one Customer Administrator is assigned to a customer account it will not be possible to assign the user to a different customer account. 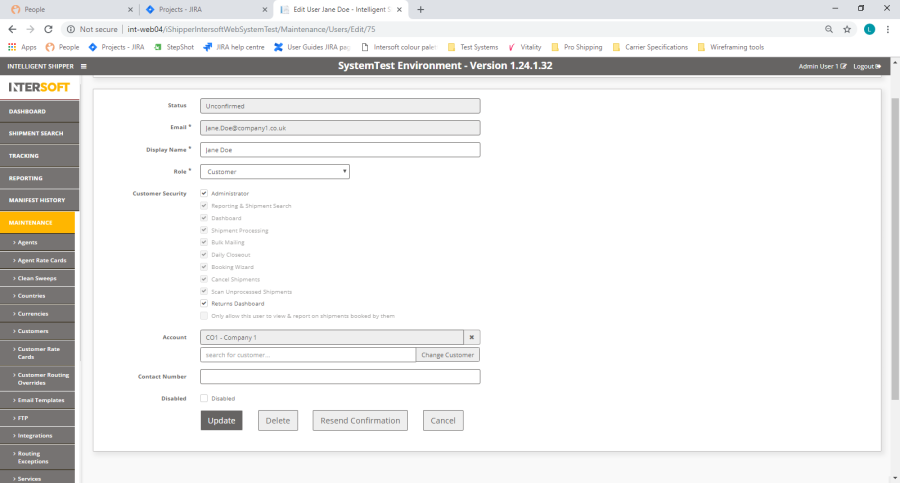
Figure 22: Edit User screen
Delete User account
User accounts can be deleted by selecting the delete icon for that user. This will delete the user account from the system completely; if you need to change the user's access level or remove them from the customer account then this can be done in the Users maintenance screen. 
Figure 23: Delete user icon
NOTE: A customer account must have at least one Customer Administrator user assigned. Therefore, if only one Customer Administrator is assigned to a customer account it will not be possible to delete that user.
Add Royal Mail Account Details to Customer Account
For customers using Royal Mail services, once the customer account has been created the customer's Royal Mail account details need to be added to their Intelligent Shipper customer account. This will ensure that customers are only able to ship using a valid Royal Mail account and services and will also reduce the manual work needed by Administrator users to setup and maintain Royal Mail account details in Intelligent Shipper.
NOTE: Email notification updates will be sent during the Royal Mail account onboarding process. These emails will be sent to the email address of the Intelligent Shipper user account that submits the Royal Mail onboarding request. Therefore, before adding the customer's Royal Mail account details, ensure the email address of the account you are logged in under is the email address you want to receive notifications to.
To add Royal Mail account details to a customer account, select Maintenance > Customers and then select the customer record by clicking on that row in the customer list. 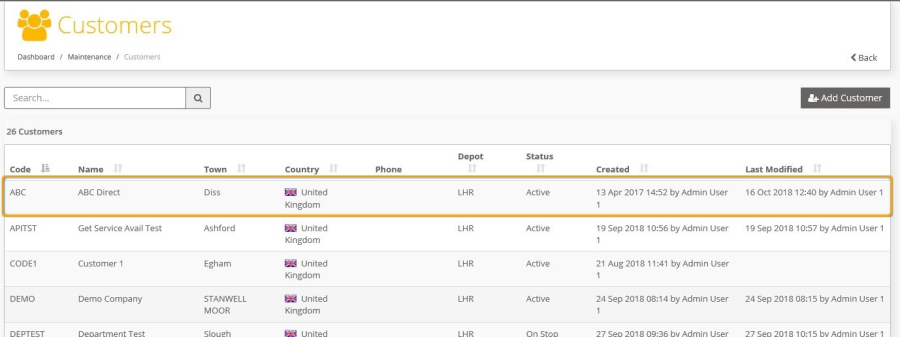
Figure 24: Select Customer from Customers list
The Edit Customer screen opens. Select the "Royal Mail Account" tab.
Figure 25: Add customer's Royal Mail account details
To setup the customer's Royal Mail account details:
- Enter the customer's Royal Mail account number. This must be 10 digits long- if the customer's account number is not 10 digits then add 0s at the front of the account number to increase the length to 10 digits.
- Enter the posting location number of the customer's main posting location. Additional posting locations can be added once the customer's Royal Mail account details have been setup.
- The OBA Access Code for the posting location will need to be requested from Royal Mail. To do this, select the "Request OBA Access Code" button. A confirmation window will be displayed prompting you to enter the customer's OBA email address.
- Enter the email address that was used when the posting location was registered with Royal Mail and click the "Request OBA Access Code" button.
NOTE: If you click the "Cancel" button the confirmation message will be cancelled, and the OBA Access Code will not be requested.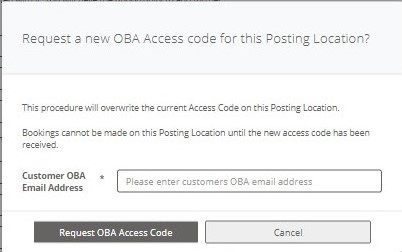
Figure 26: Request OBA Access Code
- The OBA Access Code field will be updated with the text "PENDING" and the current date.
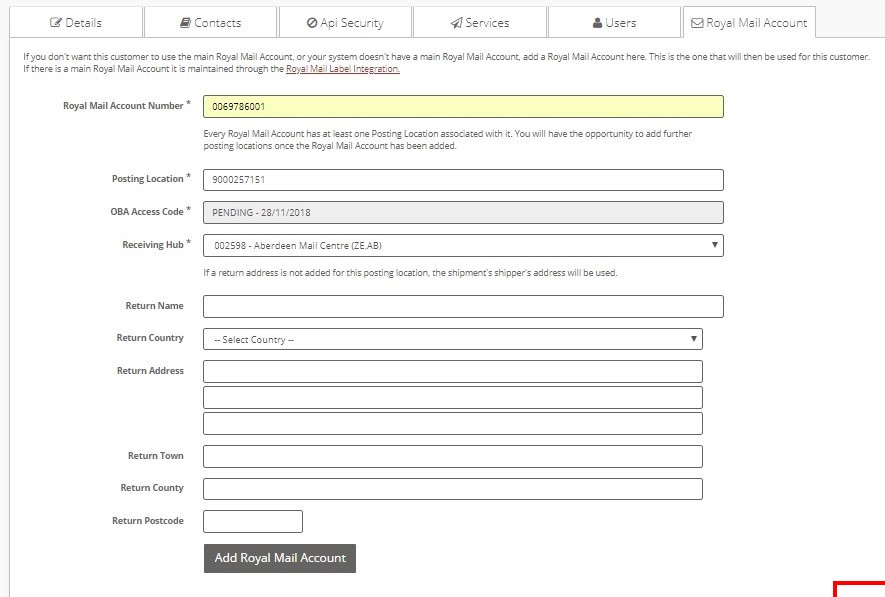
Figure 27: OBA Access Code Pending
- Select the Royal Mail hub the customer will be sending their shipments to from the drop-down list.
- If the customer's return address is different from their shipping address, then enter the returns address details. If a returns address is not entered then the customer's shipping address will be used for returns, or if the customer is using the system via API, they can specify a returns address in the Shipper section of the API request.
- Once all details have been entered, select the "Add Royal Mail Account" button. This will save the customer's Royal Mail account details and the screen will update. The OBA Access Code will be set to 'Pending' and the customer's Royal Mail Account Status will be set to 'Disabled'.
NOTE: It will not be possible to create shipments for the Royal Mail account until the Access Code has been entered.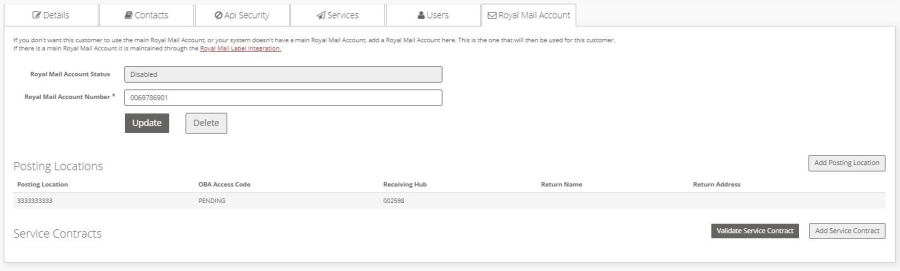
Figure 28: Royal Mail Account details saved
- The Royal Mail OBA team will be notified the Access Code has been requested. You will receive an email detailing the next steps in the process (this will be sent to the email address of the user account you are logged in under).
- Royal Mail will add the Access Code to customer account within 2-5 working days. Once this is done, the OBA Access Code field will be updated to display the correct Access Code and the Royal Mail Account Status will be changed to 'Enabled'. You will receive an email informing you the customer's Royal Mail account has been activated (this will be sent to the email address of the user account you were logged in under when the access code request was submitted).
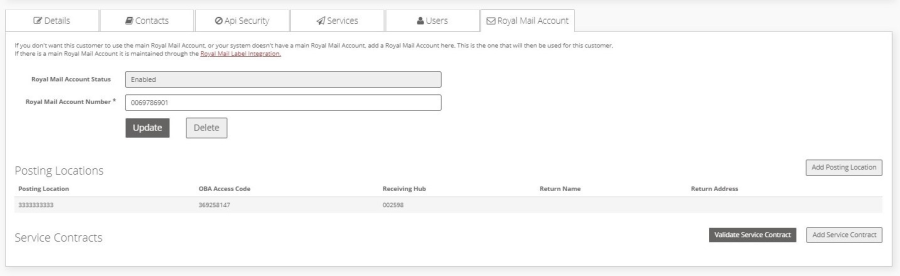
Figure 29: OBA Access Code added to Royal Mail Account details
NOTE: The customer's Royal Mail account will be checked against OBA once every 24 hours, and if the customer's account is not active in OBA then Royal Mail Account Status will be changed to back 'Disabled'. It will not be possible to create Royal Mail shipments for the account whilst the account whilst the Royal Mail Account Status is 'Disabled'.
- Once the Access Code has been added, the service contracts available for the customer's Royal Mail account will need to be validated against OBA – this will be done automatically once every 24 hours, or can be done manually by following the instructions in the Update Service Contracts section.
NOTE: If a customer's Royal Mail account number or Posting Location number changes, their Royal Mail account will need to be deleted from their Intelligent Shipper customer account and the above steps repeated for the new account or Posting Location details. This is to ensure the account details in Intelligent Shipper match those in OBA, and the customer is not prevented from creating Royal Mail labels when the automated OBA validation checks are run.
Validate Service Contracts
Once a customer's Royal Mail account details have been added, the customer's service contracts can be updated by validating the customer's details against OBA again. This will ensure the customer's service contact list remains up to date.
NOTE: If the customer's service contracts are not validated manually as described below, the system will automatically do this once every 24 hours.
To validate service contracts for a customer:
- Select Maintenance > Customers.
- Select the customer from the customers list to open the Edit Customer screen, then select the Royal Mail Account tab.
- Click the "Validate Service Contract" button.
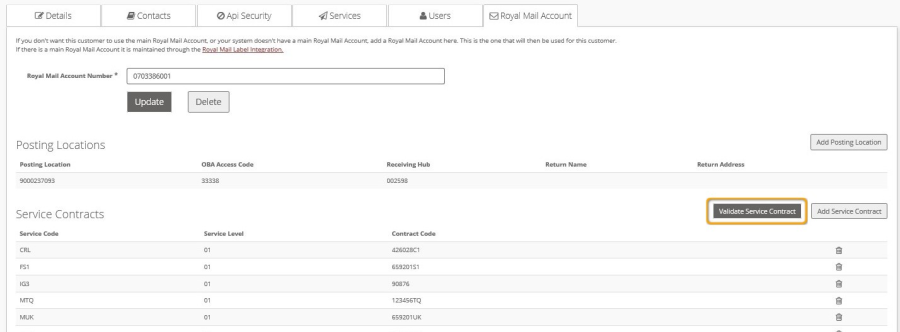
Figure 30: Validate Service Contracts
Service Contracts Validated Successfully
Intelligent Shipper will check the service contracts assigned to the customer in OBA and update the Service Contracts and Services lists. Any new service contracts added to the customer in OBA will be added to the list, and any service contracts that are no longer assigned to the customer in OBA will be removed from Service Contracts list.
Figure 31: Service Contracts List Updated
Service Contracts Not Validated
If the customer's service contracts cannot be validated against OBA, e.g. if the customer's Royal Mail account is on stop, then an error message will be displayed in the top right corner of the screen.
The customer will need to contact Royal Mail Finance to discuss their account. 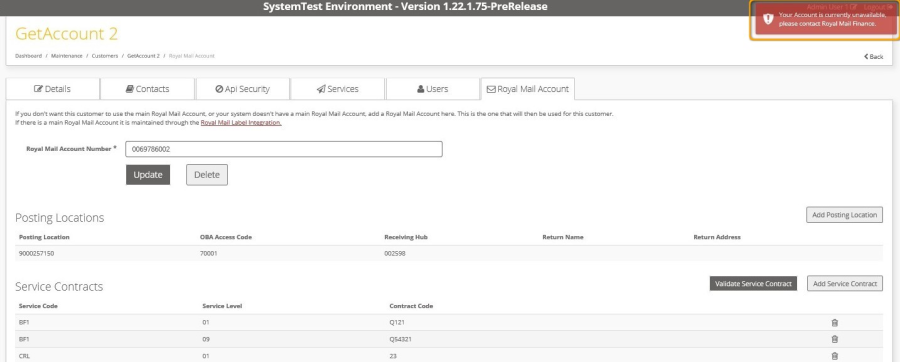
Figure 32: Unable to validate service contracts error message
Delete Customer Account
If a customer account is no longer needed it can be deleted from Intelligent Shipper.
- To delete a customer account, open the Edit Customer screen for that customer and select the 'Delete' button.

Figure 33: Customer screen Delete button
- You will be prompted to confirm whether you want to delete the customer account.
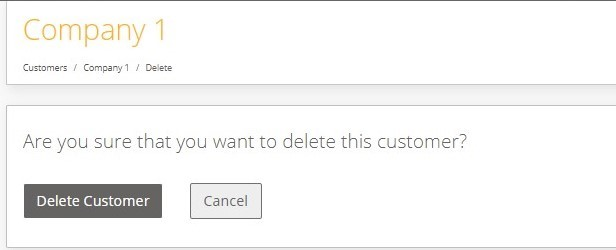
Figure 34: Delete customer account confirmation message
- To continue and delete the account, select the 'Delete Customer' button. This will remove the customer account from the system.
- If the 'Cancel' button is selected, the message will be dismissed, and the customer account will not be deleted.
Appendix 1 – Glossary
Term | Definition |
OBA | Online Billing Account - Royal Mail's billing platform |