Configure Service Enhancements Manual v2.0
- Laura Lyonette (Unlicensed)
Commercial and in Confidence
The information contained in this document is confidential. No part of this document may be reproduced, disclosed to any third party, or issued in any form or by any means without the express written permission of Intersoft Systems & Programming Ltd.
Contents
1 Document Controls
2 Table of Figures
3 Introduction
4 Configure Service Enhancements and Service Enhancement Groups
4.1 Configure Service Enhancement Groups
4.1.1 Add Service Enhancement Group
4.1.2 Edit Service Enhancement Group
4.1.3 Delete Service Enhancement Group
4.2 Configure Service Enhancements
4.2.1 Add Service Enhancement
4.2.2 Edit Service Enhancement
4.2.3 Delete Service Enhancement
5 Add Service Enhancements to Services
5.1 Add Enhancements to Service
5.2 Remove Enhancements from Service
6 Service Enhancement Translations
6.1 Add Service Enhancement Translation
6.2 Remove Service Enhancement Translations
7 Appendix 1 – Glossary
Table of Figures
Figure 1: Service Enhancements screen
Figure 2: Service Enhancement Groups screen
Figure 3: Add Service Enhancement Group
Figure 4: Service Enhancement Group added
Figure 5: Edit Service Enhancement Group screen
Figure 6: Edit Service Enhancement group
Figure 7: Service Enhancement Group edited
Figure 8: Delete Service Enhancement
Figure 9: Delete Service Enhancement Group confirmation message
Figure 10: Screen Name Screenshot
Figure 11: Delete Service Enhancement Group with services assigned
Figure 12: Add Service Enhancement button
Figure 13: Add Service Enhancement screen table of fields
Figure 14: Add Service Enhancement screen
Figure 15: Service Enhancement added
Figure 16: Edit Service Enhancement screen
Figure 17: Edit Service Enhancement
Figure 18: Service Enhancement edited
Figure 19: Delete Service Enhancement
Figure 20: Delete Service Enhancement confirmation message
Figure 21: Service Enhancement deleted
Figure 22: Edit Service screen Enhancements tab
Figure 23: Add Service Enhancements to Service
Figure 24: Service Enhancement added to Service
Figure 25: Remove Service Enhancements from Service
Figure 26: Service Enhancements removed from Service
Figure 27: Integrations list for selected carrier
Figure 28: Service Enhancement Translations screen
Figure 29: Add Service Enhancement Translation
Figure 30: Service Enhancement Translation added
Figure 31: Remove Service Enhancement Translation
Figure 32: Remove Service Enhancement Translation confirmation message
Figure 33: Service Enhancement Translation removed
Introduction
Some of the carriers integrated with Intelligent Shipper offer optional service enhancements, which can be used to provide additional delivery services above and beyond the carrier's standard services. For example, SMS or email delivery notifications, increased compensation for high value shipments and age verification on delivery. Intelligent Shipper allows System Administrator users to setup service enhancements, so that customer users have the option of using these enhancements when creating shipments.
This manual instructs System Administrator users how to configure service enhancements in Intelligent Shipper. Instructions for customer users on how to create shipments using service enhancements are detailed in the documents "Create Shipments Using Service Enhancements Manual" and "Intelligent Shipper API - Multi-Piece Shipment Bookings".
Configure Service Enhancements and Service Enhancement Groups
To configure service enhancements in Intelligent Shipper, the first step is to configure service enhancements and Service Enhancement Groups in the Maintenance functionality. To do this:
- Select Maintenance from the left-hand menu and then Service Enhancements.
- The Service Enhancements screen will be displayed. The screen will contain a list of existing service enhancements, and 'Add Enhancement' and 'Enhancement Groups' buttons.
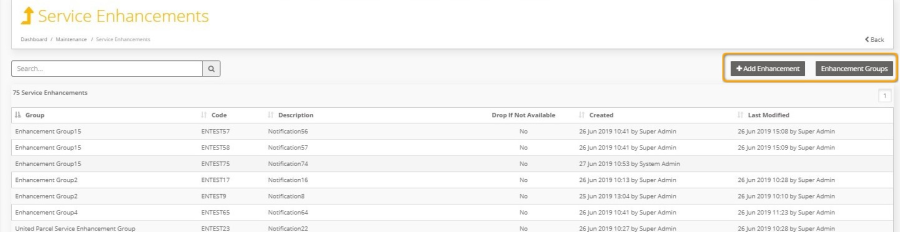
Figure 1: Service Enhancements screen
First you will need to setup Service Enhancement Groups. To do this, select the 'Enhancement Groups' button and the Service Enhancement Groups screen will open.
Configure Service Enhancement Groups
Enhancement Groups are optional and allow you to categorise similar service enhancements so that they are grouped together. E.g. enhancements relating to email and/or SMS notifications, delivery options enhancements (such as delivery to neighbour, delivery to Post Office).
When customers are creating shipments, they will only be able to use one enhancement from each Service Enhancement Group per shipment, so keep this in mind when setting up your Service Enhancement Groups. E.g. If a Service Enhancement Group SMS Notifications contains enhancements, the customer will only be able to use one SMS enhancement from the group per shipment.
If service enhancement groups are not used, then customers will not be restricted on the number of similar service enhancements they can use when creating shipments.
Add Service Enhancement Group
To setup a new Service Enhancement Group:
- Click the 'Add Enhancement Group' button.
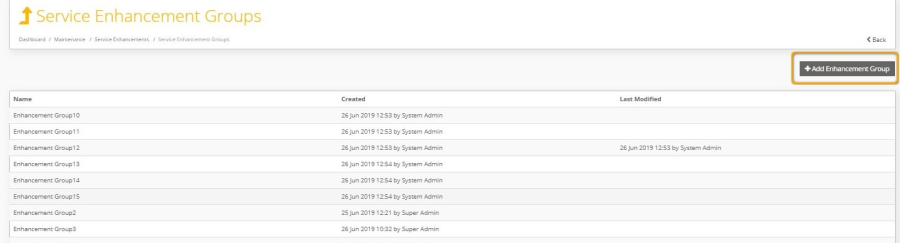
Figure 2: Service Enhancement Groups screen
- The Add Service Enhancement Group screen will open (see figure 3).
- Enter a Service Enhancement Group name in the Name field. The maximum length of this field is 50 characters.
NOTE: Service Enhancement Group name must be unique. If you attempt to enter a Service Enhancement Group name that already exists in the system then an error message will be displayed.
- Click 'Add Group'. If you click 'Cancel', the screen will be closed and the Service Enhancement Group will not be saved.
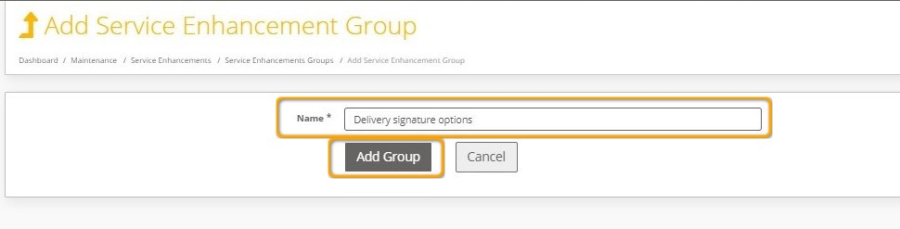
Figure 3: Add Service Enhancement Group
- The Add Service Enhancement Group screen will close and the Service Enhancement Groups screen will be displayed. A message will be displayed confirming the new Service Enhancement Group has been added, and the new group will be displayed in the Service Enhancement Groups list.
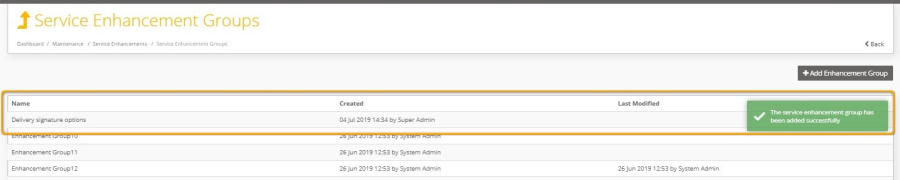
Figure 4: Service Enhancement Group added
Edit Service Enhancement Group
To edit a Service Enhancement Group:
- Click on the group name in the service enhancements group list
- The Edit Service Enhancement Group screen will open.
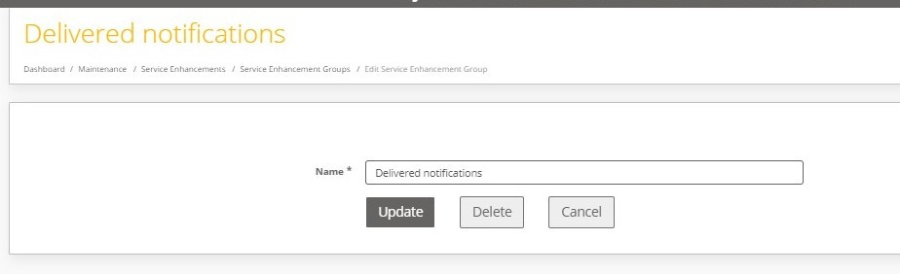
Figure 5: Edit Service Enhancement Group screen
- Edit the Service Enhancement Group name and click 'Update'.
NOTE: If you click 'Cancel', the Edit Service Enhancement Group screen will close and the Service Enhancement Group name will not be updated. 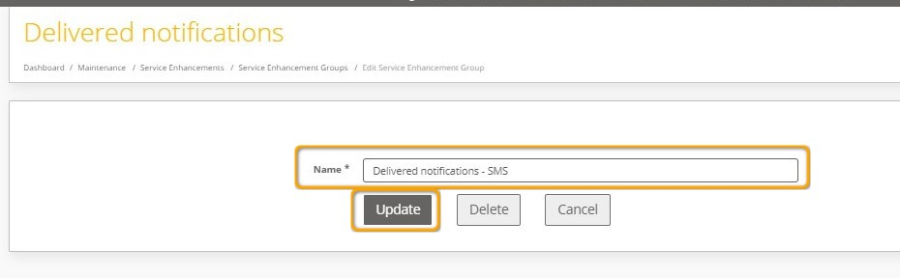
Figure 6: Edit Service Enhancement group
- The Edit Service Enhancement Group screen will close and the Service Enhancement Groups screen will be displayed. A message will be displayed confirming the service enhancement has been edited. The Service Enhancement Groups list will contain the updated group name and the date and time the Service Enhancement Group was last modified.
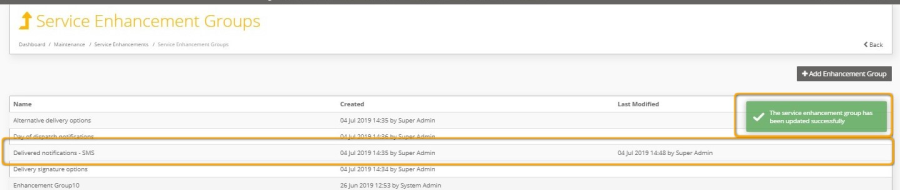
Figure 7: Service Enhancement Group edited
Delete Service Enhancement Group
To delete a Service Enhancement Group:
- Click on that group name in the Service Enhancements Group list.
- The Edit Service Enhancement Group screen will open.
- Click the 'Delete' button.
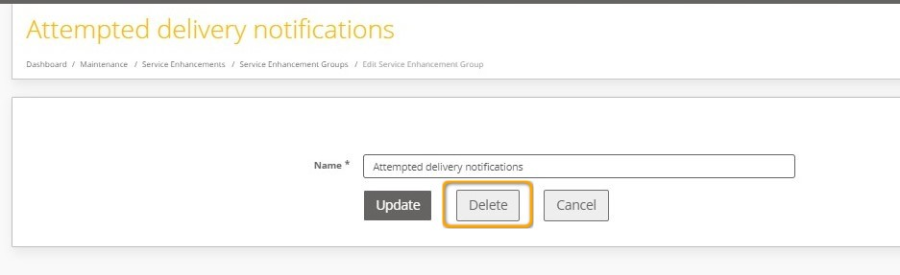
Figure 8: Delete Service Enhancement
- A message will be displayed prompting you to confirm if you want to delete the Service Enhancement Group.
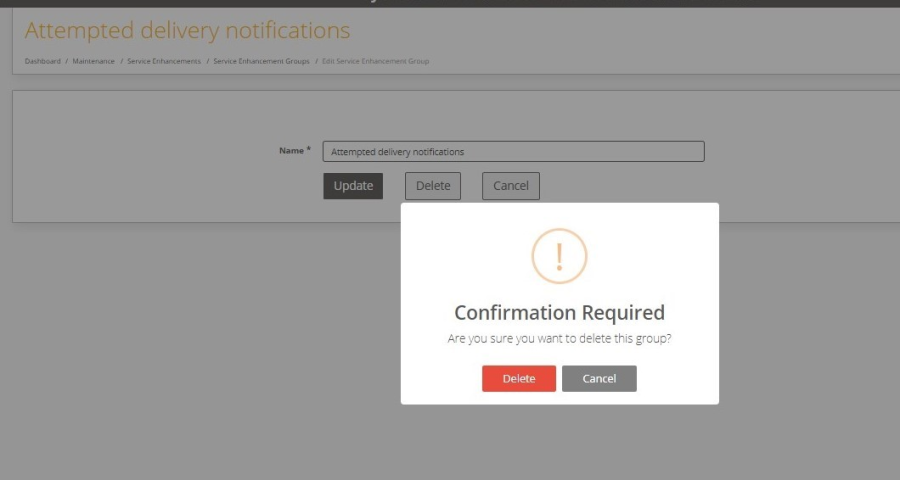
Figure 9: Delete Service Enhancement Group confirmation message
- To continue and delete the group, click the 'Delete' button. If you click the 'Cancel' button the confirmation window will be dismissed and the Service Enhancement Group will not be deleted.
- The Edit Service Enhancement Group screen will close and the Service Enhancement Groups screen will be displayed. A message will be displayed confirming the Service Enhancement Group has been deleted, and the group will no longer be displayed in the Service Enhancement Groups list.

Figure 10: Screen Name Screenshot
- If a Service Enhancement Group has service enhancements assigned to it, it will not be possible to delete the group. In this situation an error message will be displayed when you attempt to delete the Service Enhancement Group.
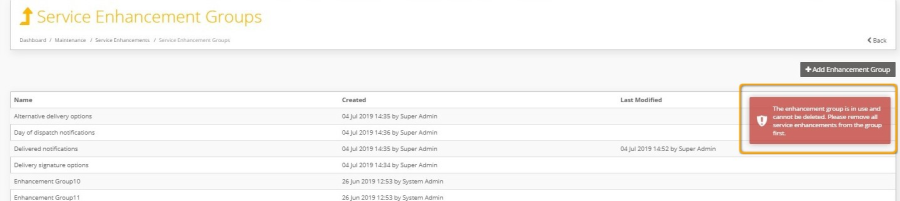
Figure 11: Delete Service Enhancement Group with services assigned
- To delete a Service Enhancement Group that has service enhancements assigned, you will first need to remove all service enhancements from the group. See the Edit Service Enhancement section for instructions on how to do this.
Configure Service Enhancements
Once you have setup Service Enhancement Groups (if required), you can then setup service enhancements.
To setup service enhancements:
- Navigate to the Service Enhancements screen by selecting the 'Back' link in the Service Enhancement Groups screen header or by selecting Maintenance > Service Enhancements.
- On the Service Enhancements screen select the 'Add Enhancement' button.
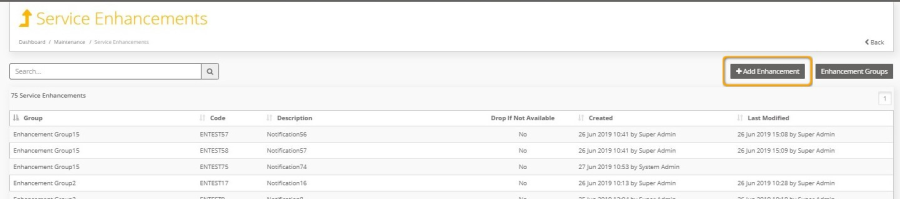
Figure 12: Add Service Enhancement button
- The Add Service Enhancement screen will open (see figure 14).
Add Service Enhancement
To add a new service enhancement:
- Populate the fields on screen as described in the table below.
Field Name | Description | Optionality (M/C/O) | Validation Rules |
|---|---|---|---|
Code | A code used for identifying the enhancement. This code will be used by customers when creating shipments to request the enhancements. | Mandatory | Max length 10 characters. |
Description | Enhancement name or description. Used to tell customers what the enhancement is. | Mandatory | Max length 50 characters. |
Drop enhancement request if not available for service | Sets what should happen if the enhancement is requested for a shipment but is not available for the shipment service. In this scenario, if the box is ticked then the enhancement will be "dropped" and the shipment will be created without the enhancement. If the box is unticked, then an error message will be displayed and the shipment will not be created. | Mandatory | Tick box, unticked by default. |
Service Enhancement Group | Sets the Service Enhancement Group the service enhancement belongs to. When creating shipments customers will only be able to use one enhancement from a group per shipment, so adding the enhancement to a group ensures it cannot be used with any similar/conflicting enhancements. | Optional | Selection from list of groups setup in Service Enhancement Groups screen. |
Figure 13: Add Service Enhancement screen table of fields
- Once all fields have been populated, click the 'Add Enhancement' button. If the 'Cancel' button is clicked, the Add Service Enhancement screen will close and the enhancement will not be added.
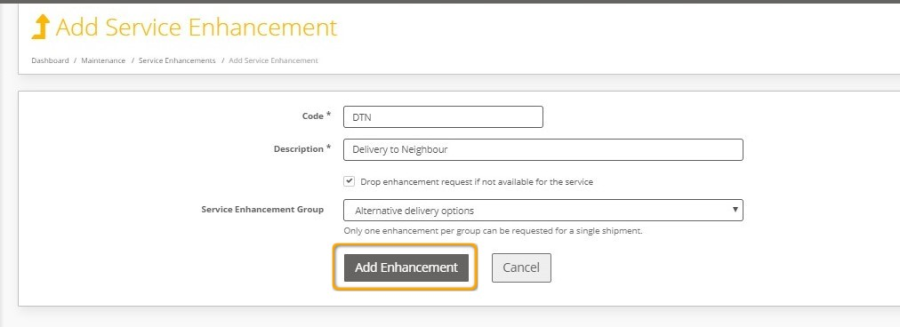
Figure 14: Add Service Enhancement screen
- The Add Service Enhancement screen will close and the Service Enhancements Screen will be displayed. A message will be displayed confirming the new enhancement has been added, and the new enhancement will be displayed in the service enhancements list.
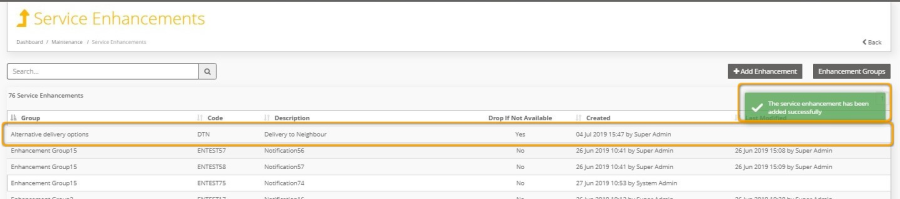
Figure 15: Service Enhancement added
Edit Service Enhancement
To edit a service enhancement:
- Click on the enhancement name in the Service Enhancements list.
- The Edit Service Enhancement screen will open.
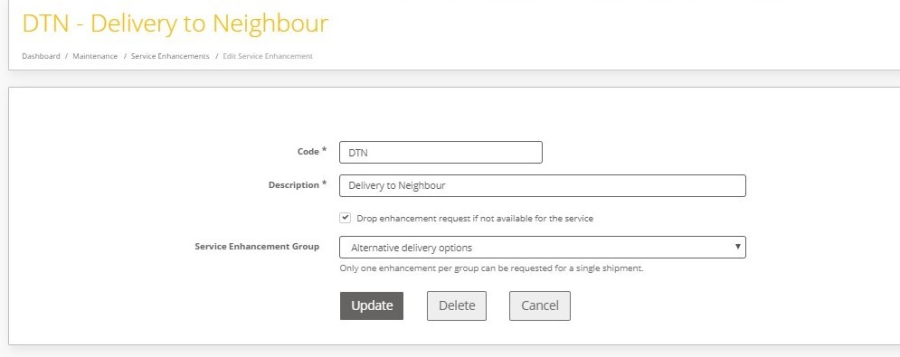
Figure 16: Edit Service Enhancement screen
- Edit the details you want to change and click 'Update'. If you click 'Cancel', the Edit Service Enhancement screen will close and the service enhancement will not be updated.

Figure 17: Edit Service Enhancement
- The Edit Service Enhancement screen will close and the Service Enhancements screen will be displayed. A message will be displayed confirming the service enhancement has been updated. The service enhancements list will contain the updated service enhancement details and the date and time the service enhancement was last modified.
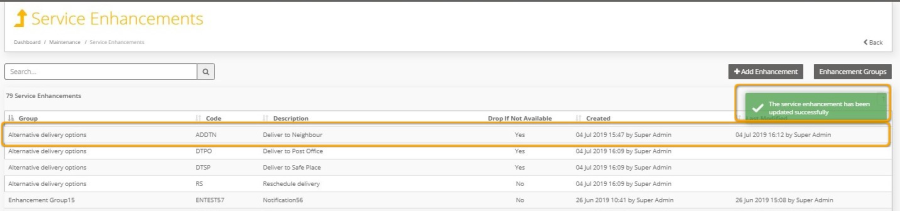
Figure 18: Service Enhancement edited
Delete Service Enhancement
To delete a service enhancement:
- Click on the service enhancement name in the service enhancements list.
- The Edit Service Enhancement screen will open.
- Click the 'Delete' button.

Figure 19: Delete Service Enhancement
- A message will be displayed prompting you to confirm if you want to delete the service enhancement.
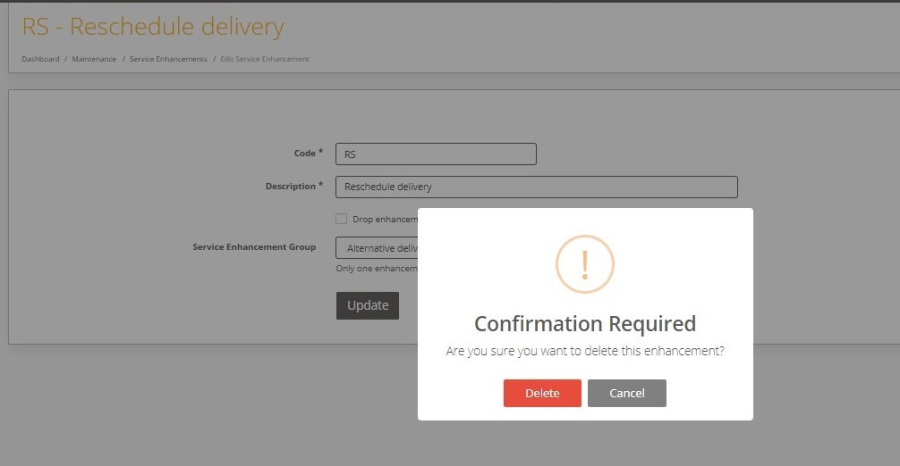
Figure 20: Delete Service Enhancement confirmation message
- To continue and delete the enhancement, select the 'Delete' button. If you click the 'Cancel' button the confirmation window will be dismissed and the service enhancement will not be deleted.
- The Edit Service Enhancement screen will close and the Service Enhancements screen will be displayed. A message will be displayed confirming the service enhancement has been deleted, and the enhancement will no longer be displayed in the service enhancements list.
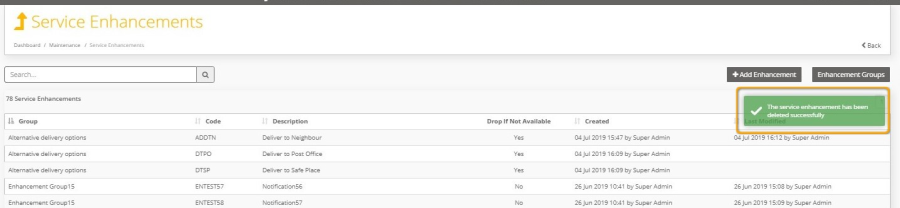
Figure 21: Service Enhancement deleted
Add Service Enhancements to Services
Once you have setup service enhancements in the system, these enhancements then need to be assigned to services so that customers can use these service enhancements when creating shipments.
To add a service enhancement to a service:
- Select 'Maintenance' from the left-hand menu and then 'Services'.
- The Services screen will open.
- Click on the service you want to add the enhancement(s) to and the Edit Service screen will open.
- Select the 'Enhancements' tab.
- The Enhancements screen for that service will be displayed. The screen will contain the following:
- Current Enhancements - list of all enhancements that have been added to the service.
- Available Enhancements - list of all enhancements that have not been added to the service.
NOTE: For newly added services only the Available Enhancements list will show, as there will not be any enhancements currently assigned to the service. 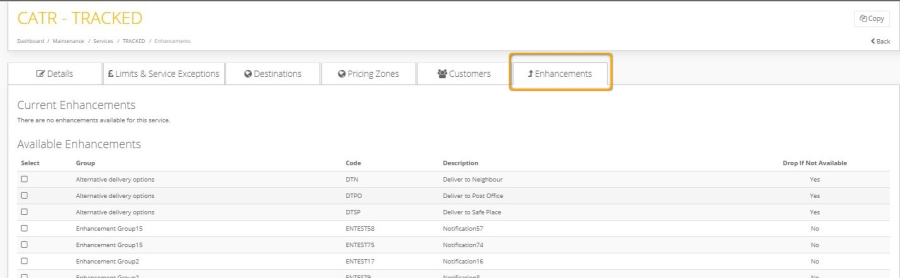
Figure 22: Edit Service screen Enhancements tab
Add Enhancements to Service
To add service enhancements to the service:
- Tick the 'Select' box for all enhancements you want to add to the service.
- Select the 'Add Enhancements' button at the bottom of the screen.
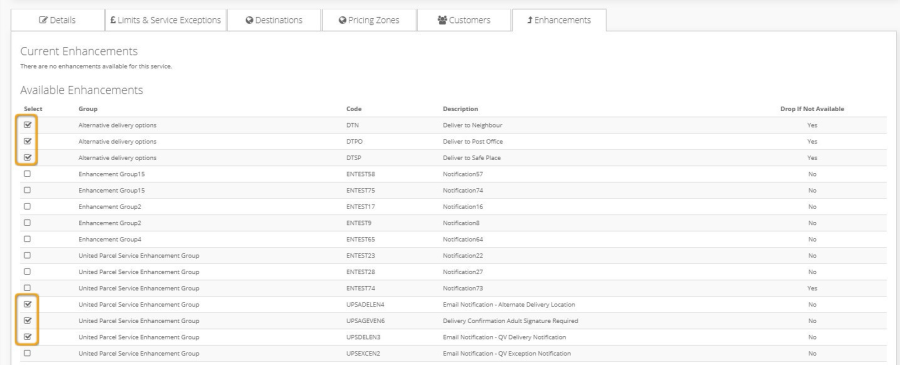
Figure 23: Add Service Enhancements to Service
- The enhancements will be added to the Current Enhancements list and removed from the Available Enhancements list. A message will be displayed confirming the enhancement has been added to the service.
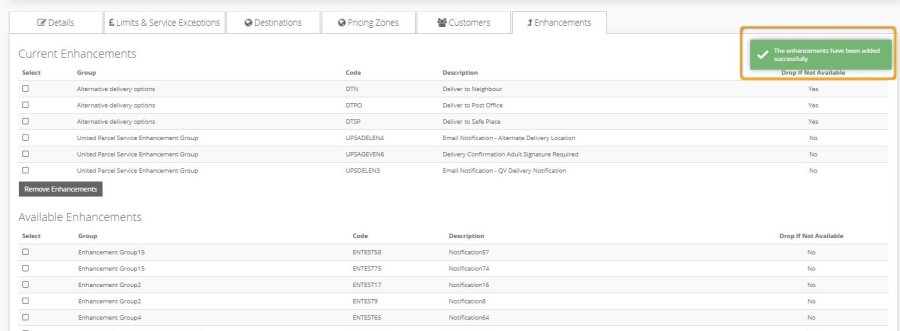
Figure 24: Service Enhancement added to Service
- Customers can then use the enhancements in the Current Enhancements list when creating shipments using that service.
Remove Enhancements from Service
To remove service enhancements from the service:
- Tick the 'Select' box for the services in the Current Enhancements list that you want to remove from the service.
- Click the 'Remove Enhancements' button.
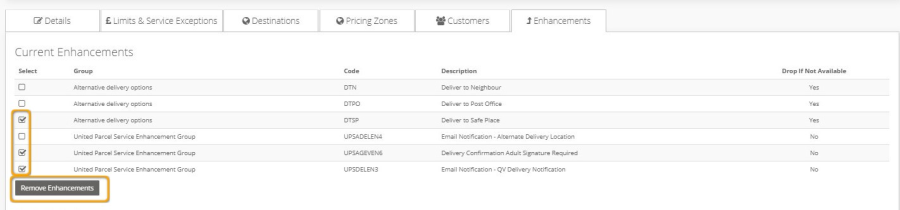
Figure 25: Remove Service Enhancements from Service
- The selected enhancement(s) will be removed from the Current Enhancements list and added to the Available Enhancements list. A confirmation message will be displayed on screen.
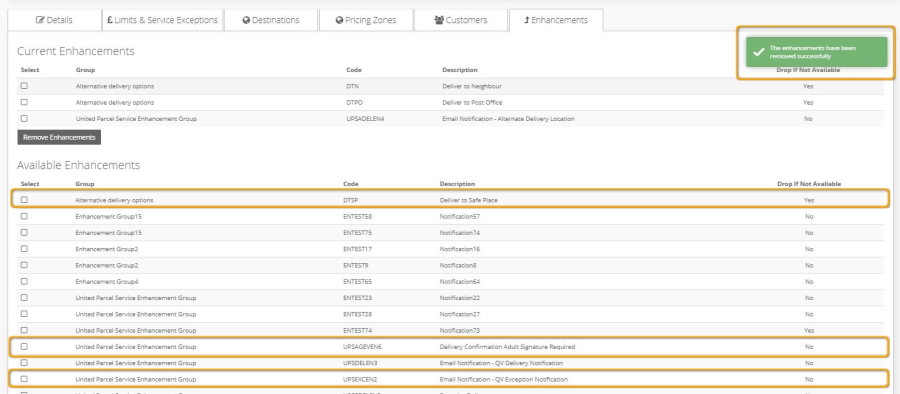
Figure 26: Service Enhancements removed from Service
- Customers will no longer be able to use those service enhancements when creating shipments using the service.
Service Enhancement Translations
Once service enhancements have been setup and added to services, the final configuration step required is to map the service enhancements to carrier service enhancements in Service Enhancement Translations. This is so that when a customer creates a shipment using a service enhancement, the carrier receives the data they need in order to apply the service enhancement to the shipment. For example, if a shipment is created with a notification enhancement and the carrier offers multiple notifications, they will need to know which notification that has been requested to ensure the correct one is sent.
In the example shown in figures 28 to 31, service enhancement 'No signature needed on delivery' setup in Service Enhancements maintenance is being mapped to the Parcelforce service enhancement 'No Signature Required'.
See the document "Intelligent Shipper Carrier Integrations and Features" for more information on the service enhancements that are available for each carrier.
To setup Service Enhancement Translations:
- Select 'Maintenance' from the left-hand menu and then 'Integrations'.
- Select the carrier that you want to map the service enhancement to from the list of carrier integrations.
- Select the label integration for that carrier from the integrations list.
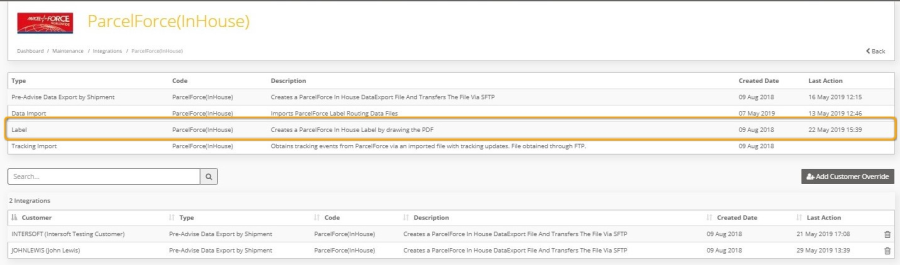
Figure 27: Integrations list for selected carrier
- The Label Integration screen for that carrier opens,
- Select the Enhancements tab.
- The Service Enhancement Translations screen will be displayed. The screen will contain a list of all service enhancement translations that have been added for that carrier.
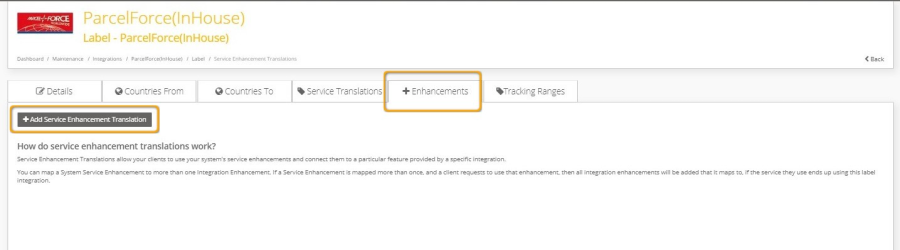
Figure 28: Service Enhancement Translations screen
Add Service Enhancement Translation
To add a new service enhancement translation:
- Select the 'Add Service Enhancement Translation' button.
- The screen will update to contain service enhancement translation fields.
- The 'Service Enhancements' field contains a list of all the service enhancements that have been setup in the Service Enhancements maintenance screen. Select the enhancement you want to map to a carrier enhancement from the drop-down list.
- The 'Integration Enhancement' field contains a list of all the service enhancements available in Intelligent Shipper for the selected carrier integration. Select the carrier service enhancement you want the service enhancement to be mapped to from the drop-down list.
NOTE: This determines the data that will be sent to the carrier when shipments are created using the service enhancement. E.g.: In the example in figure 30, if a shipment is created using the Parcelforce integration and the service enhancement code DSONS, then the shipment will be created with the Parcelforce service enhancement "No Signature Required".
- Click the 'Add Translation' button.
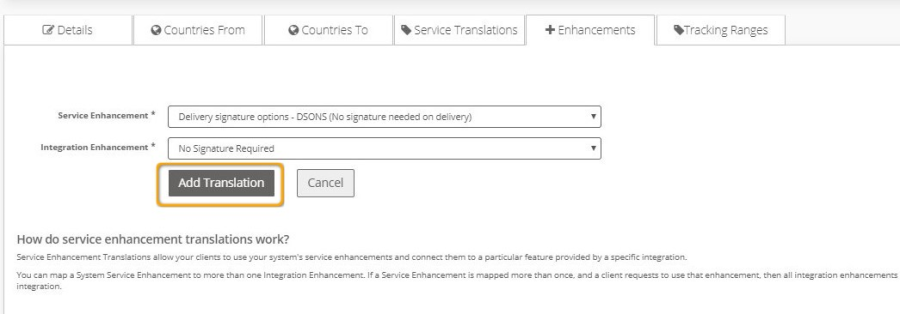
Figure 29: Add Service Enhancement Translation
- The service enhancement will be saved and will be displayed in the Service Enhancements list. A confirmation message will be displayed on screen.
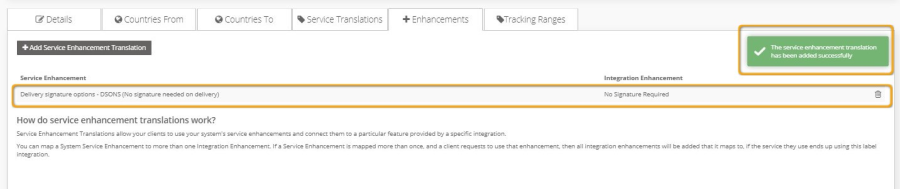
Figure 30: Service Enhancement Translation added
NOTE: A service enhancement setup in Service Enhancements maintenance can be mapped to multiple carrier integrations. For example, the system enhancement 'No signature needed on delivery' mapped to a Parcelforce enhancement in figure 30 can also be mapped to other carriers. When a shipment is created using the 'No signature needed on delivery' system enhancement, the agent and label integration used for the shipment will then determine the correct service enhancement translation to use.
Remove Service Enhancement Translations
To remove a service enhancement translation from an integration:
- Select the delete icon next to the service enhancement translation you want to remove.
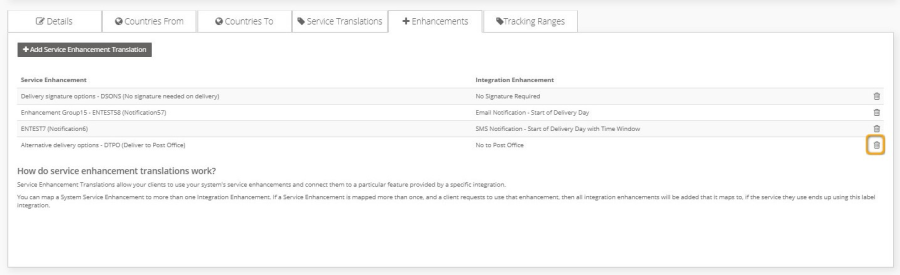
Figure 31: Remove Service Enhancement Translation
- A message will be displayed prompting you to confirm if you want to remove the service enhancement translation.
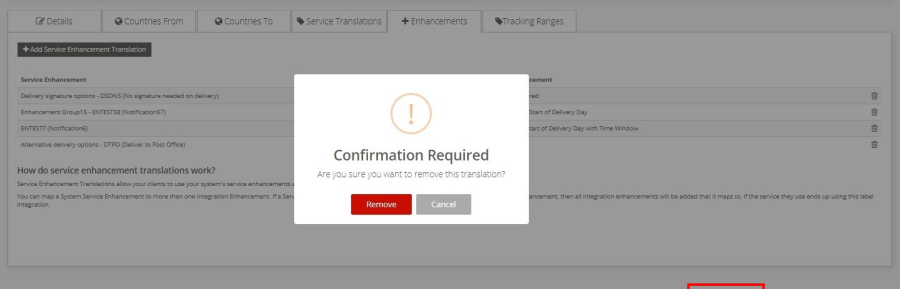
Figure 32: Remove Service Enhancement Translation confirmation message
- Click 'Remove' to continue and delete the service enhancement translation. If you click 'Cancel' the message will be dismissed and the service enhancement translation will not be deleted.
- A confirmation message will be displayed and the service enhancement translation will be removed from the Enhancements list for that carrier integration.
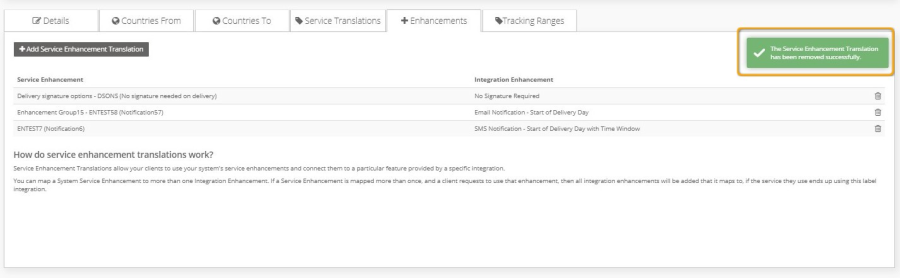
Figure 33: Service Enhancement Translation removed
Appendix 1 – Glossary
Term | Definition |
Customer User | The core users of the system who will be creating, processing and closing out shipments. This user role will be assigned to a customer account. |
Service Enhancement | Optional functionality offered by carriers that provide additional services above and beyond standard delivery services. For example, delivery notifications, alternative delivery options (such a deliver to a neighbour or leave in a safe place) and enhanced compensation levels are all types of service enhancement. |
System Administrator User | Administrator who will be setting up and maintaining the system. This user role will not be assigned to a customer account and so will be able to view data for all customer accounts in your system. |