DC Scanning - DC IN & Repack Manual v1.0
- Laura Price
Commercial and in Confidence
The information contained in this document is confidential. No part of this document may be reproduced, disclosed to any third party, or issued in any form or by any means without the express written permission of Intersoft Systems & Programming Ltd.
Contents
1. Document Controls
2. Table of Figures
3. Introduction
4. DC Scanning Screen
5. Set Scanning Location
5.1. Change Location
6. DC IN Scanning
7. Repack Shipment
8. Appendix 1 – Glossary
Table of Figures
Figure 1: DC Scanning screen
Figure 2: Set Scanning Location
Figure 3: Set Location - select Scanning location
Figure 4: Scanning Location is set
Figure 5: DC Scanning - Change Location
Figure 6: Change Location - Select New Location
Figure 7: Scanning Location Updated
Figure 8: DC Scanning Screen
Figure 9: DC IN Scan – Single Piece
Figure 10: DC IN Scan – Multi Package shipment in Split IN status
Figure 11: DC IN Scan – Multi Package shipment in DC IN status
Figure 12: Scan shipment for repacking
Figure 13: DC Repack - Change Address
Figure 14: DC Repack - Show Items
Figure 15: DC Repack - Change Service
Figure 16: DC Repack - Change Agent
Figure 17: DC Repack - Number of Packages
Figure 18: Label Image - Download and Print Label
Introduction
DC Scanning is the process of scanning shipments through Despatch Control and takes place between till scanning and chute Scanning. Shipments that have been till scanned must first be DC IN scanned as they arrive in Despatch Control. Once a shipment has been DC IN scanned, if the shipment service, agent, delivery address or number of packages need changing the shipment can be repacked and new labels will be generated. When the shipment leaves Despatch Control it will be DC OUT scanned. The DC OUT scanning process is covered in the DC Scanning – DC OUT Manual/
The DC Scanning Screen is available to Depot users when DC Scanning has been enabled for the system. This manual instructs Depot users how to DC IN scan and repack shipments.
DC Scanning Screen
To access the DC IN scan shipments, Depot users will need to select Scanning from the left-hand menu and then DC Scanning. The DC Scanning screen will be displayed. 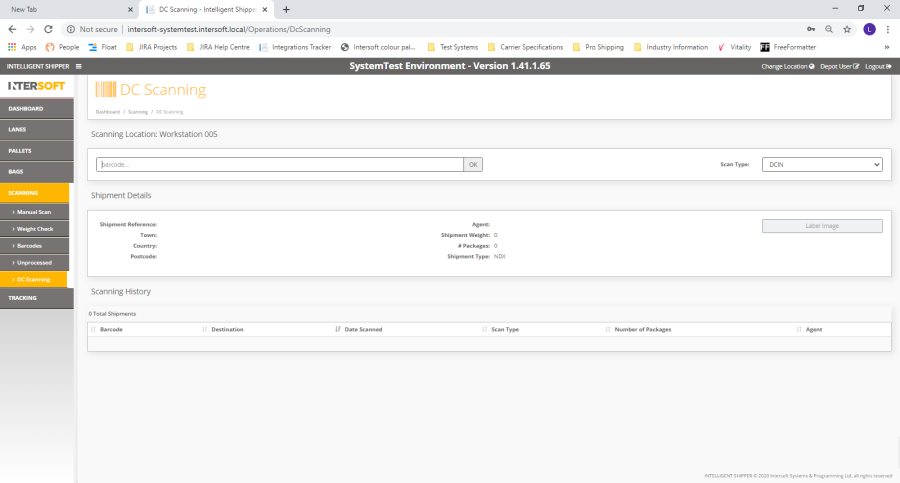
Figure 1: DC Scanning screen
Before the user can beginning scanning shipments, a scanning location must be set on the workstation. Scanning location can be set by a System Administrator user in either the Scanning Locations maintenance screen or from within the DC Scanning screen.
Set Scanning Location
Setting a scanning location on the workstation is required for the first time if has not already been set by the System Administrator.
- When on DC Scanning Screen and the scanning location is not already set then Set Machine location Pop is displayed.
- A System Administrator user will need to enter the pin number that was set in the Scanning Locations maintenance screen. See the Scanning Locations user manual for more information on setting the scanning location pin. It will not be possible to Set the Scanning location on the workstation until a valid pin has been entered.
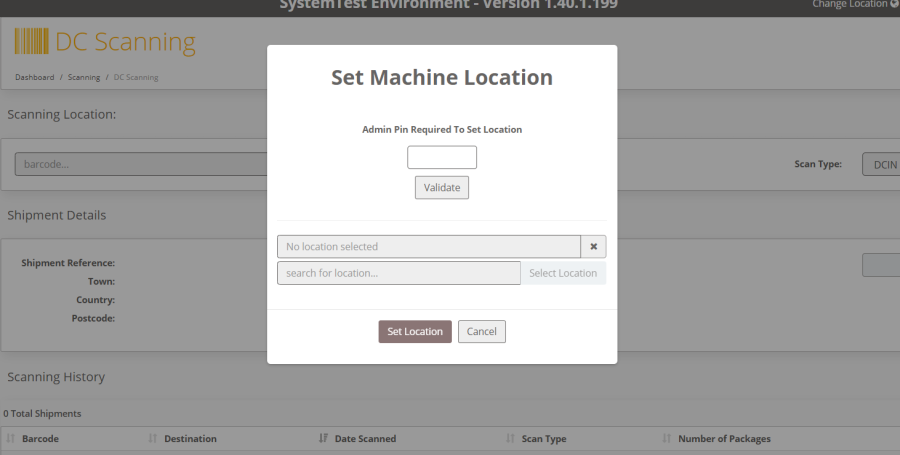
Figure 2: Set Scanning Location
- Select Validate.
- If the pin is validated successfully the location search field and Change Location button will be enabled.
Note: If the pin is not validated successfully, an error message will be displayed
- Select the location and click on Set Location
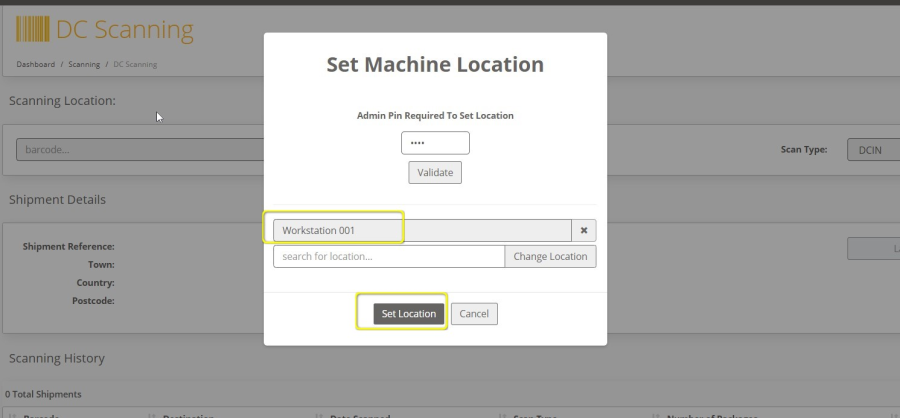
Figure 3: Set Location - select Scanning location
- Scanning Location is now set on the workstation and displays on the DC Scanning screen.
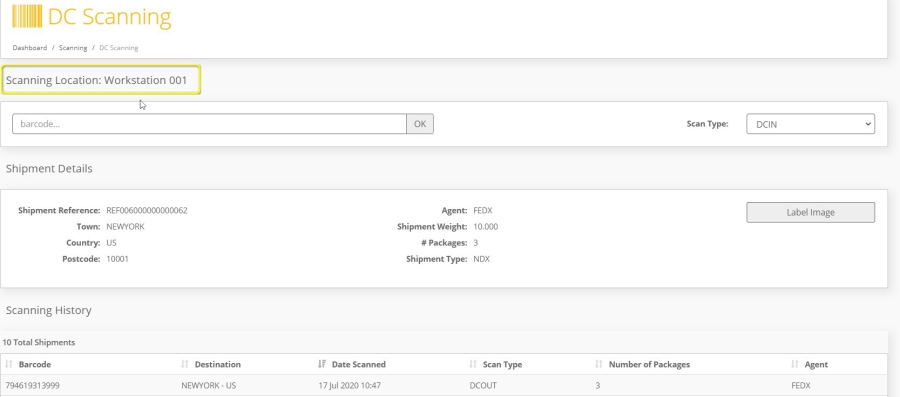
Figure 4: Scanning Location is set
Change Location
Once the Scanning Location is set on the machine, if the Scanning Location is changed or the workstation is moved to another location, then the new Scanning location must be set on the workstation using the Change location option. When shipments are DC scanned, the scanning location is saved against Shipment record for audit trail purposes.
To Change the Scanning Location:
- Select Change Location Option on the toolbar at the top of the screen
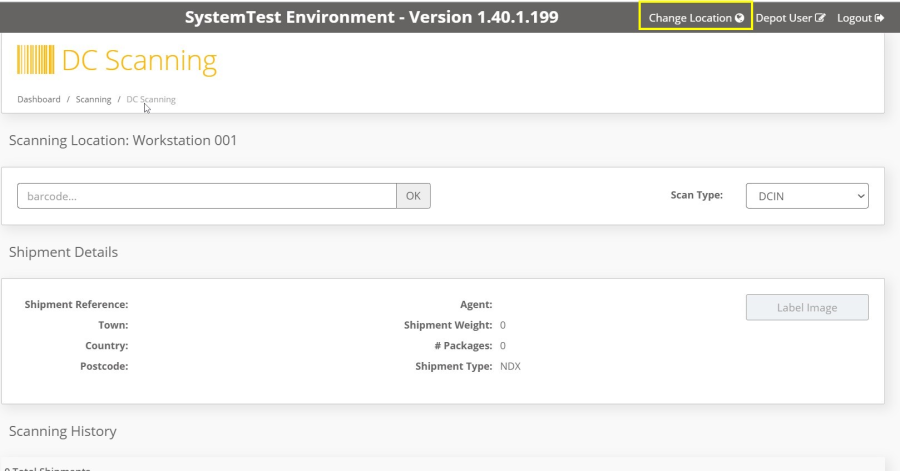
Figure 5: DC Scanning - Change Location
- Change Machine Location screen is displayed
- A System Administrator user will need to enter the pin number that was set in the Scanning Locations maintenance screen. See the Scanning Locations user manual for more information on setting the scanning location pin. It will not be possible to change the pin until a valid pin has been entered.
- Select Validate.
- If the pin is validated successfully the location search field and Change Location button will be enabled.
Note: If the pin is not validated successfully, an error message will be displayed
- Select the location and click on Change Location.
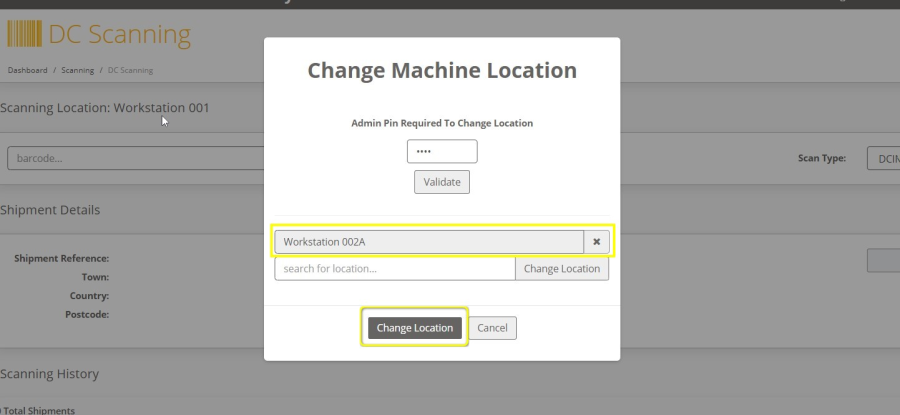
Figure 6: Change Location - Select New Location
- Scanning Location for the Workstation is now changed to the selected location and displays on the DC Scanning screen.
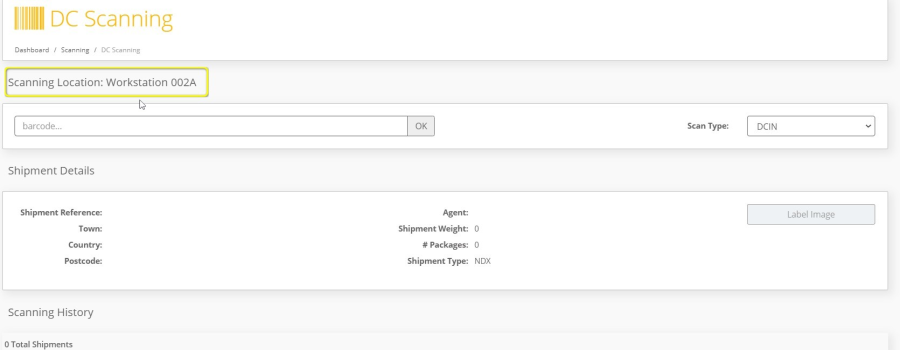
Figure 7: Scanning Location Updated
DC IN Scanning
When shipments arrive in Despatch Control, they must be DC IN scanned.
After a successful DC IN Scan, for single package shipments the scan status is set to DC IN. For multi –package shipments the packages are set to SPLIT IN scan status until the last package tracking number is successfully DC IN Scanned; at this point the scan status will be updated to DC IN scan for all the packages.
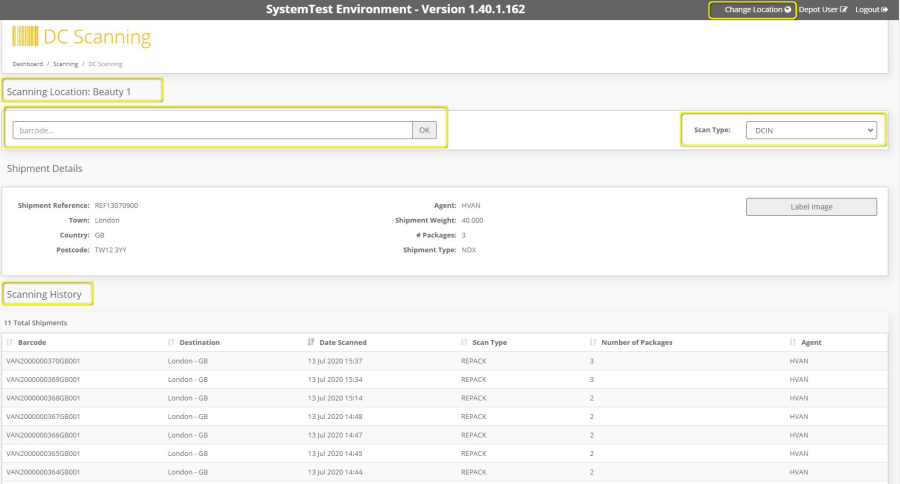
Figure 8: DC Scanning Screen
- Scan or manually type a package tracking number in the barcode field.
- Select the Scan Type as DC IN
- Click Ok
- Shipment details are displayed in the Shipment details section.
Note: Number of packages will display the total number of packages for the shipment.
- For single package shipments, the number of packages will display as 1
- For multi-package shipments, the number of packages will be > 1
- Scanning history displays the Shipment record and the Scan Type is displayed as DC IN.
Note: Scanning History list will display all the shipments/Packages scanned at the Scanning location for the day.
- For single package shipments, the shipment is successfully DC IN scanned and the shipment details are displayed in the Shipment details section of the screen. The Scan History will be updated with a record of the scan and the Scan Type will be displayed as DC IN.
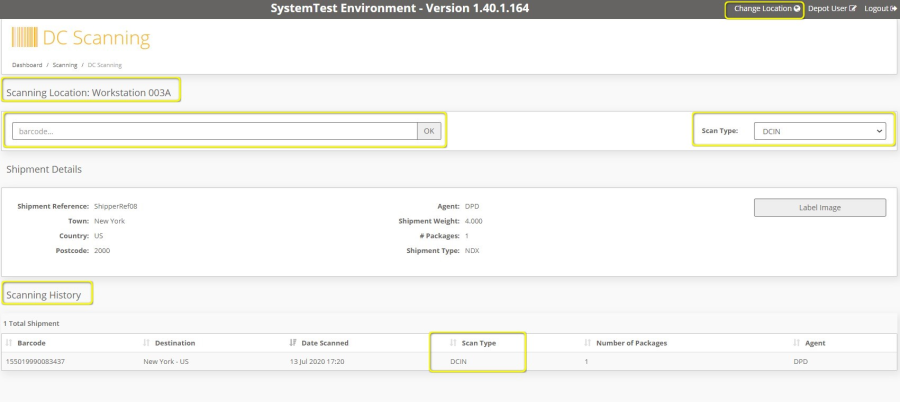
Figure 9: DC IN Scan – Single Piece
- For multi-package shipments, when the first package for the Shipment is scanned, a new record is inserted in the scanning history displaying the Scan Type as SPLIT IN. Until the last package is scanned all the packages will display the Scan State as SPLIT IN. When the last package tracking number of the shipment is scanned, the scan status for all packages in the shipment is updated from SPLIT IN to DC IN.
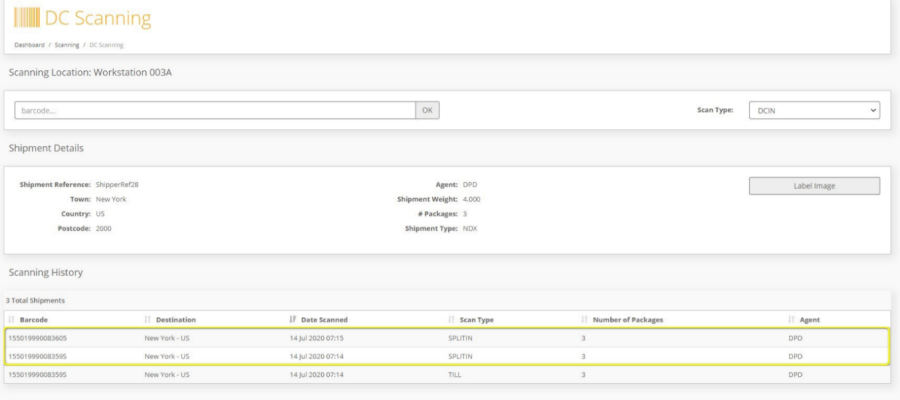
Figure 10: DC IN Scan – Multi Package shipment in Split IN status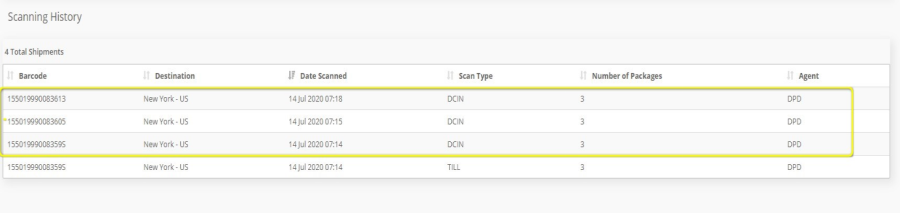
Figure 11: DC IN Scan – Multi Package shipment in DC IN status
Repack Shipment
Users will be able to Repack a shipment to change the number of packages, change the Agent, change the service, or update recipient name or address. When a shipment is repacked, the original will be cancelled, a new shipment will be created and new labels will be generated. All packages in a shipment must be DC IN scanned before it can be repacked. 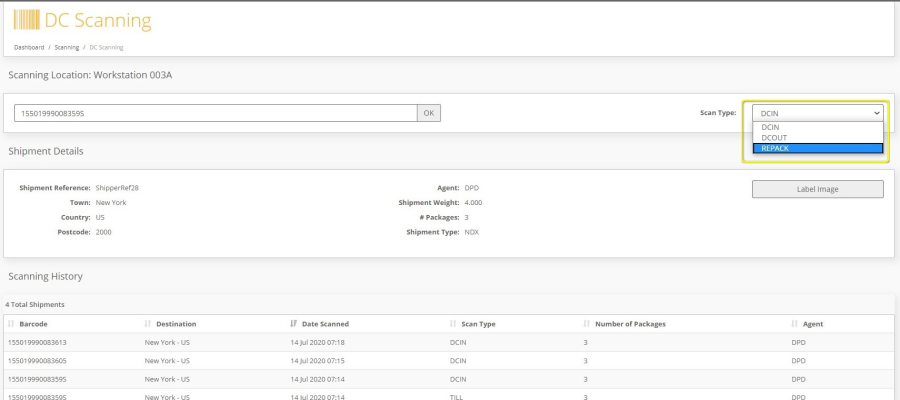
Figure 12: Scan shipment for repacking
- Scan the package tracking number or enter the package tracking number in the barcode field on the DC Scanning screen
- From the Scan Type list select Repack and click ok.
- Repack Screen is displayed.
- If you want to change of recipient name or address, then Select Change address
This will enable the Customer Name and address details to edit and update the recipient name & Address. 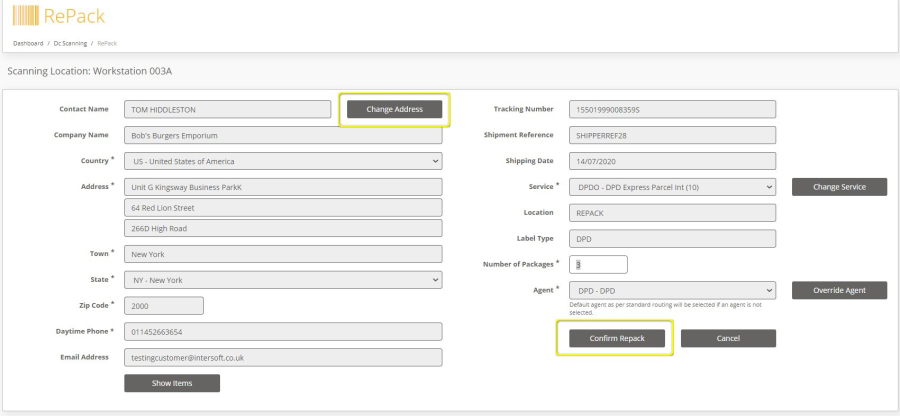
Figure 13: DC Repack - Change Address
- Clicking on Show Items will display the number of items in the package.
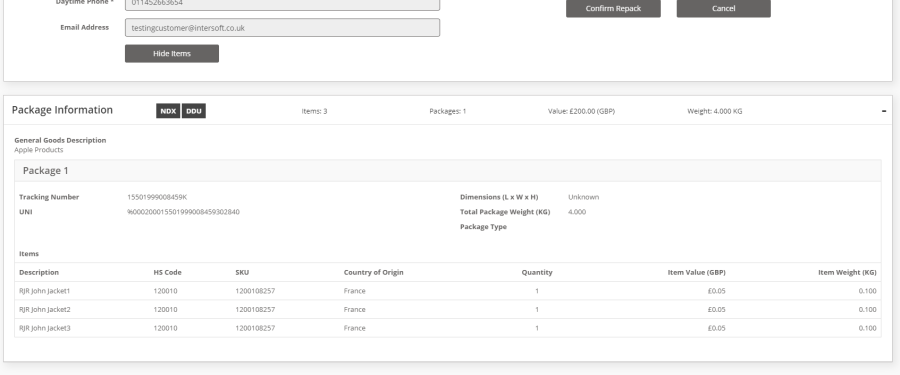
Figure 14: DC Repack - Show Items
- If you want to change the service, then select Change Service – this will enable the Service field. The service field will display a list of the services configured for the system. Select the service to be used for the shipment.
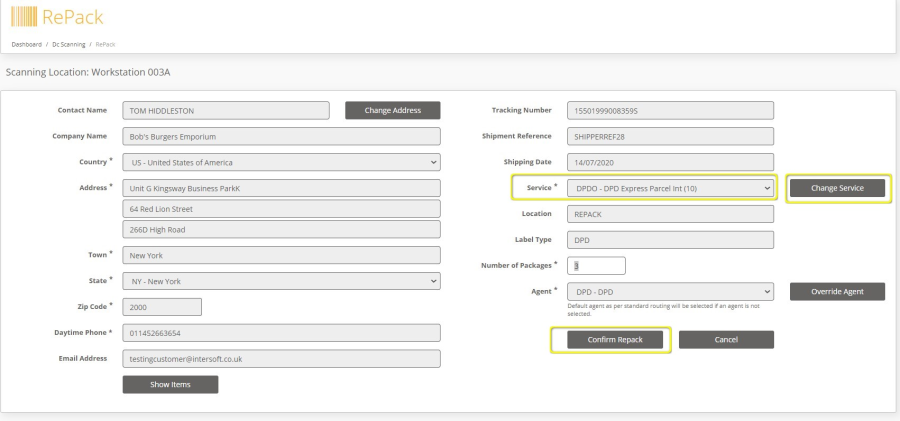
Figure 15: DC Repack - Change Service
- If you want to change the Agent, then Select Override Agent – the Agent field will become editable and the field will display a list of the agents available in the system. Select the agent you want to use for the shipment from the list
Note: Selecting an agent will override the standard routing logic that has been setup in the system and use the selected agent. The service used for the shipment must be available for the selected agent, else an error message will be displayed when you confirm the repack. If the shipment service is not available for the selected agent, then the service will need to be changed 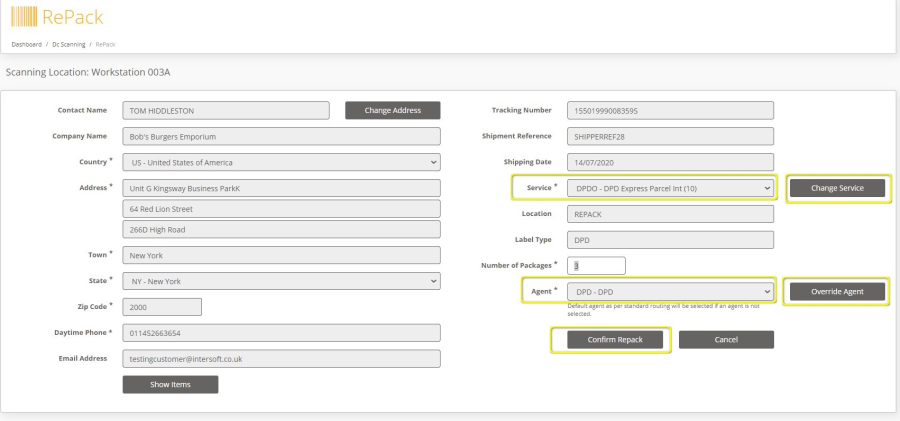
Figure 16: DC Repack - Change Agent
- If the user wants to change the Number of packages for the shipment, then enter the new number of packages required in the Number of Packages field.
Note: The field accepts a maximum of 99 packages, however if the service used for the shipment supports less than this, the maximum number of packages for the service will override the field maximum of 99. 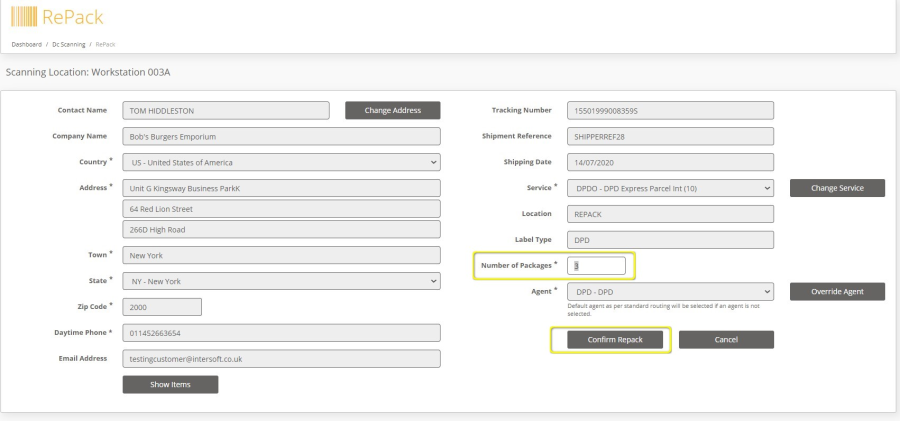
Figure 17: DC Repack - Number of Packages
- Once the user has made all the changes they want to Select Confirm Repack.
- The Shipment is now Repacked. The original shipment is cancelled and a new shipment is created, with new labels and tracking numbers.
- If the system has an active Print Label Webhook then the label will be sent via webhook to the customer's API configured in the Print Label Webhook maintenance screen, so that the label can be printed automatically.
- If the Print label webhook is not active then user will be able to download the label by clicking the download option and print the label.
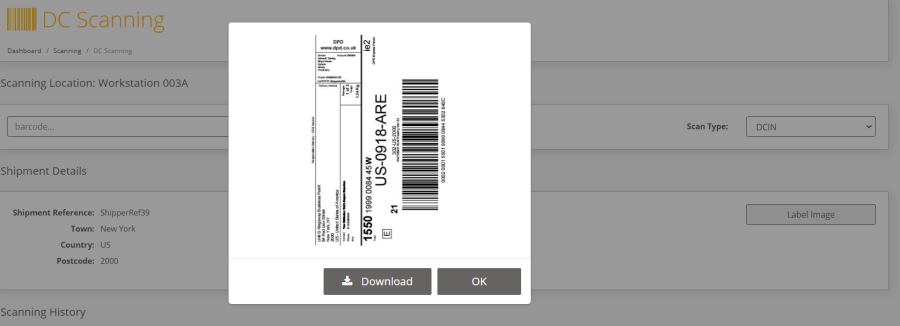
Figure 18: Label Image - Download and Print Label
Appendix 1 – Glossary
Term | Definition |
|---|---|
Scanning Location | Location where the Shipments/packages are scanned. |
DC IN Scan | Despatch Control Acceptance Scan. |
DC IN SPLIT-IN | Multi Package shipment where not all packages have been scanned DC IN |
DC Repack | Repack a Shipment after DC IN scan |