Till Scanning Manual v1.0
Commercial and in Confidence
The information contained in this document is confidential. No part of this document may be reproduced, disclosed to any third party, or issued in any form or by any means without the express written permission of Intersoft Systems & Programming Ltd.
Contents
1 Document Controls
2 Table of Figures
3 Introduction
4 Till Scanning
5 Set Scanning Location
5.1 Change Scan Location
6 Till Scanning
6.1 Scanning History
Table of Figures
Figure 1:Till Scanning Screen
Figure 2: Set Machine Location Pop up
Figure 3: Set Location - Select Scanning Location
Figure 4: Till Scanning Screen - Scanning Location Set
Figure 5: Change Location
Figure 6: Change Machine Location
Figure 7: Till Scanning Screen
Figure 8: Shipment Label
Figure 9: Scanning History
Introduction
The Till Scanning screen allows Pack users to scan unprocessed shipments to produce the required final mile labels for their shipments. This screen is only accessible to Pack users if DC Scanning is enabled for the system.
This manual instructs Pack users how to till scan shipments to produce final mile labels.
Till Scanning Screen
When a Pack user logs in, the Till Scanning screen will be displayed automatically.
The screen will allow users to scan a barcode matching the shipper reference number or type in the shipper reference and select the number of labels required. When a matching shipper reference is found, the shipment will be updated with the number of packages input by the user, a delivery agent will be selected according to the standard routing rules and the shipping labels will be produced. 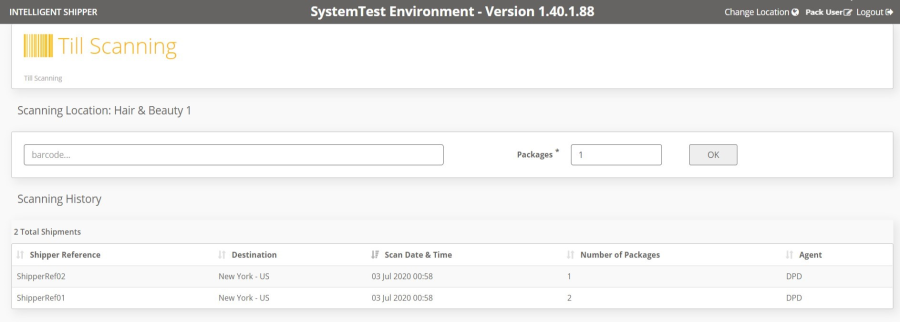
Figure 1:Till Scanning Screen
Before the user can beginning scanning shipments, a scanning location must be set on the workstation. Scanning location can be set by a System Administrator user in either the Scanning Locations maintenance screen or from within the Till Scanning screen.
Set Scanning Location
Setting a scanning location on the workstation is required for the first time if it has not already been set by a System Administrator.
- When on Till Scanning Screen and the scanning location is not already set then Set Machine Location Pop is displayed.
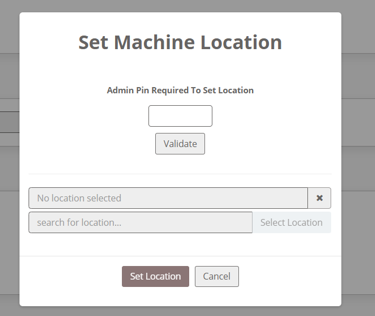
Figure 2: Set Machine Location Pop up
- A System Administrator user will need to enter the pin number that was set in the Scanning Locations maintenance screen. See the Scanning Location Setup Manual for more information on setting the scanning location pin. It will not be possible to Set the Scanning location on the workstation until a valid pin has been entered.
- Select Validate.
- If the pin is validated successfully the location search field and Change Location button will be enabled.
Note: If the pin is not validated successfully, an error message will be displayed
- Select the location either entering the Scanning Location and click on Select Location to find the specific Scanning Location or leave the field blank and click Select Location to select from the list of Scanning Locations displayed.
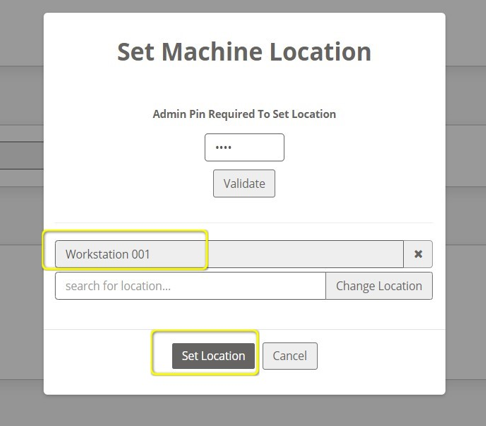
Figure 3: Set Location - Select Scanning Location
- Click on Set Location. Scanning Location is now set on the workstation and is displayed on the Till Scanning Screen.
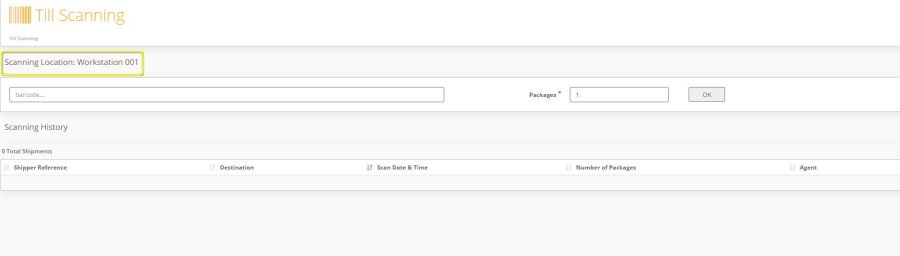
Figure 4: Till Scanning Screen - Scanning Location Set
Change Scan Location
Once the Scanning Location is set on the machine, if the Scanning Location is changed or the workstation is moved to another location, then the new Scanning location must be set on the workstation using the Change location option. When shipments are till scanned, the scanning location is saved against Shipment record for audit trail purposes.
To Change the Scanning Location:
- Select Change Location Option on the toolbar at the top of the screen
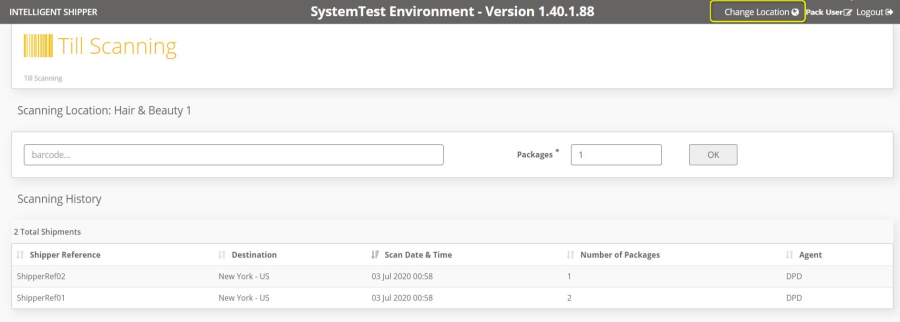
Figure 5: Change Location
- Change Machine Location screen is displayed
- A System Administrator user will need to enter the pin number that was set in the Scanning Locations maintenance screen. See the Scanning Locations user manual for more information on setting the scanning location pin. It will not be possible to change the pin until a valid pin has been entered.
- Select Validate.
- If the pin is validated successfully the location search field and Change Location button will be enabled.
Note: If the pin is not validated successfully, an error message will be displayed.
- Search for and select the New Scanning Location. This will look up the location entered in the search field against the locations entered in the Scanning Locations maintenance screen.
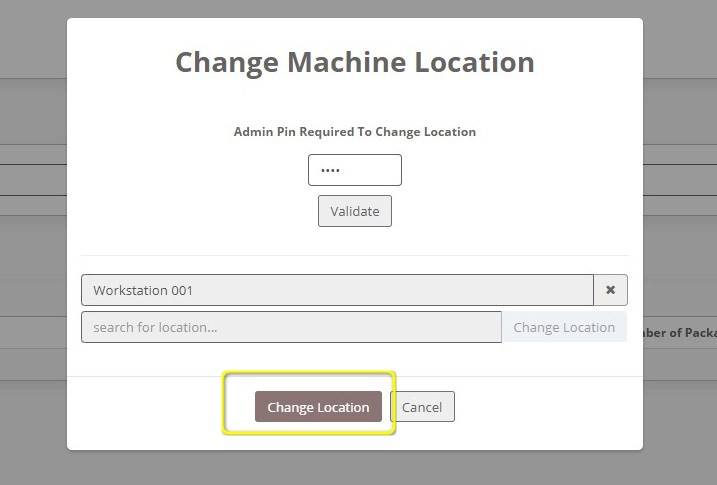
Figure 6: Change Machine Location
- Select Change Location.
- New scanning Location is updated on the Till Scanning Screen.
Till Scan Shipments
To till scan a Shipment, it must be in Unprocessed state.
- Scan or Type the Shipper Reference Number in the Barcode Field
- Enter Number of Packages
- Minimum Packages allowed - 1
- Maximum Packages allowed – 40
- Select Ok
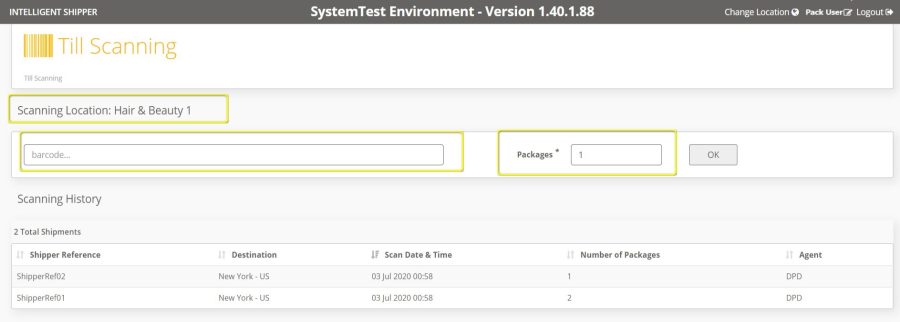
Figure 7: Till Scanning Screen
Note: When the Pack user selects ok, the shipment will be validated and standard routed logic will be run to determine the agent. Label(s) will be printed for the service code specified when the shipment was created, and the number of packages entered in the Till Scanning screen.
- A final mile label will be generated for each package in the shipment.
- If the system has an active Print Label Webhook then the label will be sent via webhook to the customer's API configured in the Print Label Webhook maintenance screen, so that the label can be printed automatically.
- If the Print label webhook is not active then user will be able to download the label by clicking the download option and print the label.
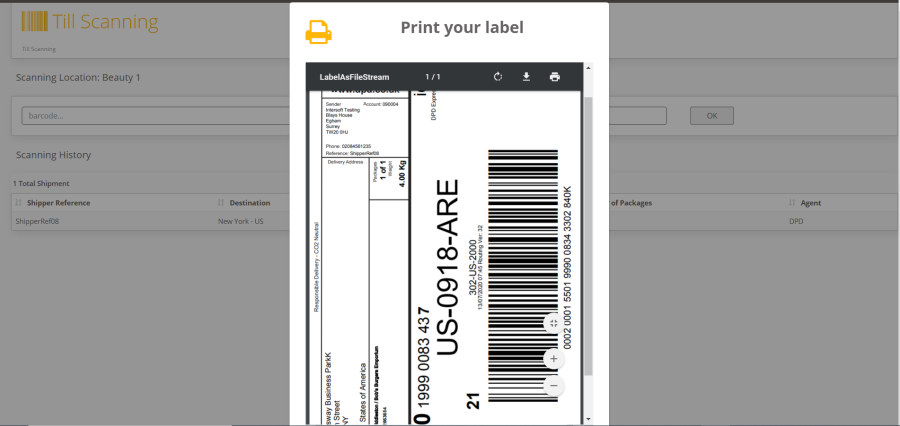
Figure 8: Shipment Label
- Where the shipment has failed validation then an error message is displayed to the user.
Scanning History
All the Shipments that are till scanned for the day at the scanning location are displayed in the scanning History section.
Scanning History will display the below columns:
- Shipper's Reference – Displays scanned Shippers Reference number
- Destination – Displays the shipment destination town and country
- Scan Date & Time – Displays the till scan date & time
- Packages - Displays number of packages in the shipment
- Agent - Carrier the label is generated for.
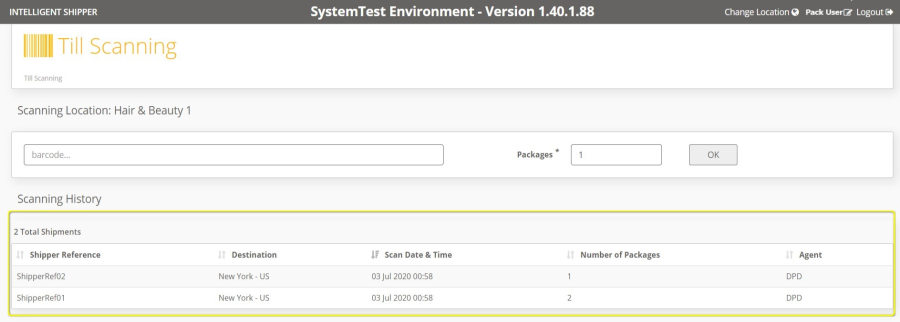
Figure 9: Scanning History