...
Author
...
Intelligent Shipper
Repack Shipments Manual
Version 3.0
...
Document Owner
...
INTERSOFT Systems and Programming Limited
...
Version
...
3.0
...
Date
...
23/07/2019
...
Description
...
Instructs Customer role users how to edit a shipment to change the number of packages in the shipment and the items allocated to each package.
Commercial and in Confidence
The information contained in this document is confidential. No part of this document may be reproduced, disclosed to any third party, or issued in any form or by any means without the express written permission of Intersoft Systems & Programming Ltd.
| Anchor | ||||
|---|---|---|---|---|
|
Version History
Version | Amendments | Date | Author |
|---|---|---|---|
0.1 | First draft | 18/04/2019 | Laura Lyonette |
0.2 | Updates with review feedback | 25/04/2019 | Laura Lyonette |
1.0 | Final version | 29/04/2019 | Laura Lyonette |
1.1 | Updated section 4.1 and figures 4-8, 10 and 12-16 for change to add package dimensions fields to the Repack Shipment screen | 21/05/2019 | Laura Lyonette |
2.0 | Final version | 28/05/2019 | Laura Lyonette |
3.0 | Section 4.1 updated for new service enhancements functionality | 23/07/2019 | Laura Lyonette |
Review
Name | Title | Date Reviewed | Version Reviewed |
|---|---|---|---|
Steve Sneath | Retail Solutions Consultant | 24/04/2019 | 0.1 |
Weronika Kucharska | Customer Success Executive | 24/04/2019 | 0.1 |
Weronika Kucharska | Customer Success Executive | 29/04/2019 | 0.2 |
Shahid Rajput | Test Analyst | 28/05/2019 | 1.1 |
Referenced Documents
Document Name | Version | Location (e.g. Link to Shared Drive, SharePoint etc.) |
|---|---|---|
Shipment Search Manual | 1.0 | https://intersoftuk-servicedesk.atlassian.net/wiki/spaces/EST/pages/74154157/Shipment+Search+v1.0 |
Shipment Scan to Print Manual | 1.0 | |
User Roles Manual | 3.0 | https://intersoftuk-servicedesk.atlassian.net/wiki/spaces/EST/pages/511803394/User+Roles+Manual+v3.0 |
Hold Shipments Manual | 1.0 | |
Cancel Shipments Manual | 3.0 |
Contents
1 Document Controls
2 Table of Figures
3 Introduction
4 Repack Shipment
4.1 Set Package Details
4.2 Allocate Items to Packages
4.2.1 Remove Items from Packages
4.2.2 Remove Package from Shipment
4.3 Confirm Repack
4.3.1 Creating New Shipments and Packages
4.4 Printing Labels for New Packages
5 Appendix 1 – Glossary
| Anchor | ||||
|---|---|---|---|---|
|
Figure 1: Shipment Search results
Figure 2: Repack button in View Shipment screen
Figure 3: Repack Shipment window
Figure 4: Repack Shipment screen
Figure 5: Package details
Figure 6: Hold Action selected
Figure 7: Hold Action selected – no hold reasons displayed for customer account
Figure 8: Defer Action selected
Figure 9: Allocate items to packages
Figure 10: Items added to package
Figure 11: Full quantity of item allocated to packages
Figure 12: Remove items from packages
Figure 13: Remove Package from shipment
Figure 14: Package removed from shipment
Figure 15: Confirm Repack button
Figure 16: Confirmation message
Figure 17: Confirmation screen
Figure 18: Print Labels button
| Anchor | ||||
|---|---|---|---|---|
|
| Anchor | ||||
|---|---|---|---|---|
|
| Anchor | ||||
|---|---|---|---|---|
|
Intelligent Shipper has the ability for shipments to be "repacked" to change the number of packages in the shipment and the items allocated to each package, or to change the service used for the shipment. Shipments can be repacked up until the point of closeout, so that if the shipment needs to be split into multiple packages or an item in the shipment is delayed or cancelled the shipment can be edited via the repack functionality instead of the customer needing to cancel the original shipment and create a new one. This manual instructs Customer role users to how to repack an existing shipment into a different number of packages and print labels for the new packages.
| Anchor | ||||
|---|---|---|---|---|
|
To repack a shipment, select 'Shipment Search' from the left-hand menu and search for the shipment by any available criteria. See the Shipment Search Manual for more information on how to search for shipments. 
| Anchor | ||||
|---|---|---|---|---|
|
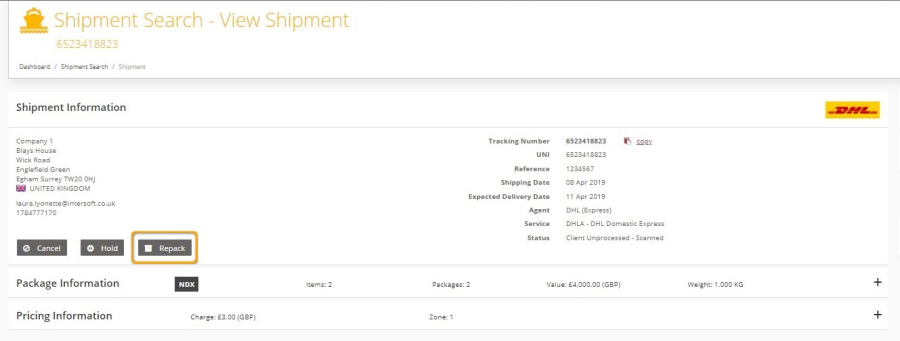
Click on the shipment row in the search results list and the View Shipment screen will open for the shipment. If the shipment has not been closed our or cancelled, then the View Shipment screen will contain a 'Repack' button.
| Anchor | ||||
|---|---|---|---|---|
|
| Anchor | ||||
|---|---|---|---|---|
|
To repack the shipment:
- Select the 'Repack' button.
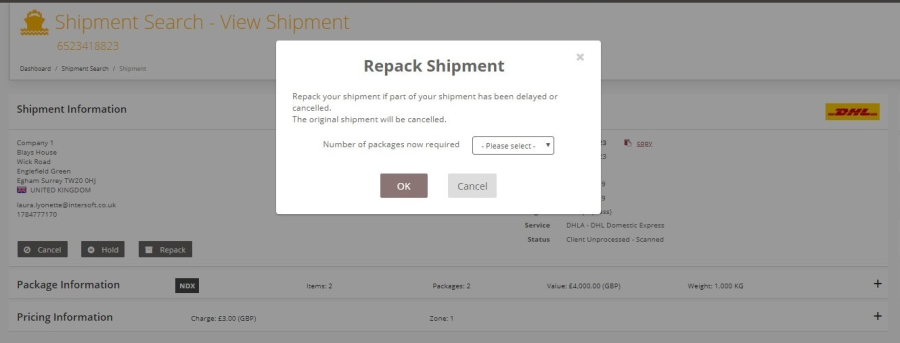
- A window will be displayed prompting you to select the number of packages that are now required.
| Anchor | ||||
|---|---|---|---|---|
|
- Select the required number of packages from the list. A maximum of 9 packages can be selected, as this is the highest number of packages Intelligent Shipper allows in a single shipment.
- Select the 'OK' button.
- The Repack Shipment screen will be displayed.
| Anchor | ||||
|---|---|---|---|---|
|
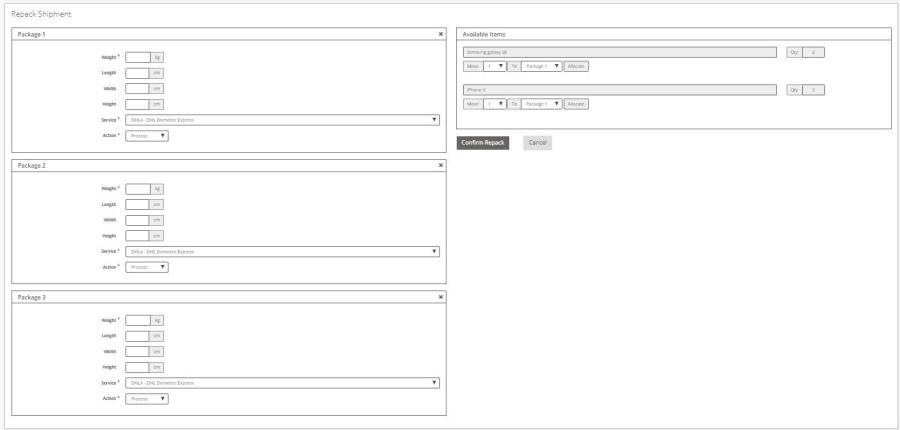
The left-hand side of the screen contains a Package section for the number of packages selected in the previous window. E.g. If 3 packages were selected from the drop-down list, the Repack Shipment screen will contain 3 Package sections.
The right-hand side of the screen contains a list of all items in the shipment and allows these items to be allocated to the packages listed on the left-hand side.
| Anchor | ||||
|---|---|---|---|---|
|
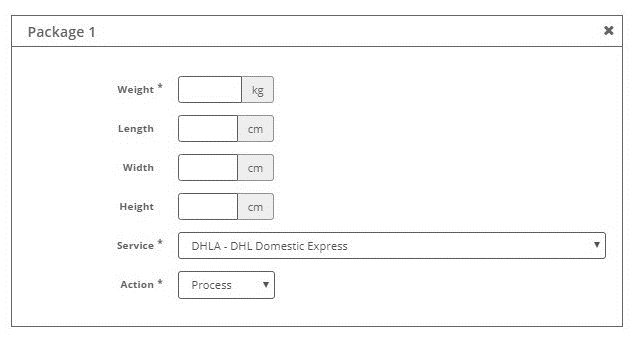
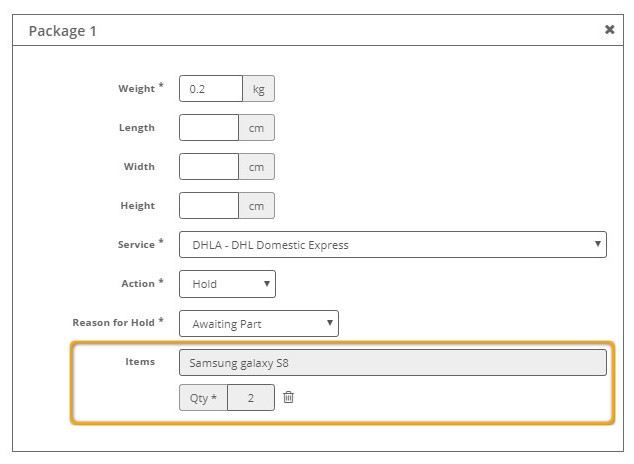
To repack a shipment, first set the following details for each new package listed in the screen:
- Enter the package weight in KG. This is the overall package weight, including weight of the packaging and the items within the package
- The package dimension (length, width and height) fields are optional. The fields accept values between 0.01cm and 250 cm, and if populated the dimensions entered must be less than the maximum dimensions set for the service that is selected in step 3.
NOTE: Some services may require dimensions to be populated. If dimensions are not populated or the values entered are greater than the maximum dimensions set for the service, an error will be displayed when the repack is confirmed.
- Select the service that will be used for the package. The field will contain a drop-down list of the services that have been configured for the destination country. The service used for the original shipment will be selected by default, and this can be changed if needed. The service selected for each package will determine how many new shipments are created when the repack is confirmed. See the Confirm Repack section for more details.
NOTE: If the original shipment had a service enhancement, if the same service is selected when repacking then the enhancement will be applied to the new shipment. If a different service is selected when repacking, then if the enhancement is available for the new service it will be applied to the new shipment, else the new shipment will be created without the enhancement.
- Select the shipment action from the following list:
- Process - creates the new shipment and package in a Processed state. A label will be created for the package, and the shipment will be ready for close out.
- Unprocess - creates the new shipment and package in an Unprocessed state. The shipment will need to be scanned to generate the label and process the shipment ready for close out.
- Hold - the new shipment and package will be put on hold, which excludes the shipment from the close out and clean sweep processes indefinitely until the shipment is released from hold again. See the Hold Shipments Manual for more information on held shipments.
- Defer – delays close out of the shipment until a specified date. When a shipment is deferred a defer date must be entered, and the shipment will not be included in the closeout or clean sweep processes until this defer date is reached. Shipments can be deferred for a maximum of 30 days from the current date.
| Anchor | ||||
|---|---|---|---|---|
|
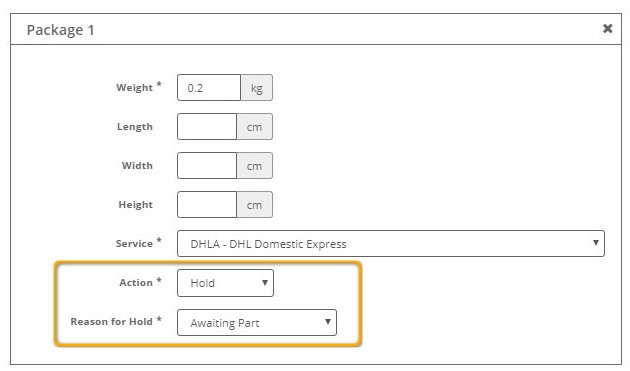
- If the 'Action' is set as Hold, then a mandatory 'Reason for Hold' field will be displayed. This field will contain a list of the reasons that have been entered in the Hold Reasons maintenance screen. Select a 'Reason for Hold' from the drop-down list.
| Anchor | ||||
|---|---|---|---|---|
|
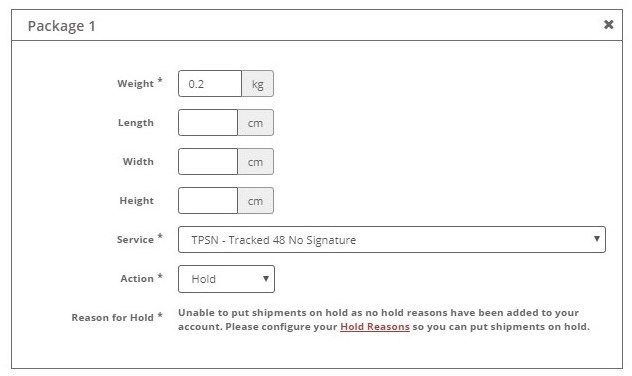
- If no hold reasons have been entered in the maintenance screen, then a message will be displayed instead in the 'Reason for Hold' field instead of the drop-down list. A Customer Administrator role user will need to setup hold reasons for the package to be placed on hold and the shipment repacked.
| Anchor | ||||
|---|---|---|---|---|
|
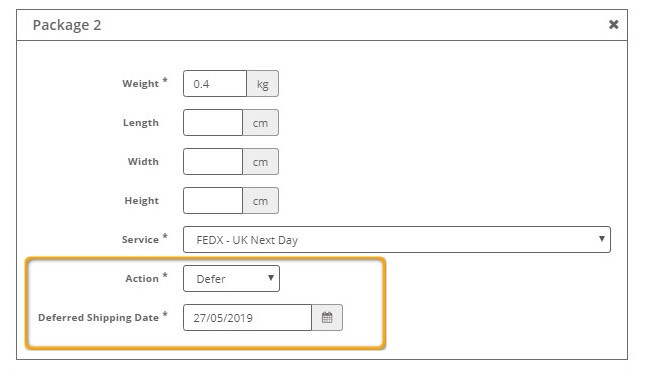
- If the 'Action' is set as 'Defer' then a mandatory 'Deferred Shipping Date' field will be displayed. Click the calendar icon to select the date the shipment will be deferred to.
| Anchor | ||||
|---|---|---|---|---|
|
| Anchor | ||||
|---|---|---|---|---|
|
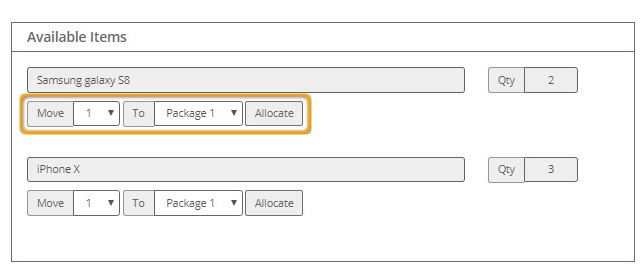
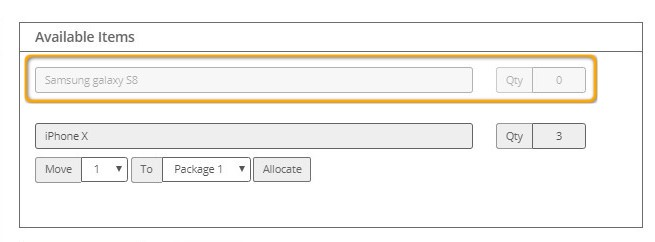
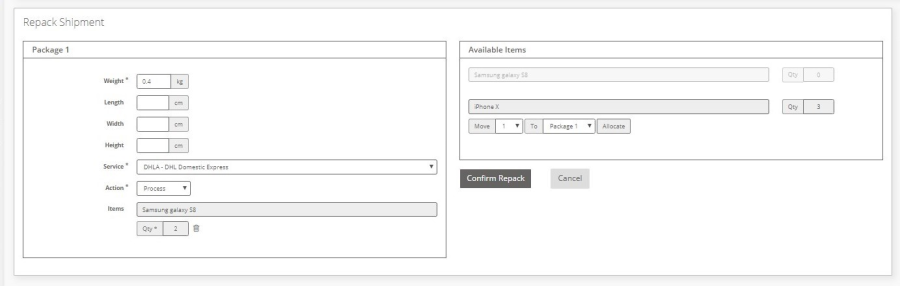
Once package details have been entered for each new package, the items in the shipment need to be allocated to the packages. The Available Items list on the right-hand side of the screen will contain a list of all items included in the original shipment and show the quantity of each item.
To allocate the items to packages:
- In the 'Move' field select the quantity of the item that will be allocated to the package
- In the 'To' field select the package the item(s) will be moved to
- Click the 'Allocate' button
| Anchor | ||||
|---|---|---|---|---|
|
- The item(s) will be allocated to the selected package, and the item name and item quantity will be displayed in that package section.
| Anchor | ||||
|---|---|---|---|---|
|
- When items are added to a package the item quantity in the Available Items list will decrease. When the full quantity of an item has been allocated to a package/packages, the 'Move' and 'To' fields for that item will be removed.
| Anchor | ||||
|---|---|---|---|---|
|
| Anchor | ||||
|---|---|---|---|---|
|
Once items have been allocated to a package, it is possible from them to be removed from the package by selecting the delete icon next to item quantity. 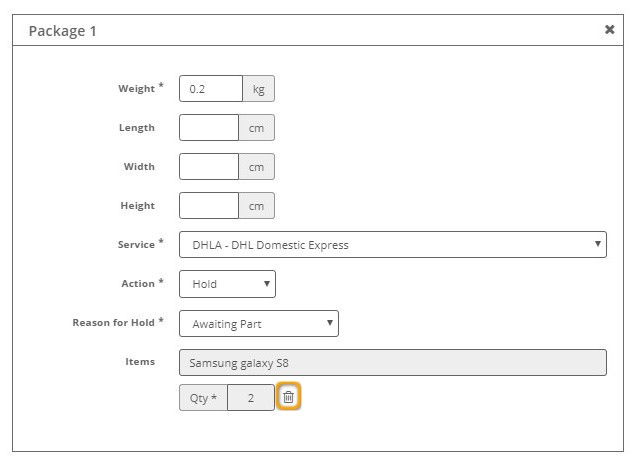
| Anchor | ||||
|---|---|---|---|---|
|
This will remove the items from the package, and the quantity of removed items will be added to the Available Items list again.
| Anchor | ||||
|---|---|---|---|---|
|
If you are repacking a shipment and want to reduce the number of packages in the repacked shipment, you can remove a pack from the shipment.
To remove a package from the shipment, select the 'X' icon in the top right corner of that Package section. 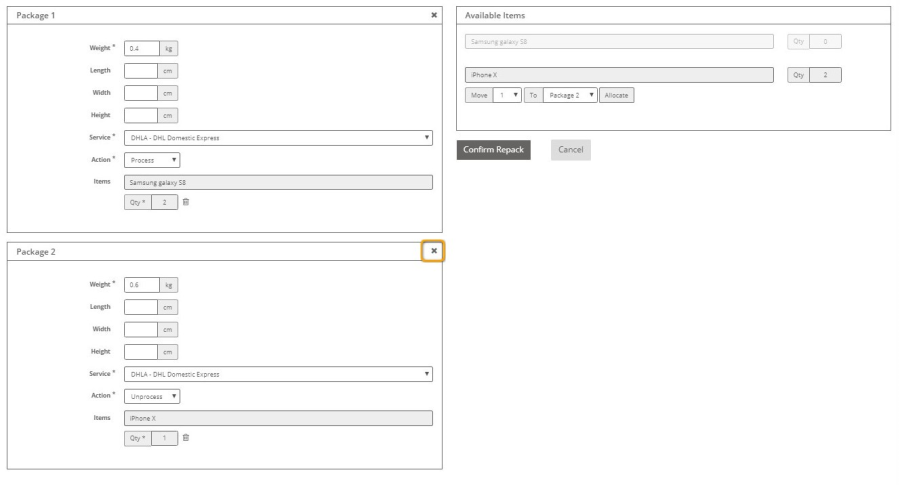
| Anchor | ||||
|---|---|---|---|---|
|
The package will then be removed from the shipment.
| Anchor | ||||
|---|---|---|---|---|
|
| Anchor | ||||
|---|---|---|---|---|
|
| Anchor | ||||
|---|---|---|---|---|
|
Once package details have been set for all packages and items have been allocated to packages as required, then the repack can be confirmed.
NOTE: Each package must have at least one item allocated for the repack to be confirmed, but not all items in the shipment need to be allocated to a package. When the repack is confirmed, any items that have not been allocated to a new package will be deleted from the new shipment(s).
Once the repack is ready to be confirmed, select the 'Confirm Repack' button. 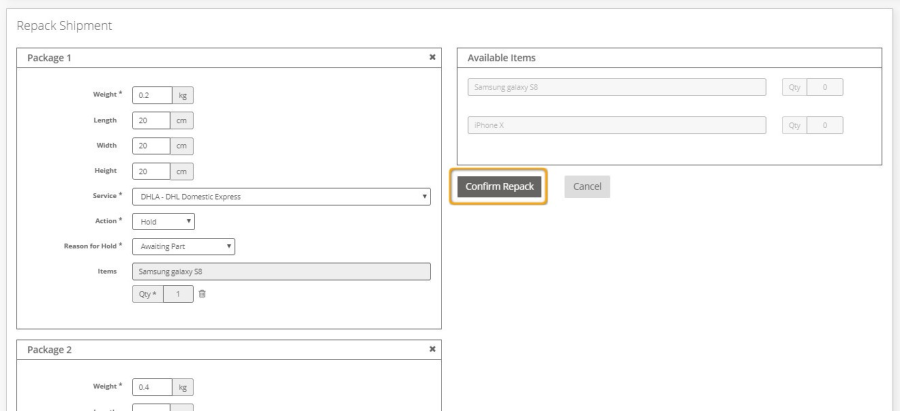
| Anchor | ||||
|---|---|---|---|---|
|
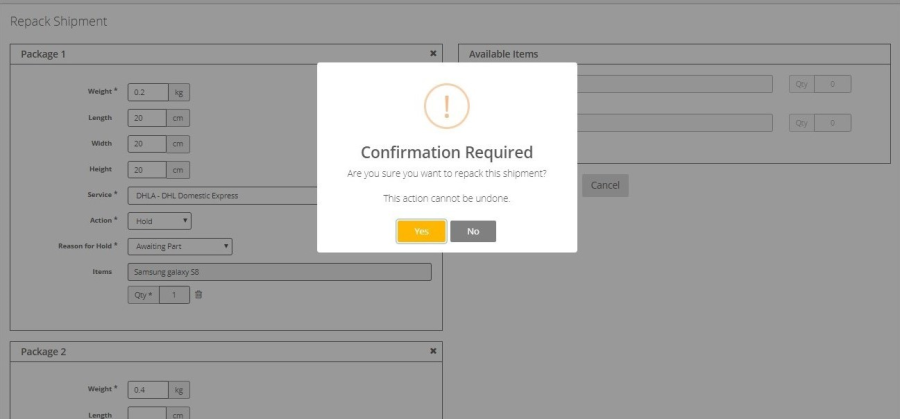
A confirmation message will then be displayed, containing 'Yes' and 'No' buttons.
| Anchor | ||||
|---|---|---|---|---|
|
If the 'No' button is selected, the confirmation message will be dismissed and the shipment will not be repacked.
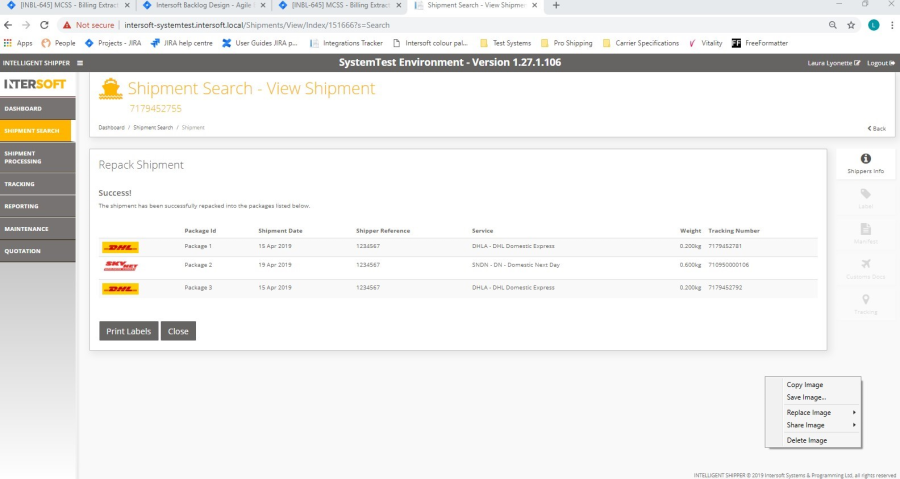
If the 'Yes' button is selected, the repack will be confirmed. The original shipment will be cancelled and a new shipment/shipments will be created containing the new packages. A confirmation screen will be displayed listing the new shipments and packages.
NOTE: As the original shipment is cancelled and a new shipment/shipments created, the labels and tracking for the original shipment can no longer be used. New tracking numbers will be allocated to the new packages, and the new labels can be printed from the confirmation screen – see the Printing Labels for New Packages section for more details. If you are using Intelligent Shipper via API and the shipment tracking number is automatically populated in your system via the createShipmentResponse, you will need to manually update the tracking number for repacked shipments.
| Anchor | ||||
|---|---|---|---|---|
|
| Anchor | ||||
|---|---|---|---|---|
|
If the Service and Action are the same for all packages (and also Hold Reason and Defer Date, if applicable) and the service selected supports multipiece shipments, then one new shipment will be created containing multiple packages.
If the service selected does not support multipiece shipments, or different details are entered for the packages, then multiple shipments will be created.
Packages will be grouped together where possible, e.g. A shipment is repacked into 3 packages, 2 packages are the same and the other is different, the same service is used for all packages and the services supports multipiece. When the repack is confirmed, one shipment will be created for the 2 packages with the same settings, and a second shipment will be created containing the one different package.
| Anchor | ||||
|---|---|---|---|---|
|
| Anchor | ||||
|---|---|---|---|---|
|
| Anchor | ||||
|---|---|---|---|---|
|
| Anchor | ||||
|---|---|---|---|---|
|
| Anchor | ||||
|---|---|---|---|---|
|
If the Action was set as Process for a new package, then it will be possible to print the label for that package from the confirmation screen. If the Action was set as Unprocess, the shipment will need to be scanned to generate the label as per the standard shipment scanning functionality. See the Shipment Scan to Print Manual for more details.
For packages where the Action was set as Hold or Defer, if the original shipment was created in Processed state then it will be possible to print the labels from the Repack Shipment confirmation screen. If the original shipment was created in Unprocessed state then the new shipment will also be created in Unprocessed state, and the shipment will need to be scanned via the shipment scanning functionality to generate the labels.
To print labels for the new shipments and packages that have been created, select the 'Print Labels' button in the confirmation screen. This will download a PDF containing labels for the new shipments and packages that have been created, where labels are available based on the status of the original shipment and the Action selected for the new package. 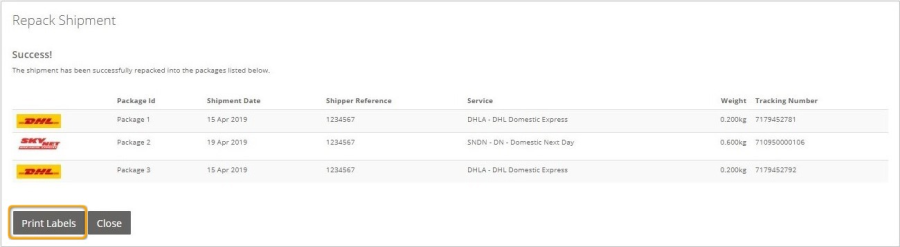
| Anchor | ||||
|---|---|---|---|---|
|
If labels are not available for any of the new shipments and packages, then the 'Print Labels' button will not be displayed.
If a Silent Print Profile has been selected for your customer account, then when the confirmation screen is displayed the labels will automatically be printed to the selected print profile.
Selecting the 'Close' button will close the Repack Shipment screen and return you to the Shipment Search screen.
| Anchor | ||||
|---|---|---|---|---|
|
Term | Definition |
|---|---|
Cancelled Shipment | A shipment that has been cancelled and so is no longer active. Cancelled shipments will not be included in the close out or clean sweep processes. See the Cancel Shipments Manual for more details. |
Clean Sweep | A process that runs at set days and times configured in the maintenance screens to automatically close out any outstanding shipments for a customer that have not yet been closed. This is only available for Royal Mail shipments only and it does not include other carriers. |
Close out | Before shipments are handed over to the carrier they must be closed out in the system. This finalises the shipment so that it can no longer be edited and generates the paperwork required by the carrier (e.g. manifest). For more information on closing out shipments see the Manifest & Closeout manual. |
Customer Admin User | Administrator user for the customer account they are assigned to. These users are created by selecting the "Customer" role and selecting the "Administrator" option. See the User Roles Manual for more details on the access Customer Administrator Users have to the system. |
Customer User | Users with Customer user role. These are the core users of the system who will be creating, processing and closing out shipments. This user role will be assigned to a customer account. See the User Roles Manual for more details on the access Customer Users have to the system. |
Deferred Shipment | Shipment that has been deferred to a future date. Deferred shipments will be excluded from the close out and clean sweep processes until the defer date set for the shipment is reached. |
On Hold Shipment | Shipment that has been put on hold. On hold shipments will be excluded from the close out and clean sweep processed until they are released from hold. See the Hold Shipments Manual for more details. |
Processed Shipment | A shipment that was created in Processed state or has been processed via shipment scanning. Shipments in processed state will have the label available and are ready to be closed out. |
Unprocessed Shipment | A shipment that was created in Unprocessed state via either API or Bulk Mailing. If a shipment is in Unprocessed state the label will not be available; the shipment will need to be scanned to generate the label and move it into Processed state so that it can be closed out. |