User Roles Manual v5.0
Commercial and in Confidence
The information contained in this document is confidential. No part of this document may be reproduced, disclosed to any third party, or issued in any form or by any means without the express written permission of Intersoft Systems & Programming Ltd.
Contents
Document Controls
Table of Figures
1. Introduction
2. User Roles
2.1 Access Per User Role
3. Configuring Access for Customer Users
3.1 Updating Access for Existing Users
Table of Figures
Figure 1 - Access by user role
Figure 2 - Add a User screen
Figure 3 - Customer user role selected
Figure 4 - Shipment Processing option selected
Figure 5 - Search for a user account in Users screen
Figure 6 - Update user's access
Introduction
The Intelligent Shipper system contains several user roles that restrict the access users have to the system, so that each user only has access to the functionality required for their role.
Note: A user account can only have one user role assigned.
This manual describes the system functionality that each user level has access to and shows how Customer user accounts can be configured to access specific areas of functionality.
User Roles
The following user roles are available in Intelligent Shipper, in the following hierarchy:
- Depot - operational users who will be scanning shipments in a depot or processing facility.
- Pack – shop floor staff packing orders and carrying out till pack scanning to generate labels.
- Customer – the core users of the system who will be creating, processing and closing out shipments. This user role will be assigned to a customer account.
- Customer Administrator – Administrator user for the customer account they are assigned to. These users are created by selecting the "Customer" role and selecting the "Administrator" option.
- Customer Service – an operative in your Customer Service or Support team who will be handling queries from customers. This user role will not be assigned to a customer account and so will be able to view data for all customer accounts in your system.
- System Administrator – the administrator who will be setting up and maintaining the system. This user role will not be assigned to a customer account and so will be able to view data for all customer accounts in your system.
These user roles are explained in more detail throughout this document.
Access Per User Role
The table below lists the access that each user role will have to the Intelligent Shipper menu options. For Customer level users, access will be configured for each user individually, so that it can be tailored to the functionality that the user needs to be complete their activities.
Functionality | Depot | Pack | Customer | Customer Admin | Customer Service | System Admin |
|---|---|---|---|---|---|---|
Dashboard | Yes | No | Access will be configured for each user individually. See Configuring Access for Customer Users for more information | Yes | Yes | Yes |
Shipment Search | No | No | Yes | Yes | Yes | |
Shipment Processing | No | No | Yes | No | No | |
Tracking | Yes | No | Yes | Yes | Yes | |
Reporting | No | No | Yes | Yes | Yes | |
Manifest History | No | No | Yes | No | Yes | |
Quotation | No | No | Yes | Yes | Yes | |
Till Scanning | No | Yes | No | No | No | No |
Lanes | Yes | No | No | No | No | No |
Pallets | Yes | No | No | No | No | No |
Bags | Yes | No | No | No | No | No |
Scanning | Yes | No | No | No | No | No |
DC Scanning | Yes | No | No | No | No | No |
Maintenance | No | No | Yes | Yes | Yes | Yes |
Maintenance Functionality | ||||||
Address Book | N/A | N/A | Yes | Yes | No | No |
Agents | N/A | N/A | No | No | No | Yes |
Agent Rate Cards | N/A | N/A | No | No | No | Yes |
Agent Surcharges | N/A | N/A | No | No | No | Yes |
Bulk Mailing Templates | N/A | N/A | Yes | Yes | No | No |
Countries | N/A | N/A | No | No | No | Yes |
Currencies | N/A | N/A | No | No | No | Yes |
Customers | N/A | N/A | No | No | Yes | Yes |
Customer Rate Cards | N/A | N/A | No | No | No | Yes |
Customer Routing Overrides | N/A | N/A | No | No | No | Yes |
Departments | N/A | N/A | No | Yes | No | No |
Email Templates | N/A | N/A | No | No | No | Yes |
FTP Hosts | N/A | N/A | No | No | No | Yes |
Goods Description | N/A | N/A | Yes | Yes | No | No |
Integrations | N/A | N/A | No | No | No | Yes |
Label Options | N/A | N/A | No | Yes | No | No |
Package Types | N/A | N/A | Yes | Yes | No | Yes |
Hold Reasons | N/A | N/A | Yes | Yes | No | No |
Routing Exceptions | N/A | N/A | No | No | No | Yes |
Scanning Locations | N/A | N/A | No | No | No | Yes |
Services | N/A | N/A | Yes | Yes | No | Yes |
Silent Printing | N/A | N/A | Yes | Yes | No | No |
Service Enhancements | N/A | N/A | No | No | No | Yes |
System Maintenance | N/A | N/A | No | No | No | Yes |
Tracking Milestones | N/A | N/A | No | Yes | No | Yes |
Users | N/A | N/A | No | Yes | Yes | Yes |
Webhooks | N/A | N/A | No | No | No | Yes |
Figure 1 - Access by user role
NOTE 1 – The DC Scanning functionality will only be accessible to Depot users if this has been enabled for the system in the System Maintenance screen.
NOTE 2 – Customer users will only have access to Bulk Mailing Templates if they have access to the Bulk Mailing shipment processing functionality.
NOTE 3 – Package Types created by Customer or Customer Admin users will apply to that customer account only and are used when creating shipments via the Booking Wizard and repacking shipments. Package Types set by System Administrator level users apply at system level and are only used in the DCOUT Weight & Dimensions screen. The Package Types screen is only available to System Admin users when DC Scanning is enabled.
NOTE 4 – Customer users will have access to a read-only view of the Hold Reasons screen. Customer Administrator users will only be able to add, edit and delete Hold Reasons for their Customer account.
NOTE 5 – The Scanning Locations screen will only be available to System Administrator users when DC Scanning is enabled in the system.
NOTE 6 – Customer and Customer Administrator users will have access to a read-only view of the Services screen to see the services that have been setup for their account.
NOTE 7 – Customer Administrator users will only be able to add, edit and delete Customer or Customer Administrator users for their customer account. A customer account must have at least one user assigned, so it will not be possible to delete all users from the customer account. NOTE 8 – Customer Service users will only be able to add, edit and delete other users of their user role or below. E.g. a Customer Service user cannot access System Administrator user accounts. NOTE 9 – System Administrator users will be able to add, edit and delete Depot, Customer, Customer Administrator, Customer Service and other System Administrator accounts.
NOTE 10 - The Webhooks screen will only be available to System Administrator users when DC Scanning is enabled in the system.
Configuring Access for Customer Users
For Customer level users, all functionality except the Maintenance functions must be configured for each user individually when the user account is created.
- To configure access for a Customer user, select Maintenance and Users.
- Click the "Add User" button and the Add a User screen will open.
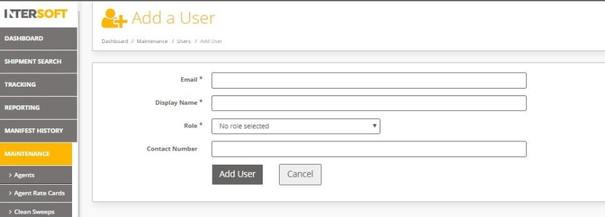
Figure 2 - Add a User screen
- Enter an email address and display name for the user.
- Select "Customer" from the Role drop-down list and the screen will update to display a Customer Security section containing a list of system functionality with tick boxes:
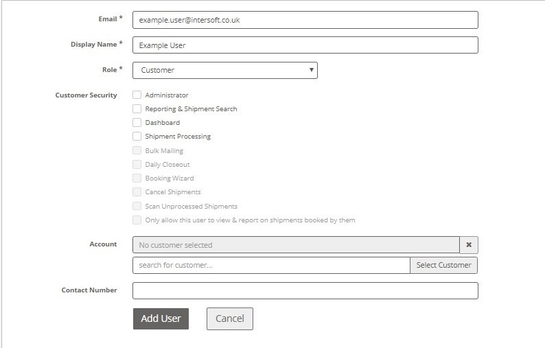
Figure 3 - Customer user role selected
- Select tick boxes to assign the required functionality to the user account, from the following list:
- Administrator – sets the user as a Customer Administrator role. If this option is selected, all tick boxes will be automatically ticked and disabled except for "only this user to view & report on shipments booked by them". See Access Per User Role for a list of the functionality Customer Administrator users can access.
- Reporting & Shipment Search – gives the user access to the Reporting menu option and Shipment Search functionality.
- Dashboard – gives the user access to the Dashboard screen. Customer and Customer Administrator users will only be able to view data for their customer account.
NOTE: If the user is given access to the Dashboard, this is the first screen that will be displayed when they login to the system. If the user is not given access to the Dashboard, they will be directed to a landing page allowing them to access all functionality they have been given access to.
- Shipment Processing – if Shipment Processing is selected, this will automatically enable and select the tick boxes listed below – see figure 4. The tick boxes can then be unselected as needed to configure the shipment process functionality required for the user.
NOTE: If Shipment Processing is selected for a user, they will automatically be given access to the Manifest History screen.
- Bulk Mailing – allows the user to create multiple shipments at once via the bulk mailing functionality.
NOTE: This will also give the user access to the Bulk Mailing Templates maintenance screen.
- Daily Closeout – allows the user to closeout shipments to create the end of day manifest.
- Booking Wizard – allows the user to manually create shipments via the Booking Wizard functionality.
- Cancel Shipments – allows the user to cancel shipments that have not been closed out.
- Scan Unprocessed Shipments – allows the user to scan shipments that have been created in an unprocessed state for the shipment to be processed and the label generated.
- Only allow this user to view & report on shipments booked by them – restricts the user's view so that they can only view data for shipments created by them. If this option is not selected then the user will be able to view all shipments created for the customer account. This option is only enabled when Shipment Processing is ticked.
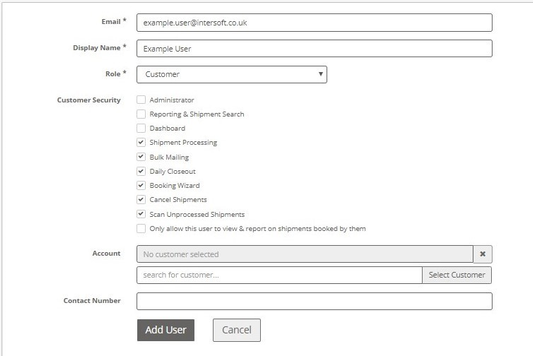
Figure 4 - Shipment Processing option selected
- Once the functionality required for the user account has been selected, in the Account field search for the customer account the user will be assigned to and click "select Customer" to add the user to the customer account.
- Click the "Add User" button to create the user account.
- When the user login, they will be able to access the functionality that has been setup for their customer account in the Add User screen.
Updating Access for Existing Users
Once a Customer user account has been created, the access they have to the system can be changed via the Edit User screen.
- To update the access for an existing user, select Maintenance and then Users.
- Search for the user you want to update, then click on the user's name to open the Edit User screen.

Figure 5 - Search for a user account in Users screen
- The Edit User screen will open. From here you can select and unselect functionality to change the user's access.
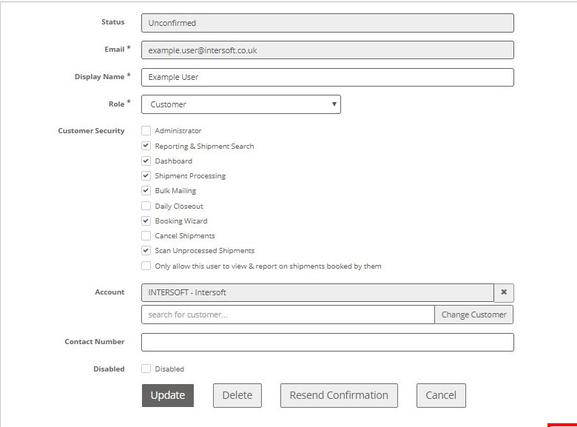
Figure 6 - Update user's access