Intelligent Shipper
Automated File Import & Label Printing User Guide
Version 3.0
Document Owner |
INTERSOFT Systems and Programming Limited |
Version |
3.0 |
Date |
27/12/2018 |
Description |
Instructs customers how to configure the Intelligent Shipper Print Harvester and Silent Printing functionality to provide automated file import and label printing. |
Author |
Laura Lyonette |
Commercial and in Confidence
The information contained in this document is confidential. No part of this document may be reproduced, disclosed to any third party, or issued in any form or by any means without the express written permission of Intersoft Systems & Programming Ltd.
Document Controls
Version History
Version |
Amendments |
Date |
Author |
0.1 |
First draft for review |
01/06/2018 |
Laura Price |
1.0 |
Final version |
06/06/2018 |
Laura Price |
2.0 |
Installing Print Harvester section updated |
13/06/2018 |
Laura Price |
2.1 |
Added section 9 Switching from Test to Live Environment |
20/12/2018 |
Laura Lyonette |
3.0 |
Final version |
27/12/2018 |
Laura Lyonette |
Review
Name |
Title |
Date Reviewed |
Version Reviewed |
Beata Brewer |
Customer Services Manager |
05/06/2018 |
0.1 |
Ellie Chapman |
HR Manager |
05/06/2018 |
0.1 |
Faris Choudhry |
Application Support Engineer |
27/12/2018 |
2.1 |
Referenced Documents
Document Name |
Version |
Location (e.g. Link to Shared Drive, SharePoint etc.) |
N/A |
N/A |
N/A |
Contents
1. Document Controls
2. Table of Figures
3. Introduction
3.1. Process Diagram – Configuring Print Harvester and Silent Printing
4. Create CSV Import File
4.1. Create Bulk Mailing Template
4.1.1. Selecting fields for the Bulk Mailing Template
4.1.2. Adding a default value to a selected field
4.1.3. Bulk Mailing Templates
4.2. Test Import of Bulk Mailing Template
4.2.1. Upload New Data File
4.2.2. Data File does match the Upload Template
4.2.3. Bulk Mailing File Contains Errors
4.2.4. File Successfully Processed to Bulk Mailing
5. Label Options
5.1. Configuring Label Options
6. Silent Printing
6.1. Pre-requisites
6.2. Installing Silent Print Application
6.3. Configure Silent Print Application
6.3.1. Reset Settings
6.4. Selecting Silent Print Profile in Intelligent Shipper
6.5. Edit Silent Print Profile
7. Print Harvester
7.1. Installing Print Harvester
7.1. Configuring Print Harvester
7.1.1. Scan Settings
7.1.2. Response Settings
7.1.3. Printing Settings
7.1.4. API Information
7.2. Run Print Harvester
7.2.1. Application Log
8. End to End Test
9. Switching from Test to Live Environment
9.1. Uninstalling the Silent Print and Print Harvester Applications
10. Appendix 1 – Glossary
11. Appendix 2 – Quick Reference Guides
11.1. Quick Reference Guide - Add a Bulk Mailing Template
11.2. Quick Reference Guide - Upload New Data File
11.3. Quick Reference Guide – Silent Print Application
11.4. Quick Reference Guide – Print Harvester
Table of Figures
Figure 1 - Add Bulk Mailing Template
Figure 2 - Field Selection for the Bulk Mailing Template
Figure 3 - Default Values
Figure 4 - Default Value for the Shipment Service Field
Figure 5 - Bulk Mailing Templates
Figure 6 - Example CSV (opened with notepad)
Figure 7 – Bulk Mailing Button
Figure 8 - Upload New Data File Button
Figure 9 - Upload New Data File Screen
Figure 10 - Upload file does not match error
Figure 11 - Errors on Data File
Figure 12- Error Column on Data file
Figure 13 - Print Labels from Bulk Mailing Screen
Figure 14 - Label Options Screen
Figure 15 - Download Silent Print Application Button
Figure 16 - Silent Print Download Window
Figure 17 - Windows Defender Message
Figure 18 - Run Silent Print Installation
Figure 19 - Silent Print Icon
Figure 20 - Silent Print Registration and Profiles Screen
Figure 21 - Silent Print Profile Successfully Registered Message
Figure 22 - Silent Print Settings and Printing Screen
Figure 23 - Reset Silent Print Settings
Figure 24 - Silent Printing Screen Select Profile Button
Figure 25 - Silent Print Profile Selected
Figure 26 - Edit Print Profile Button
Figure 27 - Edit Silent Print Profile
Figure 28 - Edit Silent Print Profile Fields Description
Figure 29 - Open Print Harvester Settings
Figure 30 - Print Harvester Settings Screen
Figure 31 - Print Harvester Scan Settings
Figure 32 - Print Harvester Response Settings
Figure 33 - Print Harvester Printing Settings
Figure 34 - Silent Print Profile ID
Figure 35 - Enter Profile ID in Print Harvester
Figure 36 - Copy Import Profile ID
Figure 37 - Enter Import Profile ID in Print Harvester
Figure 38 - Run and Pause Print Harvester
Figure 39 - Print Harvester Application Log
Figure 40 - Download Example CSV File for Bulk Mailing Template
Figure 41 - Silent Print Start Polling Selected
Figure 42 - Import File in Scan Folder
Figure 43 - Import File Successfully Processed and Moved to Response Folder
Figure 44 - Error File Created in Response Folder
Figure 45 - Error Response File
Figure 15 - Silent Print application in Uninstall or Change a Program list
Introduction
The Print Harvester and Silent Printing functionality in Intelligent Shipper provides "on demand" file processing by automating file import and label printing. This functionality allows you tell the system where your order files are posted to so that they can be picked up by the system, processed automatically and the required labels printed automatically, without needing any manual input from the user.
This user guide explains how to configure the Intelligent Shipper system, Print Harvester and Silent Print applications to use this automated file import and printing process.
Process Diagram – Configuring Print Harvester and Silent Printing
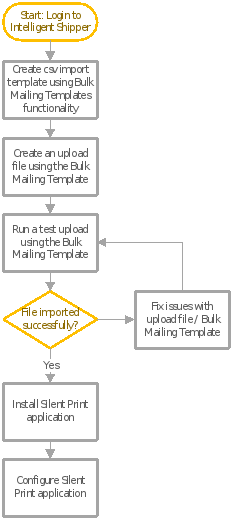
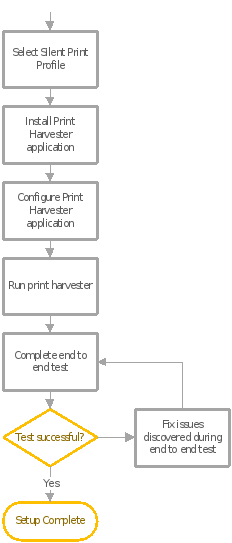
The diagram below shows the process for configuring the Intelligent Shipper Print Harvester and Silent Printing functionality. The steps in this diagram are described in more detail throughout the document.
Continued on next page
Create CSV Import File
To configure the Intelligent Shipper system for automated file import and label printing, you will first need to create an import file in csv format. This can be done using the Bulk Mailing Template functionality in Intelligent Shipper.
- To create a new Bulk Mailing Template, login to Intelligent Shipper and navigate to Maintenance > Bulk Mailing Templates.
- Click "Add Template". This will then take you to the Add Bulk Mailing Template screen.
Create Bulk Mailing Template
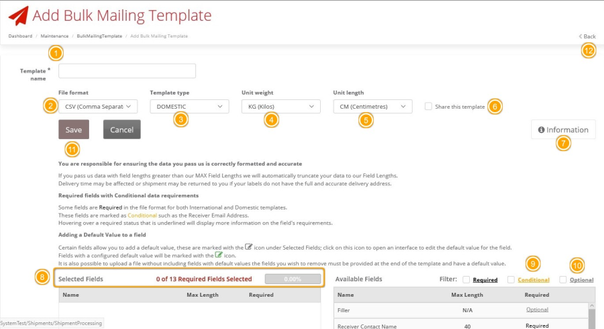
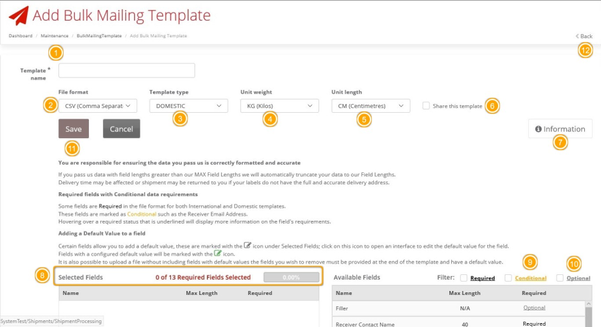
Figure 1 - Add Bulk Mailing Template
To create a new template, complete the following steps in the Add Bulk Mailing Template screen:
- Enter a template name – this is a required field
- The sample file can be downloaded in the formats: CSV (Comma Separated), PIPE Separated and ASCII fixed length. Select CSV from the File Format drop-down list.
- Select the required template type from the 2 available options:
- Domestic
- International
Note: The International template has extra required fields.
- Select the Unit Weight from the 2 available options:
- KG(Kilos)
- G(Grams)
- Select the Unit Length from the 2 available options:
- CM(Centimetres)
- MM(Millimetres)
- Tick the "Share this template" box, as the template will need to be shared for it to work with the Printer Harvester application. This will make the template available to other users under your customer account.
- Select the "Information" button to display instructions on adding fields to the template. The section Selecting fields for the Bulk Mailing Template also contains more details on selecting fields for the template.
- All required fields must be selected by clicking on the field in the Available Fields list – this will move the field over to the Selected Fields list. A progress bar indicates if all required fields have been selected. This bar must be at 100% before a template can be saved.
- If a Conditional field is selected, then it will require other fields. I.e. Item Description requires item value and weight.
- Optional fields are truly optional, if they are not selected there is no impact to template functionality.
- A newly created Bulk Mailing Template may be saved once all required fields have been selected. Once you have added all the necessary fields to your Bulk Mailing Template, click "Save" to create the new template.
- Click on the back button to go back the Bulk Mailing Templates screen.
Note: If the "Back" button is selected without the template being saved, then the data will be lost.
Selecting fields for the Bulk Mailing Template
Figure 2 - Field Selection for the Bulk Mailing Template
- From the Available Fields table, as fields are selected these will move across into the Selected fields table.
- All required fields progress bar in the example above is now Green and 100% indicating the template can now be saved.
Adding a default value to a selected field
Figure 3 - Default Values
- A default value can be added by clicking on the icon in the image above. On clicking the icon, the Default Value option appears as below in the Shipment Service example.
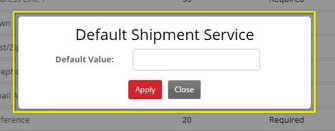
Figure 4 - Default Value for the Shipment Service Field
- You can enter the default value in the field provided. This will then be output as example data when example csv files are downloaded for the template.
Bulk Mailing Templates
Figure 5 - Bulk Mailing Templates
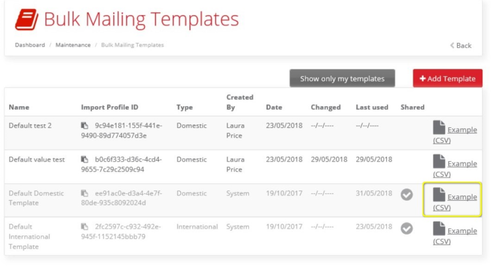
- The recently created template will be displayed on the Bulk Mailing Templates screen. To download a sample file:
- Find your template
- Click on Example (CSV)
Figure 6 - Example CSV (opened with notepad)
- An example csv will be provided that can be updated with your shipments. The csv will contain an example row underneath the header row, and this example row will contain the default values you entered when the template was created.
Test Import of Bulk Mailing Template
Once you have created the Bulk Mailing Template and downloaded an example csv, it is recommended that you import the csv file into Intelligent Shipper manually to test that the file can be imported successfully.
- To run a test import of the csv file, first add a row of test data to the file and save in csv format.
- In Intelligent Shipper navigate to Shipment Processing and Select "Bulk Mailing".
Figure 7 – Bulk Mailing Button
- The Bulk Mailing Screen will open.
Upload New Data File
Figure 8 - Upload New Data File Button
To import your csv file, click on "Upload New Data File" in the Bulk Mailing screen. The Upload New Data File screen will then open:
Figure 9 - Upload New Data File Screen
In the Upload New Data File screen:
- Enter a Project Name. This field is not required, but if provided the project name will be displayed on the Dashboard->Shipment Processing->Bulk Mailing where you can download the labels generated.
- Browse the file to be uploaded.
- If an email address is provided, then an email notification will be sent confirming the file was successfully processed.
- If the file has headers, select the 'Headers' tick box.
- Select the Bulk Mailing template created earlier.
- The Upload Type can be either Unprocessed or Bulk Mailing, explained below. For the purpose of testing the file import, select Bulk Mailing.
- Unprocessed - If you choose this option then labels will not be generated. These shipments can be scanned later to produce labels.
- Bulk Mailing - If this option is selected then shipments will be processed, and labels will be produced on upload.
- Click on "Upload file".
Data File does match the Upload Template
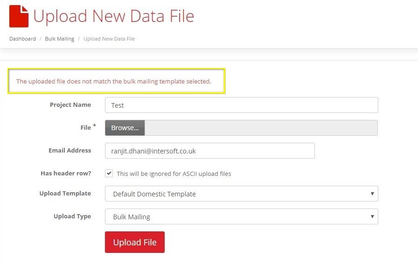
Figure 10 - Upload file does not match error
- On clicking upload file, if the file chosen does not match the Upload template, an error is returned, "The uploaded file does not match the bulk mailing template selected." In this scenario, you can:
- Select the correct template for your file
- Update your file to match the template
- Add a new Bulk Mailing Template
Bulk Mailing File Contains Errors
Figure 11 - Errors on Data File
- If the import file contains some errors, the message "Your file has some errors. You can download errors and abort uploading or continue processing successful records" will be displayed. Click on "Download errors" to download the file detailing the list of errors encountered.
- Click on "Continue processing successful records" to process records that were successfully uploaded.
Figure 12- Error Column on Data file
- The errors file that is downloaded contains the data entered in the import file and includes a column at the end describing the errors that prevented the data from being processed.
- Update the import file to correct the errors stated in the errors file, then upload the import file again.
File Successfully Processed to Bulk Mailing
- If the Bulk Mailing import file does not contain any errors, then the file will be imported successfully and added to the list of uploads in the Bulk Mailing screen:
Figure 13 - Print Labels from Bulk Mailing Screen
- From here it is possible to print/download the labels generated by clicking the printer/agent icon. For the purpose of testing the import file, you do not need to download and print the label.
Label Options
The Intelligent Shipper system contains various label designs for you to choose from, ranging from standard thermal labels to labels integrated as part of an A4 document.
- To select your label options, log into Intelligent Shipper then select Maintenance > Label Options.
- The Label Options screen will then be displayed for you to select your preferred label settings.
Configuring Label Options
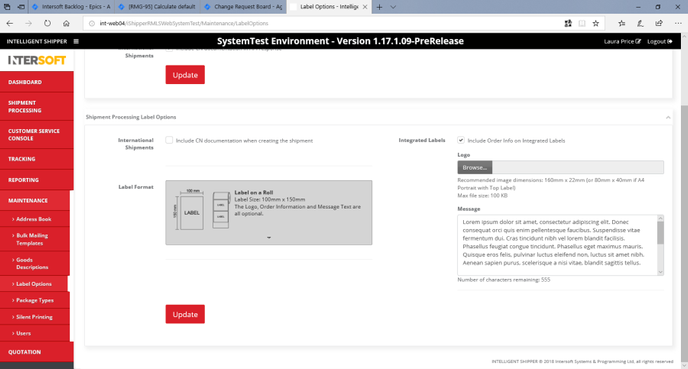
Figure 14 - Label Options Screen
- Select the "Label on a roll" option from the Label Format list. This label format is required for use with the Print Harvester application.
- The "Update" button saves your label format selection.
Silent Printing
The Silent Printing functionality allows for the fully automated production of shipping labels and associated documents by printing to the necessary printers automatically when a shipment is created.
Pre-requisites
To run the Silent Print application successfully the below requirements will need to be met:
- PC running Windows 7 or above
- An x64-capable processor
- 20 megabytes (MB) of available hard disk space
- 2 GB or more of RAM.
- A monitor with a resolution of 1024 × 768 or higher
- Internet access (HTTPS port 443)
- Access to either a physical or network printer
To install the Intersoft Silent Print application you will need Administrator privileges on your PC.
Installing Silent Print Application
- To install the Silent Print application, log into Intelligent Shipper and select Maintenance > Silent Printing > then click the "Download Silent Print Application" button.
Note: This button will only be displayed for Customer Administrator users.
Figure 15 - Download Silent Print Application Button
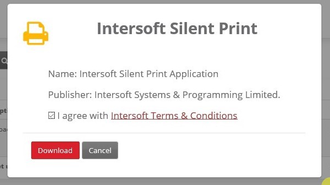
- The Silent Print download window will be displayed. You will need to tick the "I agree to Intersoft Terms & Conditions" box to download the Silent Print application.
Figure 16 - Silent Print Download Window
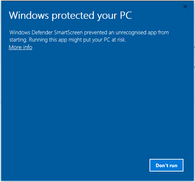
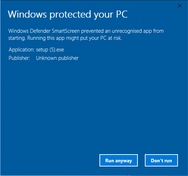
- Windows may display a message regarding Windows Defender which has prevented the download. If this message is displayed, then you will need to select the "More Info" link to proceed.
Figure 17 - Windows Defender Message
- Click "Run Anyway" to proceed with installing the Silent Print application. This will download the application and install it on your PC.
Figure 18 - Run Silent Print Installation
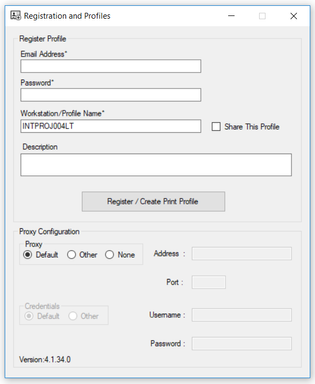
- Once the application has been downloaded a small icon will appear in the icon task bar and the Silent Print Registration and Profiles screen will open automatically.
Figure 19 - Silent Print Icon
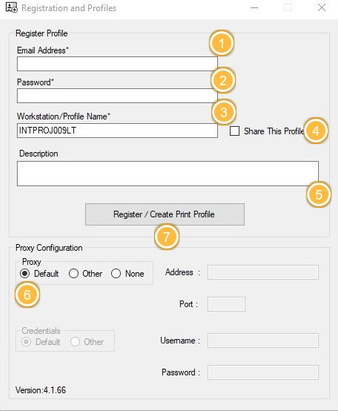
Figure 20 - Silent Print Registration and Profiles Screen
Configure Silent Print Application
Once the Silent Print application has been installed, you will then need to configure the application in the Registration and Profiles screen. This will create a Silent Print Profile that is then available for selection in the Intelligent Shipper application.
- In the Email Address field enter the email address that you use to login to Intelligent Shipper.
- In the Password field enter the password that you use to login to Intelligent Shipper.
- Workstation/Profile Name will be displayed in the Intelligent Shipper Silent Printing maintenance screen to identify the silent print profile. This will be populated with the name of your PC by default but can be changed to a name of your choice.
- Share This Profile makes the silent print profile available in Intelligent Shipper to all users under your customer account. If you want the silent print profile to be available to other users, then tick this box.
- Description allows you to enter a description for the profile. The description will be displayed in the Intelligent Shipper Silent Printing maintenance screen.
- Proxy Configuration allows you to set up proxy details. The Default option will be selected by default, you can change this and enter other proxy details if needed.
- Once all details have been completed then select "Register / Create Print Profile".
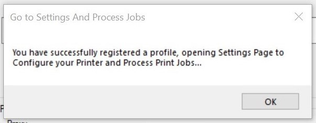
- A message will be displayed informing you the Silent Print profile has been successfully registered. Click "OK" on this message to proceed.
Figure 21 - Silent Print Profile Successfully Registered Message
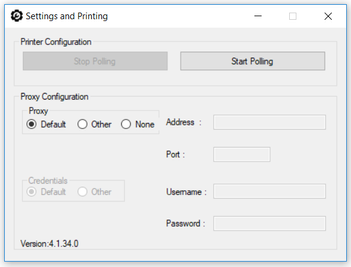
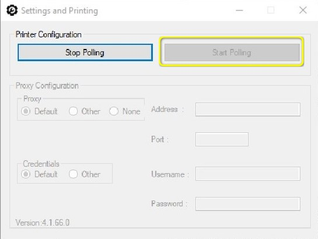
- The Settings and Printing window will then open. To start the application looking for print jobs select "Start Polling". The application will then start looking for print jobs and automatically print any labels that are generated and associated documentation (where applicable).
Figure 22 - Silent Print Settings and Printing Screen
Reset Settings
- Silent print settings can be reset at any time by right-clicking on the silent print icon on the task bar and then selecting "Reset Settings".
Figure 23 - Reset Silent Print Settings
- A confirmation message will be displayed prompting you to confirm you want to reset settings.
- If you select Yes on this message, the Registration and Profiles screen will be cleared ready and you will be able create a new silent print profile.
Selecting Silent Print Profile in Intelligent Shipper
Once a Silent Print profile has been created, you can select it as your chosen print profile in Intelligent Shipper.
- To select the new Silent Print profile, log into Intelligent Shipper and navigate to Maintenance > Silent Printing.
- The profile you created in the previous section will be listed, and the Creation date will display the current date.
- If your Silent Print profile is not displayed in the print profiles list, then go back into the Silent Print application and stop and restart polling. This will refresh the printer profile list in the Silent Printing maintenance screen.
- To select the Silent Print profile as your chosen printing profile, click the "Select Profile" button.
Figure 24 - Silent Printing Screen Select Profile Button
- The "Select Profile" button will then be replaced with a green tick to show that the profile has been selected as your chosen printing profile.
Figure 25 - Silent Print Profile Selected
Edit Silent Print Profile
You can update the printer selection or printer profile description for your Silent Print profile by editing the profile.
- To edit your Silent Print profile, in Intelligent Shipper navigate to Maintenance > Silent Printing then select "Edit Profile".
Figure 26 - Edit Print Profile Button
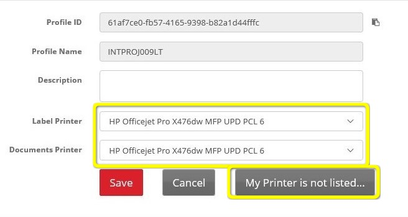
- The Edit Profile screen will open, containing the fields listed below.
Figure 27 - Edit Silent Print Profile
Field name |
Description |
|---|---|
Profile ID |
Unique ID that will be assigned to a profile |
Profile Name |
The Silent Print Application takes by default the user's computer name as profile name. This name can only be changed when Registering/Creating a Print Profile (Please refer to Silent Printing Configuration Manual). |
Description |
This field is used to add a Description for a Silent Print Profile |
Label Printer |
Printer that will be used to print labels with CN Documentation |
Document Printer |
Printer that will be used to print Manifest |
Figure 28 - Edit Silent Print Profile Fields Description
- You can change the printers that are used for printing labels and documents by selecting any printer on your network from the drop-down lists in these fields and clicking "Save".
- If the printer you want to select is not included in the drop-down lists, then select the "My Printer is not listed" button for further instructions.
Print Harvester
The Print Harvester functionality allows you to relay shipment details by transferring data files from a computer or network location to Intelligent Shipper for automatic processing and creation of shipments.
Installing Print Harvester
- To install the Print Harvester application, you will first need to download the executable file.
- To download Print Harvester for use in the Sandbox environment, select the following link: {+}https://test.intelligentshipper.net/downloads/releases/printharvester/setup.exe+
- To download Print Harvester for use in the Live environment, select the following link: https://rmls.intelligentshipper.net/downloads/releases/printharvester/setup.exe
- When prompted, select to run the executable file.
- The executable will run and the Print Harvester application will be installed on your PC.
- Once Print Harvester is installed the settings screen will open automatically, allowing you to configure the application.
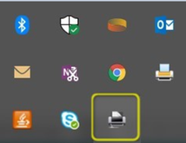
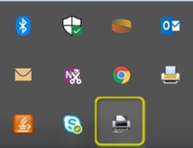
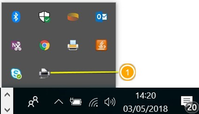
- The settings screen can also be opened at any time by right-clicking on a small icon that will appear in the system tray, as shown in the picture below.
|
|
Figure 29 - Open Print Harvester Settings
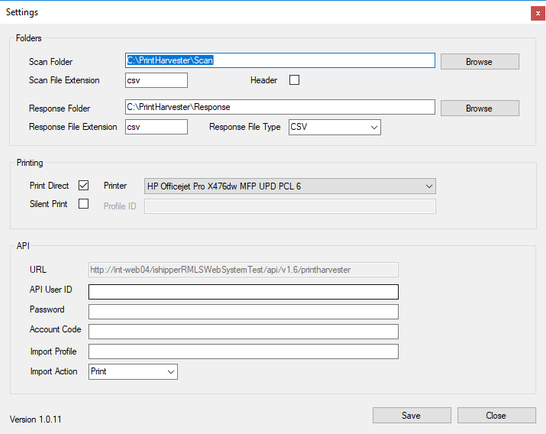
- Once Print Harvester is installed, or when the Settings option is selected, the Settings screen will open.
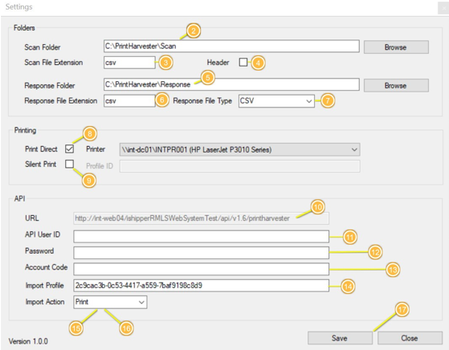
Figure 30 - Print Harvester Settings Screen
Configuring Print Harvester
Once the Print Harvester application has been installed you then need to configure your settings.
Scan Settings
- When the application is installed, it creates default scan & response folders on the local system, e.g. "C:\PrintHarvester\Scan". You can use this default location or change the scan folder to a location of your choice by selecting "Browse".
- The application accepts files in all the formats applicable in bulk mailing, i.e. csv, pipe & ascii. The extension csv is automatically populated by default. Do not change the setting from the default, as this is the extension of the Bulk Mailing Template created earlier.
- If the files you will be importing contain a header row, then select the "Header" tick box.
Figure 31 - Print Harvester Scan Settings
Response Settings
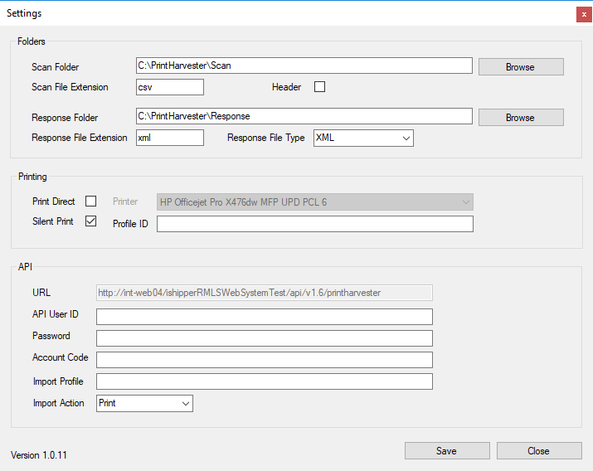
- Base64 encoded PDF images of the labels generated from the scanned file will be written to the Response Folder. You can either use the default location or choose a folder or your choice by selecting "Browse".
- The label can be returned as either an xml or json response. Select your preferred response file type from the Response File Type drop-down list, then update the Response File Extension to match the selected file type.
Figure 32 - Print Harvester Response Settings
Printing Settings
There are 2 print options available to select form:
- Print Direct: This option requires you to click a button for labels to be printed. Your current printer settings will be populated in this field by default.
- Silent Print: This option will automatically print labels once they are generated, reducing mouse clicks. When this option is selected, the system will silent print the labels as per the preference selected in the silent print profile.
Figure 33 - Print Harvester Printing Settings
- Tick the Silent Print box.
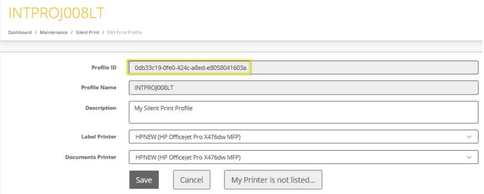
- To find your Silent Print profile ID, in Intelligent Shipper navigate to Maintenance > Silent Print > Edit Print Profile. Your Silent Print profile ID will then be displayed on screen, as shown in the image below.
Figure 34 - Silent Print Profile ID
- Copy the Silent Print profile ID, then paste it into the Profile ID field in the Print Harvester Settings screen.
Figure 35 - Enter Profile ID in Print Harvester
API Information
This section will store all the data needed to connect to Intelligent Shipper.
- The URL field will be populated by default and cannot be changed.
- API UserID, Password and Account Code will be provided by Intersoft. If you do not already have API credentials or need additional information, please contact techsupport@intersoft.co.uk .
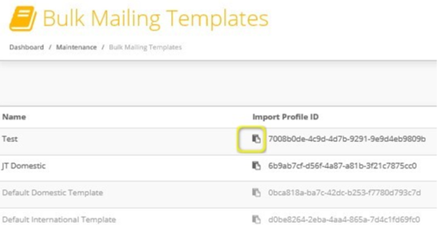
- Import Profile ID can be found in the Intelligent Shipper Bulk Mailing Templates screen. Navigate to Maintenance -> Bulk Mailing Templates and click the icon next to Import Profile ID to copy the profile ID.
Figure 36 - Copy Import Profile ID
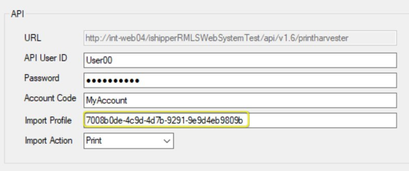
- Paste the import profile ID into the import Profile field of the Print Harvester settings screen.
Figure 37 - Enter Import Profile ID in Print Harvester
- Select your preferred import action from the 2 available options:
- Print: This option will print labels generated from the scanned data file.
- Create: This option will create shipments in Intelligent Shipper's unprocessed state. The shipments will then need to be scanned for the labels to be generated.
- Once the configuration has been completed click "Save".
Run Print Harvester
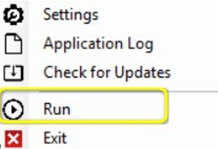
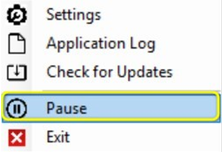
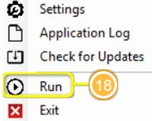
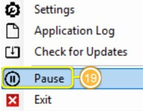
- To start transferring files, right-click on the Print Harvester Application icon and then click "Run".
- To Pause file transferring click "Pause". To resume file transfer after pausing click "Run" again.
|
|
|
Figure 38 - Run and Pause Print Harvester
Application Log
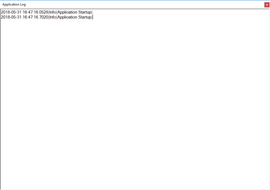
This window will keep a log of the days when the Print Harvester application has run.
- To open the application log right-click on the Print Harvester Application icon, and then click on "Application Log".
- The Application Log window is then displayed.
Figure 39 - Print Harvester Application Log
End to End Test
Once you have completed the steps above, it is recommended that you complete and end to end test before importing any live data to ensure your settings are all working as expected.
To complete an end to end test of your Intelligent Shipper configuration, follow the steps below.
- Login to Intelligent Shipper and Select Maintenance > Bulk Mailing Templates.
- Choose the template you want to use for the test and select "Example CSV". The Bulk Mailing Template will then be downloaded in csv format.
Figure 40 - Download Example CSV File for Bulk Mailing Template
- Open the example csv file download. Enter at least two rows of test data then save the file.
- Open the Silent Print application and ensure that the "Start Polling" button is selected.
Figure 41 - Silent Print Start Polling Selected
- Right click on the Print Harvester icon and select "Run".
- In Windows Explorer, navigate to the location set as the Scan Folder in the Print Harvester Settings screen.
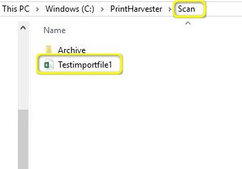
- Take a copy of the test file created in step 3 and save it in the Scan Folder location.
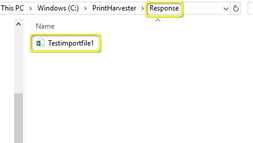
- The file will be imported by Intelligent Shipper and moved from the Scan Folder to the location set as the Response Folder.
Figure 42 - Import File in Scan Folder
Figure 43 - Import File Successfully Processed and Moved to Response Folder
- A shipment will be created for each order reference in the import file. Labels for each shipment and any CN documentation (if applicable) will be automatically printed to the printer(s) selected in the Silent Printing maintenance screen. Labels will be printed in the format configured in the Label Options maintenance screen.
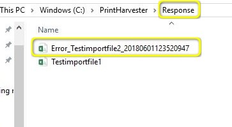
- If the import file is not processed successfully, the that is created in the Response folder will contain "Error" in the filename.
Figure 44 - Error File Created in Response Folder
- Open the error file to see a description of the error(s) that prevented the import from being processed successfully.
Figure 45 - Error Response File
- If you are unsure how to correct the error(s) stated in the error file, then contact
Switching from Test to Live Environment
When switching over from Intersoft's Test environment to the Live environment, you will need to uninstall any test versions of the Silent Print and Print Harvester applications that were installed during testing before downloading and installing the Live version.
Uninstalling the Silent Print and Print Harvester Applications
To uninstall the Silent Print and Print Harvester applications from your PC, complete the following steps:
- Access Control Panel on your PC.
- Select Programs and Features > Uninstall or Change a Program.
- Locate the 'Intersoft Silent Print' and 'Intersoft Print Harvester' applications from the list and uninstall the applications.
Figure 46 - Silent Print application in Uninstall or Change a Program list
- You will now need to remove the temporary files pertaining to Silent Print and Print Harvester from your PC.
- Access the App Data > Local folder on your PC via the following file path:
C:\UsersUser Name\AppData\Local
NOTE: You can also find the App Data folder by searching for %appdata% in file explorer, which will take you to the AppData > Roaming folder, you can then backtrack to the AppData folder and will see Local:
- Within the Local folder, delete the following folders:
- Intersoft_Systems_&_Progr
- SilentPrint
- PrintHarvester
You have now removed the Silent Print and Print Harvester applications from your PC. Silent Print and Print Harvester can be downloaded from and installed again for use with the Live environment.
Appendix 1 – Glossary
Term |
Definition |
Bulk Mailing Template |
A template defining the format to used for bulk import files, which can be used to process up to 250 shipments at a time. |
CSV |
Character separated value – file format where a character, usually a comma, is used to delineate each piece of data. |
Integrated Label |
A label format that includes the label on A4 document along with other configurable information such as retailer logo, retailer message and order details. |
JSON |
JavaScript Object Notation - a text-based data interchange format designed for transmitting structured data. |
Print Harvester |
Intelligent Shipper functionality that imports files from a designated location and automatically creates shipments for the orders within the import file. |
Silent Printing |
Intelligent Shipper functionality that automatically prints labels once they are generated, without needing the user to download or select to print the label. |
TXT |
Text file – file format structured as a sequence of lines of electronic text. |
Unprocessed |
Shipments created in an unprocessed state will not have a label or CN documentation (where applicable) generated. The shipment will need to be scanned in the Shipment Processing screen for the shipment to be processed and the label to be created. |
XML |
Extensible Markup Language - a markup language that defines a set of rules for encoding documents in a format that is both human-readable and machine-readable |
Appendix 2 – Quick Reference Guides
Quick Reference Guide - Add a Bulk Mailing Template
To create a new template, in the Add Bulk Mailing Template screen:
- A template name is required
- The sample file can be downloaded in the formats: CSV (Comma Separated), PIPE Separated and ASCII fixed length
- There are 2 types of template. Domestic and International. International template has extra required fields needed to ship shipments abroad.
- The available Units of weight are: KG(Kilos), G(Grams).
- The available Units of length are: CM(Centimetres), MM(Millimetres).
- The option to share this template with other team members is available.
- The newly created template cannot be saved unless all required fields are selected
- All required fields must be selected. A progress bar indicates if all required fields have been selected. This bar should be at 100% before a template can be saved.
- If a Conditional field is selected, then it will require other fields. I.e. Item Description requires item value and weight
- Optional fields are truly optional, if they are not select there is no impact to template functionality
- A newly created Bulk Mailing Template may be saved once all required fields have been selected
- Click on the back button to go back the Bulk Mailing Templates screen
Quick Reference Guide - Upload New Data File
To upload a Bulk Mailing file, in the Upload New Data File screen:
- Enter a Project Name, this field is not required, but if provided the project name will be displayed on the Dashboard->Shipment Processing->Bulk Mailing where you can download the labels generated.
- Browse the file to be uploaded.
- If an email address is provided, then an email notification will be sent confirming the file was successfully processed.
- If the file has headers, select the 'Headers' tick box.
- Select the Bulk Mailing templated used to create the .CSV file. The uploaded file must match a bulk mailing template in Intelligent Shipper.
- The "Upload Type" can be Unprocessed or Bulk mailing.
- If you have chosen to upload the shipments as Unprocessed - labels will not be generated. These shipments can be scanned later to produce labels.
- If Bulk Mailing is selected then shipments will be processed, and labels will be produced on upload.
- Click on "Upload file".
Quick Reference Guide – Silent Print Application
- Enter a description for the Silent Print Profile (this will be displayed in the Intelligent Shipper Silent Printing screen).
- Select the required proxy configuration. The "Default" option will be selected automatically and can be changed if needed.
- Once values have been entered in all fields select "Register / Create Print Profile". Your Silent Print Profile will be created and available for selection in the Intelligent Shipper Silent Printing screen. In Intelligent Shipper navigate to Maintenance > Silent Printing and select "Download Silent Print Application". Once the application is downloaded the Registration and Profiles screen will open automatically.
To create a Silent Print Profile, complete the following steps: - Enter the email address you use to login to Intelligent Shipper.
- Enter the password you use to login to Intelligent Shipper.
- Enter a profile name for the Silent Print Profile (this will be displayed in the Intelligent Shipper Silent Printing screen). The field will be populated with the name of your PC by default, and you can change this to name of your choice.
- Tick the "Share This Profile" box to make the profile available to other users.
- Clicking "Select Profile" will set the Silent Print profile as your chosen print profile in Intelligent Shipper.
Quick Reference Guide – Print Harvester
|
|
