| Anchor |
|---|
_GoBack | _GoBackCommercial and in Confidence
The information contained in this document is confidential. No part of this document may be reproduced, disclosed to any third party, or issued in any form or by any means without the express written permission of Intersoft Systems & Programming Ltd.
Contents
Document Controls
Table of Figures
1. Introduction
2. Installing Print Harvester
3. Configuring Print Harvester
3.1. Scan Settings
3.2. Response Settings
3.3. Printing Settings
3.4. API Information
4. Run Print Harvester
4.1. Application Log
5. Switching from Test to Live Environment
5.1. Uninstalling the Silent Print and Print Harvester Applications
Appendix 1 – Print Harvester Example Responses
Appendix 2 – Quick Reference Guide Print Harvester
| Anchor |
|---|
| _Toc533172302 |
|---|
| _Toc533172302 |
|---|
|
Table of Figures
Figure 1 - Open Print Harvester Settings
Figure 2 - Print Harvester Settings Screen
Figure 3 - Print Harvester Scan Settings
Figure 4 - Print Harvester Response Settings
Figure 5 - Print Harvester Printing Settings
Figure 6 - Silent Print Profile ID
Figure 7 - Enter Profile ID in Print Harvester
Figure 8 - Copy Import Profile ID
Figure 9 - Enter Import Profile ID in Print Harvester
Figure 10 - Run and Pause Print Harvester
Figure 11 - Print Harvester Application Log
Figure 12 - Silent Print application in Uninstall or Change a Program list
...
| Anchor |
|---|
| _Toc533172303 |
|---|
| _Toc533172303 |
|---|
|
IntroductionThe Print Harvester functionality allows you to relay shipment details by transferring data files from a computer or network location to Intelligent Shipper for automatic processing and creation of shipments.
| Anchor |
|---|
| _Toc533087784 |
|---|
| _Toc533087784 |
|---|
|
| Anchor |
|---|
| _Toc533172304 |
|---|
| _Toc533172304 |
|---|
|
Installing Print Harvester- To install the Print Harvester application, you will first need to download the executable file.
- To download Print Harvester for use in the Sandbox environment, select the following link: {+}https://test.intelligentshipper.net/downloads/releases/printharvester/setup.exe+
- To download Print Harvester for use in the Live environment, select the following link: https://rmls.intelligentshipper.net/downloads/releases/printharvester/setup.exe
- When prompted, select to run the executable file.
- The executable will run and the Print Harvester application will be installed on your PC.
- Once Print Harvester is installed the settings screen will open automatically, allowing you to configure the application.
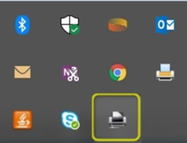
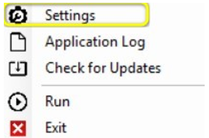
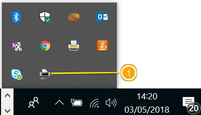
- The settings screen can also be opened at any time by right-clicking on a small icon that will appear in the system tray, as shown in the picture below.
| Anchor |
|---|
| _Toc533087832 |
|---|
| _Toc533087832 |
|---|
|
| Anchor |
|---|
| _Toc533172329 |
|---|
| _Toc533172329 |
|---|
|
Figure 1 - Open Print Harvester Settings- Once Print Harvester is installed, or when the Settings option is selected, the Settings screen will open.
| Anchor |
|---|
| _Toc533087833 |
|---|
| _Toc533087833 |
|---|
|
| Anchor |
|---|
| _Toc533172330 |
|---|
| _Toc533172330 |
|---|
|
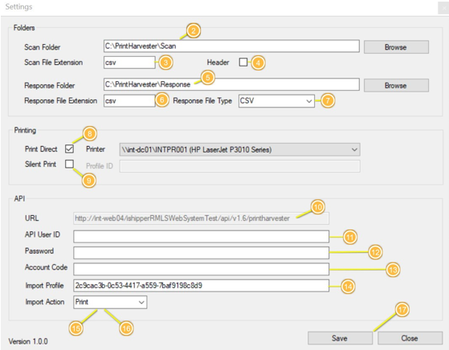
Figure 2 - Print Harvester Settings Screen| Anchor |
|---|
| _Toc533087785 |
|---|
| _Toc533087785 |
|---|
|
| Anchor |
|---|
| _Toc533172305 |
|---|
| _Toc533172305 |
|---|
|
Configuring Print HarvesterOnce the Print Harvester application has been installed you then need to configure your settings.
| Anchor |
|---|
| _Toc533087786 |
|---|
| _Toc533087786 |
|---|
|
| Anchor |
|---|
| _Toc533172306 |
|---|
| _Toc533172306 |
|---|
|
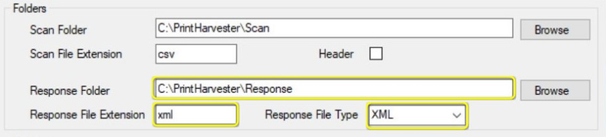
Scan Settings- When the application is installed, it creates default scan & response folders on the local system, e.g. "C:\PrintHarvester\Scan". You can use this default location or change the scan folder to a location of your choice by selecting "Browse".
- The application accepts files in all the formats applicable in bulk mailing, i.e. csv, pipe & ascii.
| Anchor |
|---|
| _Hlk514060715 |
|---|
| _Hlk514060715 |
|---|
|
The extension csv is automatically populated by default. Do not change the setting from the default, as this is the extension of the Bulk Mailing Template created earlier. - If the files you will be importing contain a header row, then select the "Header" tick box.

| Anchor |
|---|
| _Toc533087834 |
|---|
| _Toc533087834 |
|---|
|
| Anchor |
|---|
| _Toc533172331 |
|---|
| _Toc533172331 |
|---|
|
Figure 3 - Print Harvester Scan Settings| Anchor |
|---|
| _Toc533087787 |
|---|
| _Toc533087787 |
|---|
|
| Anchor |
|---|
| _Toc533172307 |
|---|
| _Toc533172307 |
|---|
|
Response Settings- Base64 encoded PDF images of the labels generated from the scanned file will be written to the Response Folder. You can either use the default location or choose a folder or your choice by selecting "Browse".
- The label can be returned as either an xml or json response. Select your preferred response file type from the Response File Type drop-down list, then update the Response File Extension to match the selected file type.
| Anchor |
|---|
| _Toc533087835 |
|---|
| _Toc533087835 |
|---|
|
| Anchor |
|---|
| _Toc533172332 |
|---|
| _Toc533172332 |
|---|
|
Figure 4 - Print Harvester Response Settings| Anchor |
|---|
| _Toc533087788 |
|---|
| _Toc533087788 |
|---|
|
| Anchor |
|---|
| _Toc533172308 |
|---|
| _Toc533172308 |
|---|
|
Printing SettingsThere are 2 print options available to select form:
- Print Direct: This option requires you to click a button for labels to be printed. Your current printer settings will be populated in this field by default.
- Silent Print: This option will automatically print labels once they are generated, reducing mouse clicks. When this option is selected, the system will silent print the labels as per the preference selected in the silent print profile.

| Anchor |
|---|
| _Toc533087836 |
|---|
| _Toc533087836 |
|---|
|
| Anchor |
|---|
| _Toc533172333 |
|---|
| _Toc533172333 |
|---|
|
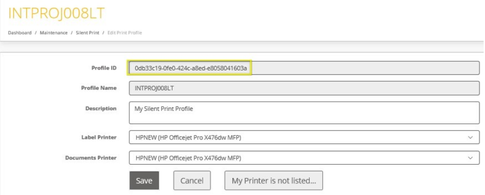
Figure 5 - Print Harvester Printing Settings- Tick the Silent Print box.
- To find your Silent Print profile ID, in Intelligent Shipper navigate to Maintenance > Silent Print > Edit Print Profile. Your Silent Print profile ID will then be displayed on screen, as shown in the image below.
| Anchor |
|---|
| _Toc533087837 |
|---|
| _Toc533087837 |
|---|
|
| Anchor |
|---|
| _Toc533172334 |
|---|
| _Toc533172334 |
|---|
|
Figure 6 - Silent Print Profile ID- Copy the Silent Print profile ID, then paste it into the Profile ID field in the Print Harvester Settings screen.

| Anchor |
|---|
| _Toc533087838 |
|---|
| _Toc533087838 |
|---|
|
| Anchor |
|---|
| _Toc533172335 |
|---|
| _Toc533172335 |
|---|
|
Figure 7 - Enter Profile ID in Print Harvester| Anchor |
|---|
| _Toc533087789 |
|---|
| _Toc533087789 |
|---|
|
| Anchor |
|---|
| _Toc533172309 |
|---|
| _Toc533172309 |
|---|
|
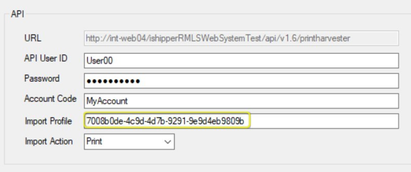
API InformationThis section will store all the data needed to connect to Intelligent Shipper.
- The URL field will be populated by default and cannot be changed.
- API UserID, Password and Account Code will be provided by Intersoft. If you do not already have API credentials or need additional information, please contact techsupport@intersoft.co.uk .
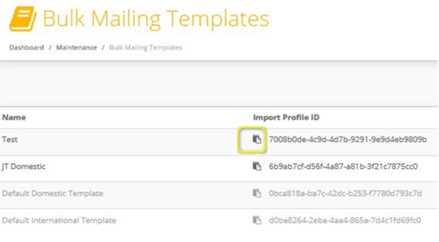
- Import Profile ID can be found in the Intelligent Shipper Bulk Mailing Templates screen. Navigate to Maintenance -> Bulk Mailing Templates and click the icon next to Import Profile ID to copy the profile ID.
| Anchor |
|---|
| _Toc533087839 |
|---|
| _Toc533087839 |
|---|
|
| Anchor |
|---|
| _Toc533172336 |
|---|
| _Toc533172336 |
|---|
|
Figure 8 - Copy Import Profile ID- Paste the import profile ID into the import Profile field of the Print Harvester settings screen.
| Anchor |
|---|
| _Toc533087840 |
|---|
| _Toc533087840 |
|---|
|
| Anchor |
|---|
| _Toc533172337 |
|---|
| _Toc533172337 |
|---|
|
Figure 9 - Enter Import Profile ID in Print Harvester- Select your preferred import action from the 2 available options:
- Print: This option will print labels generated from the scanned data file.
- Create: This option will create shipments in Intelligent Shipper's unprocessed state. The shipments will then need to be scanned for the labels to be generated.
- Once the configuration has been completed click "Save".
| Anchor |
|---|
| _Toc533087790 |
|---|
| _Toc533087790 |
|---|
|
| Anchor |
|---|
| _Toc533172310 |
|---|
| _Toc533172310 |
|---|
|
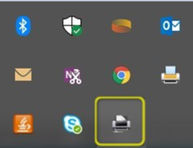
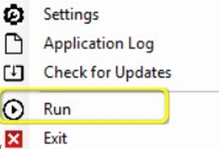
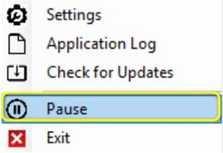
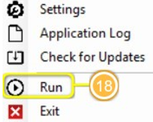
Run Print Harvester- To start transferring files, right-click on the Print Harvester Application icon and then click "Run".
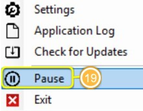
- To Pause file transferring click "Pause". To resume file transfer after pausing click "Run" again.
| Anchor |
|---|
| _Toc533087841 |
|---|
| _Toc533087841 |
|---|
|
| Anchor |
|---|
| _Toc533172338 |
|---|
| _Toc533172338 |
|---|
|
Figure 10 - Run and Pause Print Harvester| Anchor |
|---|
| _Toc533087791 |
|---|
| _Toc533087791 |
|---|
|
| Anchor |
|---|
| _Toc533172311 |
|---|
| _Toc533172311 |
|---|
|
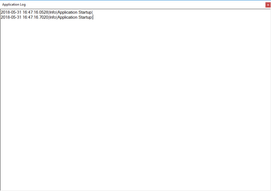
Application LogThis window will keep a log of the days when the Print Harvester application has run.
- To open the application log right-click on the Print Harvester Application icon, and then click on "Application Log".
- The Application Log window is then displayed.
| Anchor |
|---|
| _Toc533087842 |
|---|
| _Toc533087842 |
|---|
|
| Anchor |
|---|
| _Toc533172339 |
|---|
| _Toc533172339 |
|---|
|
Figure 11 - Print Harvester Application Log| Anchor |
|---|
| _Toc533087796 |
|---|
| _Toc533087796 |
|---|
|
| Anchor |
|---|
| _Toc533172312 |
|---|
| _Toc533172312 |
|---|
|
Switching from Test to Live EnvironmentWhen switching over from Intersoft's Test environment to the Live environment, you will need to uninstall any test versions of the Print Harvester application that were installed during testing before downloading and installing the Live version.
| Anchor |
|---|
| _Toc533087797 |
|---|
| _Toc533087797 |
|---|
|
| Anchor |
|---|
| _Toc533172313 |
|---|
| _Toc533172313 |
|---|
|
Uninstalling the Silent Print and Print Harvester ApplicationsTo uninstall the Print Harvester application from your PC, complete the following steps:
- Access Control Panel on your PC.
- Select Programs and Features > Uninstall or Change a Program.
- Locate the 'Intersoft Print Harvester' application from the list and uninstall the applications.

| Anchor |
|---|
| _Toc532917488 |
|---|
| _Toc532917488 |
|---|
|
| Anchor |
|---|
| _Toc533087849 |
|---|
| _Toc533087849 |
|---|
|
| Anchor |
|---|
| _Toc533172340 |
|---|
| _Toc533172340 |
|---|
|
Figure 12 - Silent Print application in Uninstall or Change a Program list- You will now need to remove the temporary files pertaining to Print Harvester from your PC.
- Access the App Data > Local folder on your PC via the following file path:
C:\UsersUser Name\AppData\Local
NOTE: You can also find the App Data folder by searching for %appdata% in file explorer, which will take you to the AppData > Roaming folder, you can then backtrack to the AppData folder and will see Local:
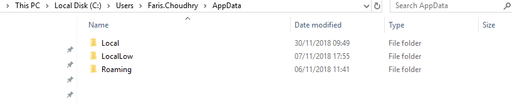
Within the Local folder, delete the following folder:
- Intersoft_Systems_&_Progr > PrintHarvester.exe_URL…
- You have now removed the Print Harvester application from your PC. Print Harvester can be downloaded and installed again for use with the Live environment.
| Anchor |
|---|
| _Toc533172314 |
|---|
| _Toc533172314 |
|---|
|
Appendix 1 – Print Harvester Example Responses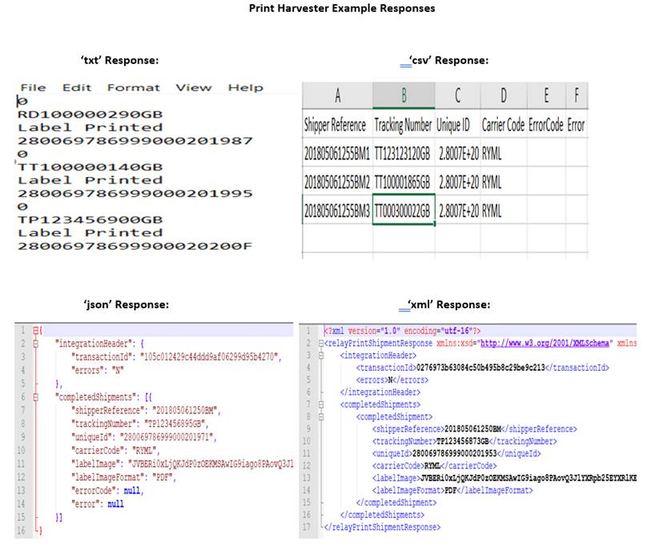
| Anchor |
|---|
| _Toc533172315 |
|---|
| _Toc533172315 |
|---|
|
Appendix 2 – Quick Reference Guide Print Harvester
| - Right-Click on Print Harvester icon and select Settings.
- Select the folder that will contain the file to be transferred.
- Enter the file extension of the file that will be scanned.
- If the file has headers, then tick the Header's option
- Select the folder that will receive the API response.
- Input the extension of the response that will be saved on Response folder.
- The API response can be either XML, CSV, JSON, TXT.
- If Print Direct is selected, then a printer needs to be selected.
- Silent Print will print automatically once the labels are generated.
- API URL, no need to change this field.
- Enter API User ID.
- Enter password.
- Enter Account Code.
- Enter Import Profile.
- Import Action Print will print labels generated.
- Import Action Create will not print labels, this will only create shipments to be processed in Intelligent Shipper.
- Once all settings have been entered, click on save.
- Click on Run to start transferring files.
- To pause file transferring click on "Pause".
|