Intelligent Shipper
Agent Setup Manual
Version 1.0
Document Owner | INTERSOFT Systems and Programming Limited |
Version | 1.0 |
Date | 30/07/2020 |
Description | Instructs System Admins on how to setup and maintain Agents |
Author | Deepa Sankaran |
...
Version | Amendments | Date | Author |
0.1 | Initial Draft | 16/07/2020 | Deepa Sankaran |
0.2 | Updated with review comments | 21/07/2020 | Deepa Sankaran |
1.0 | Final version | 30/07/2020 | Deepa Sankaran |
...
Name | Title | Date Reviewed | Version Reviewed |
Laura Price | Head of Business Analysis | 17/07/2020 | 0.1 |
Beata Brewer | Customer Experience Manager | 29/07/2020 | 0.2 |
...
Document Name
...
Version
...
Location (e.g. Link to Shared Drive, SharePoint etc.)
...
N/A
...
N/A
...
Commercial and in Confidence
The information contained in this document is confidential. No part of this document may be reproduced, disclosed to any third party, or issued in any form or by any means without the express written permission of Intersoft Systems & Programming Ltd.
Contents
1 Document Controls
2 Table of Figures
3 Introduction
4 Setting Up an Agent
4.1 Add Agent
4.2 Update Logo
4.3 Pallet Label
4.4 Agent Contact Details
5 Appendix 1 – Glossary
6 Appendix 2 – Pallet Label Example
| Anchor | ||||
|---|---|---|---|---|
|
Figure 1: Access Agent menu from the maintenance screen
Figure 2: Add Agent via the Agent option in maintenance menu
Figure 3: Agent details screen
Figure 4: Enter Agent Details
Figure 5: Confirmation screen to update tracking URL
Figure 6: Automatic updating of tracking URL
Figure 7: Confirmation required screen to not to update automatic URL
Figure 8: Tracking URL not updated automatically
Figure 9: Add Agent
Figure 10: Newly added Agent displayed in the screen
Figure 11: Logo tab and choose a logo for the Agent
Figure 12: Agent logo updated
Figure 13: Setup address for pallet label
Figure 14: Cancel button in pallet label screen
Figure 15: Select an Agent to add contact details
Figure 16: Add contact for an Agent
Figure 17: Display contact details of the Agent
...
| Anchor | ||||
|---|---|---|---|---|
|
Agents is a functionality in Intelligent Shipper that allows System Administrators to setup the carriers that will be available in the system. This manual instructs system admin users on how to create an Agent, add a logo, set up a pallet label and add contacts for the Agent.
| Anchor | ||||
|---|---|---|---|---|
|
| Anchor | ||||
|---|---|---|---|---|
|
| Anchor | ||||
|---|---|---|---|---|
|
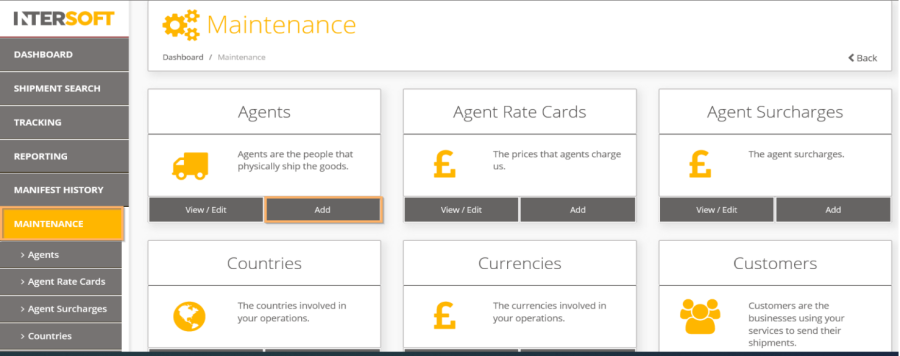
Agents are those that physically ship the goods. To add an Agent, you must first navigate to the Agent screen via the Maintenance functionality.
To do this:
- Navigate to the "Maintenance" on the left pane menu.
- Click "Maintenance"
- Click "Add" button of from the Agent menu
| Anchor | ||||
|---|---|---|---|---|
|
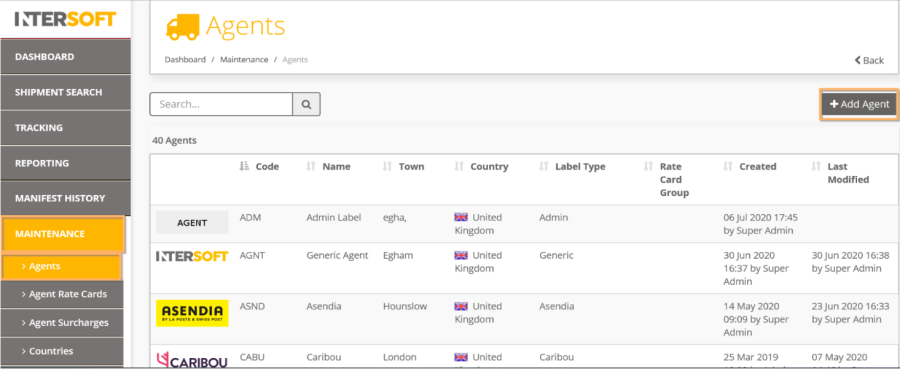
- You can also access the "Add Agent" via the "Agents" option in the maintenance menu.
| Anchor | ||||
|---|---|---|---|---|
|
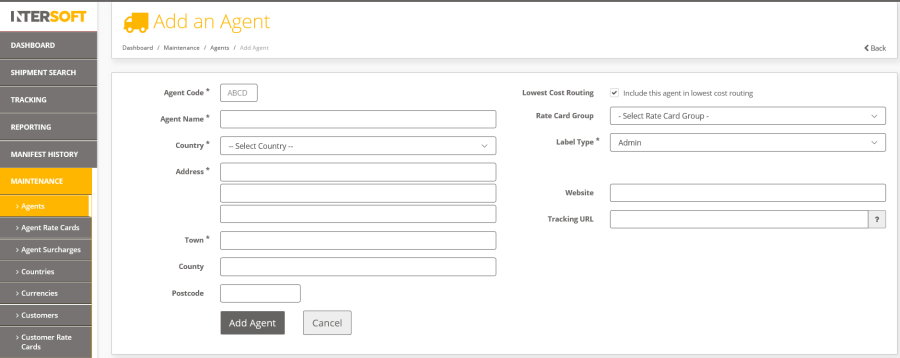
- Once the "Add Agent" is clicked this will display an Agent screen as shown below.
| Anchor | ||||
|---|---|---|---|---|
|
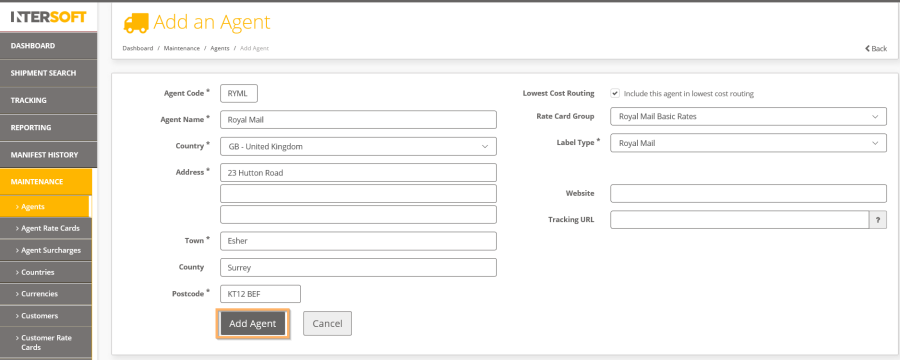
- Populate the fields with the Agent's details. An Agent is required to be setup for each carrier that customers will be shipping with. Multiple Agents can be setup per carrier if needed
e.g. one Agent for high volume shipments and one for standard shipments. 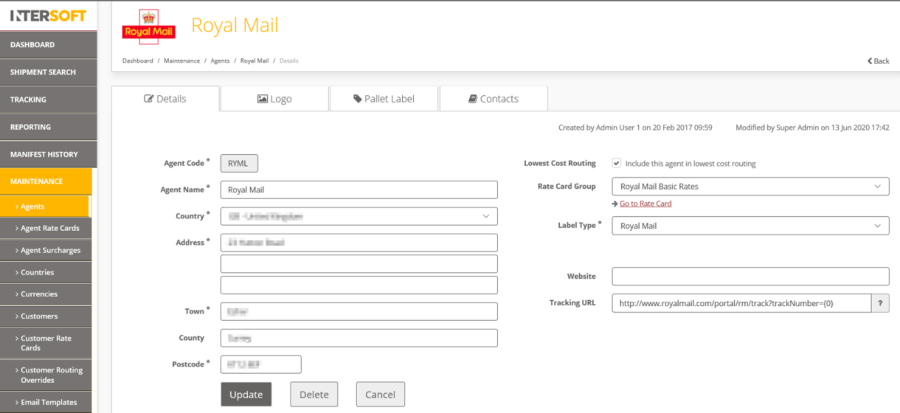
| Anchor | ||||
|---|---|---|---|---|
|
The fields are described in the table below:
Field Name | Description | Optionality (M/C/O) | Validation Rules |
|---|---|---|---|
Agent Code | Define a unique identifying code for the Agent. This will be displayed in the system alongside Agent name everywhere when Agent details are displayed. Agent code cannot be changed once the Agent is added and saved. | Mandatory | Maximum 4 alphanumeric characters. |
Agent Name | Name of the Agent | Mandatory | Maximum 100 alphanumeric characters. |
Country | Select the country the Agent is based in from the drop-down list. | Mandatory | Selection from drop-down list. |
Address | Enter the Agent's main address. | Mandatory | Must be in a valid email format e.g. name@customer.co.uk |
Town | Enter the town of the Agent's main address. | Mandatory | Maximum 30 alphanumeric characters. |
County | Enter the county or state of the Agent's main address. The field name will display as "County" or "State" or "State/Territory" depending on the country selected. E.g. if country is "Australia", it will display as "State/Territory". | Optional | Maximum 50 alphanumeric characters. |
Postcode | Enter the postcode of the Agent's main address. The field name will display as "Zip code" for certain countries e.g. USA. | Mandatory | Maximum 10 characters. |
Lowest Cost Routing | Tick this option if the Agent should be included in lowest cost routing calculations. This should only be used if pricing functionality is being used in the system. | Optional | Tick or un-tick this box. |
Rate Card Group | If a rate card needs to be used for the Agent, then choose a rate card from the list. This is applicable only if pricing is being used in the system. | Conditional | Selection from drop-down list. |
Label Type | Choose a label to apply for the Agent. This field will contain a list of integrations available in the system and sets the carrier integration that will be used for shipments for that Agent. Most of the label type will correspond to a specific carrier label. There are few label types that are used for specific reason.
| Mandatory | Selection from drop-down list. |
Account Number | Agent's assigned account number. If the label type is chosen as "generic label", then a carrier account number will be required. | Mandatory | Maximum 10 characters. |
Website | Enter the Agent's website link. | Optional | Maximum 80 characters. |
Tracking URL | The carrier's tracking link will be updated automatically based on the label type chosen. The link can be manually edited too. This will be used on the Tracking page, to provide a link through the carrier's tracking page for more detailed tracking information. | Optional | Maximum 300characters. |
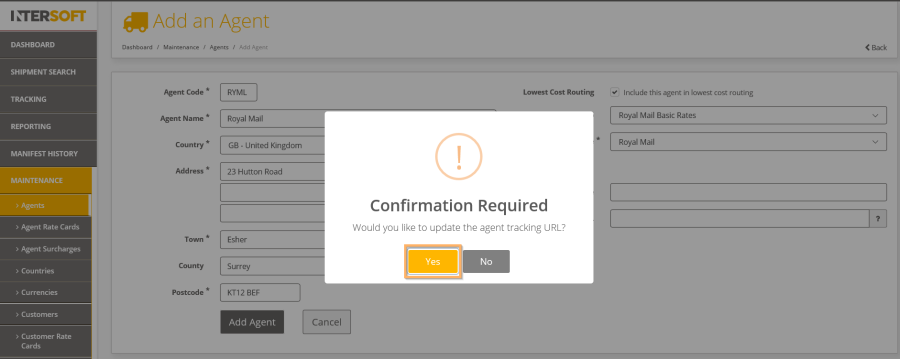
- When you select a label type from the drop-down, a prompt will be displayed to confirm if you want the tracking URL to be updated for the Agent.
- Select "Yes". On selecting "Yes", the tracking link will be updated automatically based on the label type chosen. The link can be manually edited, and this will be used on the tracking page.
| Anchor | ||||
|---|---|---|---|---|
|
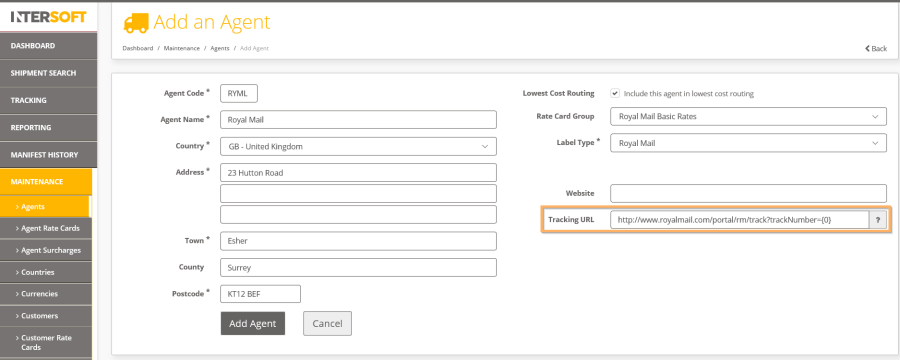
- The tracking URL for the label type chosen will updated as below.
| Anchor | ||||
|---|---|---|---|---|
|
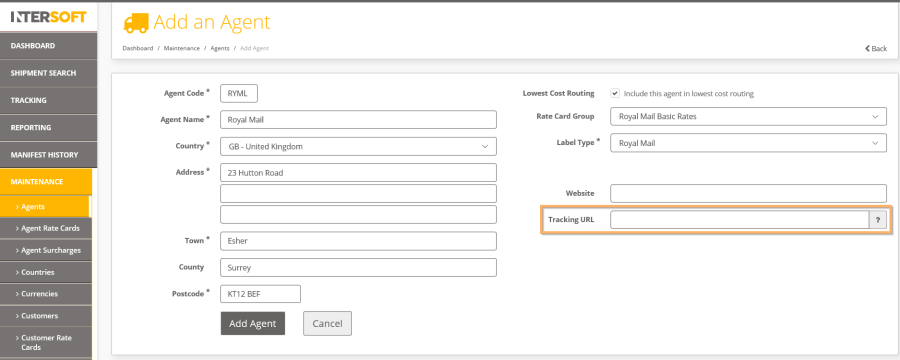
- On clicking "No", the tracking URL will not get updated.

| Anchor | ||||
|---|---|---|---|---|
|
- An empty tracking URL will be displayed. You can update this URL manually.
| Anchor | ||||
|---|---|---|---|---|
|
- Once the screen has been populated with the Agent's details, click "Add Agent" button to add the Agent to the system.
| Anchor | ||||
|---|---|---|---|---|
|
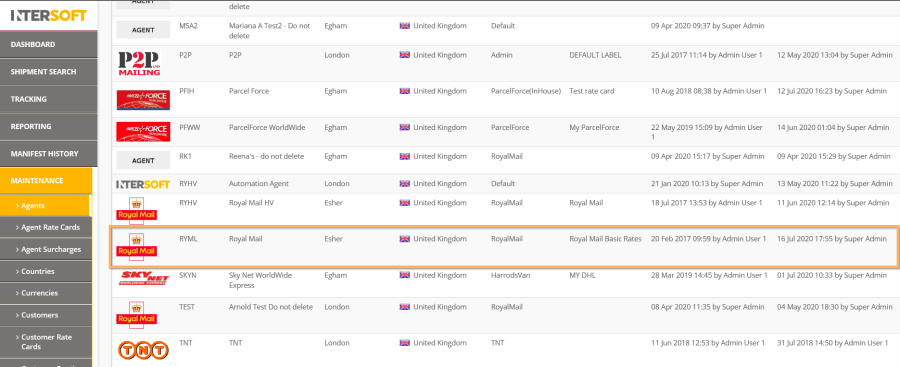
- You can now see the added Agent, as shown below.
| Anchor | ||||
|---|---|---|---|---|
|
| Anchor | ||||
|---|---|---|---|---|
|
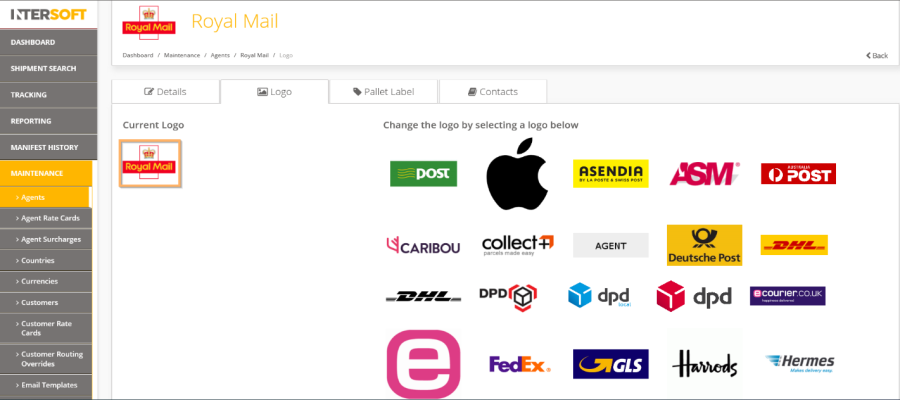
Once the Agent is added, you can add a logo to the Agent via the "Logo" tab.
- To do this, access the logo and select the required logo from the right-hand side, as highlighted below. The logos used here are the logos of the carrier integrations available in the system.

| Anchor | ||||
|---|---|---|---|---|
|
- The logo for the Agent is updated as shown below.
| Anchor | ||||
|---|---|---|---|---|
|
| Anchor | ||||
|---|---|---|---|---|
|
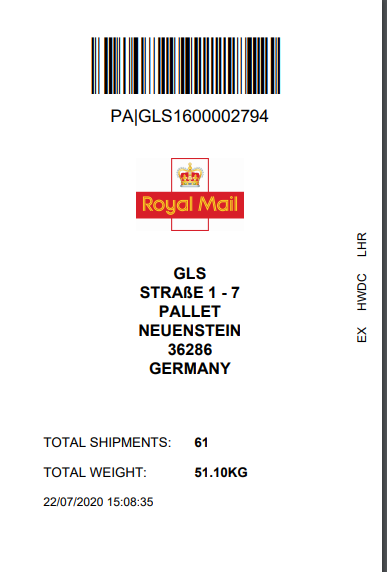
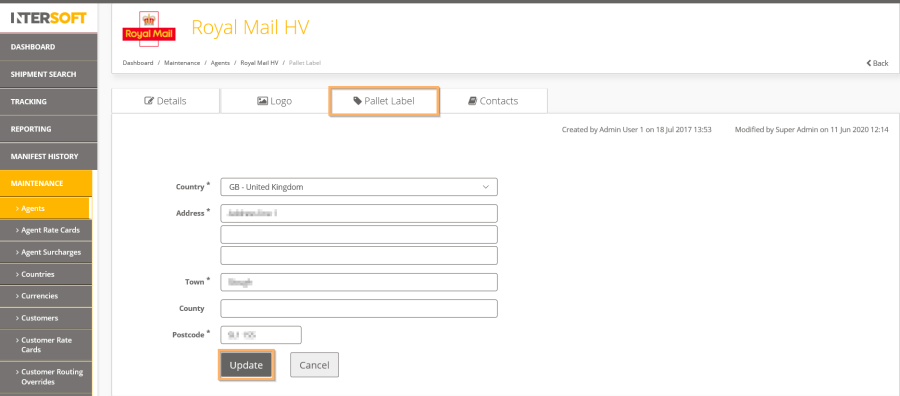
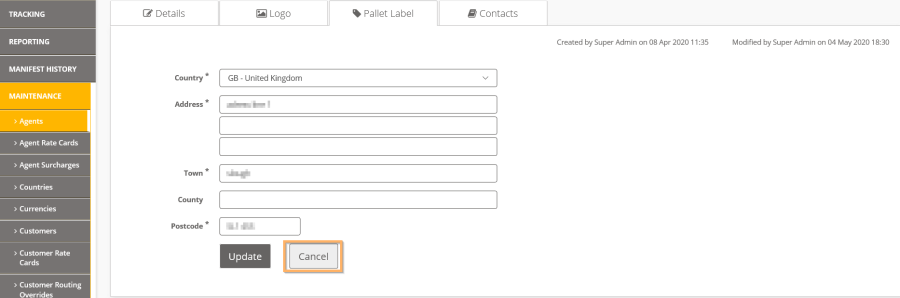
A pallet label address can be setup for an Agent. If the depot scanning functionality of the system is used, and if an Agent has an address setup for a pallet label, then on closing the pallet, a pallet label will be produced with the address setup here. An example of pallet label is provided in Appendix 2
- You can add this address by navigating to the pallet label menu.
- Once the address is entered, click "Update" and the address will be updated.
| Anchor | ||||
|---|---|---|---|---|
|
- On clicking on the "cancel" button, you will be directed to the previous screen.
| Anchor | ||||
|---|---|---|---|---|
|
| Anchor | ||||
|---|---|---|---|---|
|
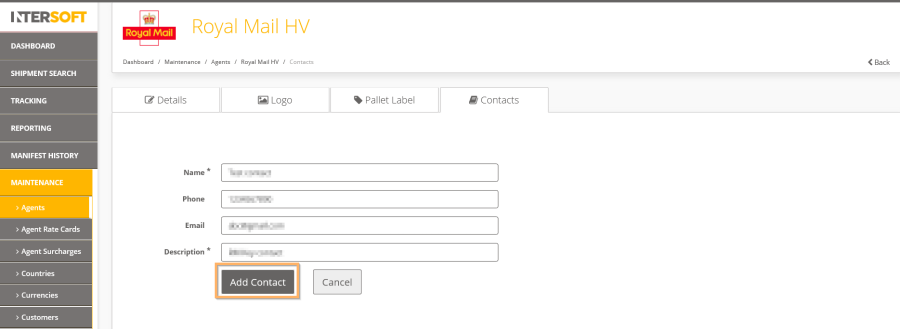
An Agent contact can be added for an Agent once the Agent is created. The contact added here is only used for reference and can be used by the customer for support purposes.
- To add a contact, navigate to the required Agent.

| Anchor | ||||
|---|---|---|---|---|
|
- Click on the contact tab of the Agent.
- Enter the Agent details like name, phone, etc...
- Click "Add Contact"
| Anchor | ||||
|---|---|---|---|---|
|
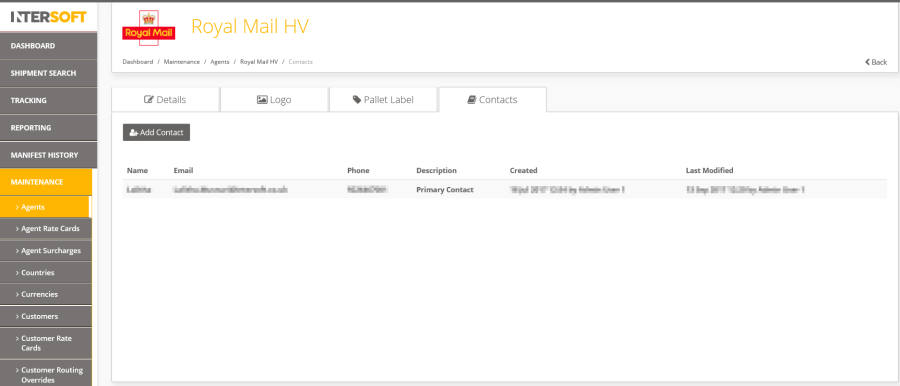
- Once added, the contact details are displayed as per the example below.
| Anchor | ||||
|---|---|---|---|---|
|
| Anchor | ||||
|---|---|---|---|---|
|
Term | Definition |
|---|---|
System Administrator User | Administrator who will be setting up and maintaining the system. This user role will not be assigned to a customer account and so will be able to view data for all customer accounts in the system. |
Rate card | Rate card is a functionality in the system which is available for system admin users to setup pricing for Agents or customers. The price that is set in the rate card will be used in the calculation of shipment pricing. |
Lowest cost routing | Lowest cost routing uses the pricing setup in Agent Rate Cards to find the lowest cost agent to deliver a shipment. If an agent has been set to use lowest cost routing, then it will be included in lowest cost routing calculations. |
| Anchor | ||||
|---|---|---|---|---|
|
| Anchor | ||||
|---|---|---|---|---|
|