Intelligent Shipper
Chute Scanning Manual
Version 1.0
Document Owner | INTERSOFT Systems and Programming Limited |
Version | 1.0 |
Date | 30/07/2020 |
Description | Instructs Depot users how to configure lanes, chutes and pallets for scanning and scan shipments to a chute |
Author | Mujeeb Mohammad |
...
Version | Amendments | Date | Author |
0.1 | Draft | 21/07/2020 | Mujeeb Mohammad |
0.2 | Updated feedback from Peer review | 23/07/2020 | Mujeeb Mohammad |
1.0 | Final version | 30/07/2020 | Mujeeb Mohammad |
...
Name | Title | Date Reviewed | Version Reviewed |
Laura Price | Head of Business Analysis | 22/07/2020 | 0.1 |
Chris Ash | Test Analyst | 28/07/2020 | 0.2 |
...
Document Name
...
Version
...
Location (e.g. Link to Shared Drive, SharePoint etc.)
...
N/A
...
N/A
...
Commercial and in Confidence
The information contained in this document is confidential. No part of this document may be reproduced, disclosed to any third party, or issued in any form or by any means without the express written permission of Intersoft Systems & Programming Ltd.
Contents
1 Document Controls
2 Table of Figures
3 Introduction
4 Create Lane
4.1 View/Edit/Delete Lane
5 Create Chute
5.1 View/Edit Chute
6 Create Pallet
6.1 View/Edit/Delete Pallet
7 Scanning – Manual Scan
8 Chute Close Out
9 Appendix 1 – Glossary
Table of Figures
Figure 1: Chute Scanning - Lanes
Figure 2: Add a Lane
Figure 3: Lane created
Figure 4: Edit Lane
Figure 5: Edit Lane – Details
Figure 6: Delete Lane
Figure 7: Add Chute
Figure 8: Create Chute
Figure 9: Create Chute - Select Agent
Figure 10: Change Agent
Figure 11: Select Service
Figure 12: Change Service
Figure 13: Edit chute
Figure 14: Chute Barcode
Figure 15: Pallets Screen
Figure 16: Add Pallet
Figure 17: Add Pallet - Select Agent
Figure 18: Add Pallet - Change Agent
Figure 19: Pallet
Figure 20: Edit Pallet
Figure 21: Delete Pallet
Figure 22: Delete Pallet - Confirmation Message
Figure 23: Manual Scan - Chute Scanning
Figure 24: Chute Scanning
Figure 25: Chute Scan - Single Package Shipment
Figure 26: Chute Scan - Multi Package Shipment - Split Bag State
Figure 27: Chute Scan - Multi Package Shipment
Figure 28: Unallocate a Shipment from chute
Figure 29: Unallocate
Figure 30: Preview Manifest
Figure 31: Chute logs
Figure 32: Chute Close out -Single Package Shipment
Figure 33: Multi Package Shipment - Split Bag
Figure 34: Finalise Chute
Figure 35: Chute Finalised
...
IntroductionThis user manual instructs Depot users how to create Lanes, Chutes and Pallets to process shipment chute scanning in Intelligent Shipper.
Lanes and Chutes must be created before Chute scanning can take place.
| Anchor |
|---|
| _Toc515954300 |
|---|
| _Toc515954300 |
|---|
|
Create Lane
The list view of Lanes will appear after clicking on 'Lanes' from the menu bar on the left-hand side. Lanes can be filtered by Agent, Gateway and Lane.
Note: * after the field name displays a mandatory field.
- To create a Lane, click on Add Lane from the Lane screen
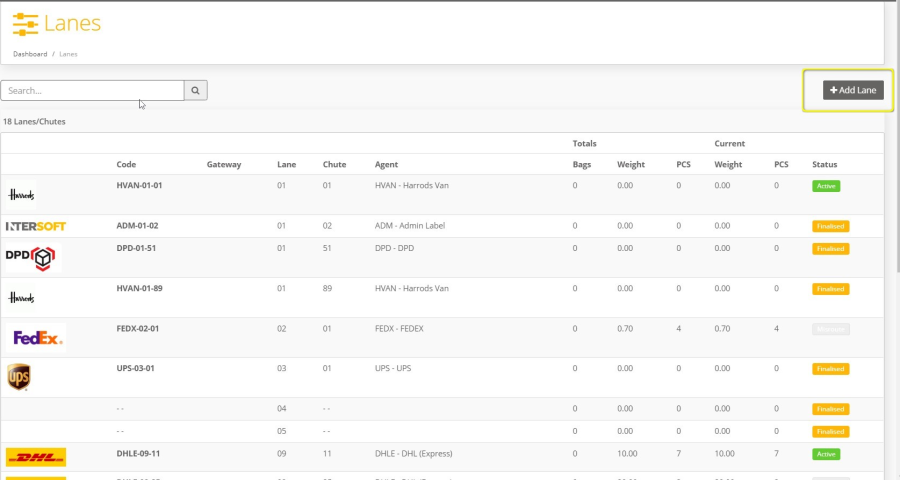
Figure 1: Chute Scanning - Lanes- Add Lane screen is displayed
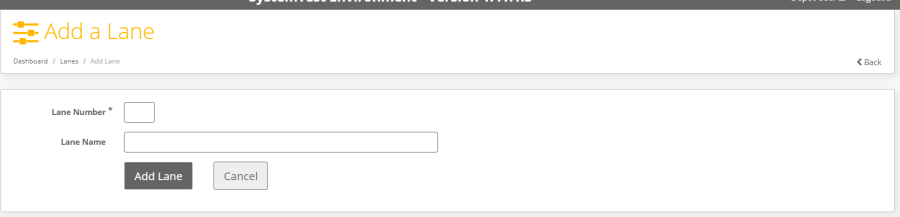
Figure 2: Add a Lane- Input Lane Number and Lane name
- Click Add Lane.
- Lane is created and displays following screen
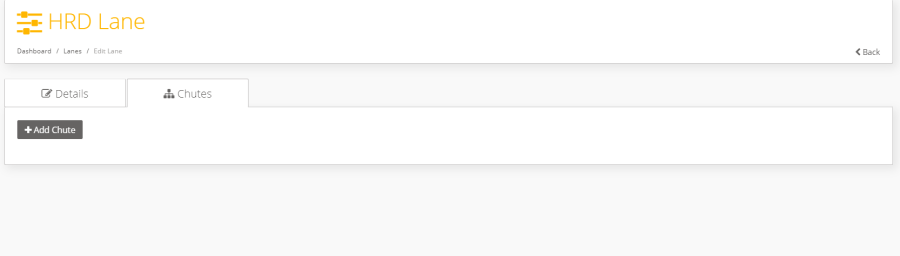
Figure 3: Lane created- The Lane Name, e.g. 'HRD Lane' in this instance, will be displayed on the page (Yellow text above the navigation menu).
| Anchor |
|---|
| _Toc515954301 |
|---|
| _Toc515954301 |
|---|
|
View/Edit/Delete Lane
- From the 'Lanes' screen each record represents a Lane that has been created.
- To view the Lane details, click on a lane from the list.
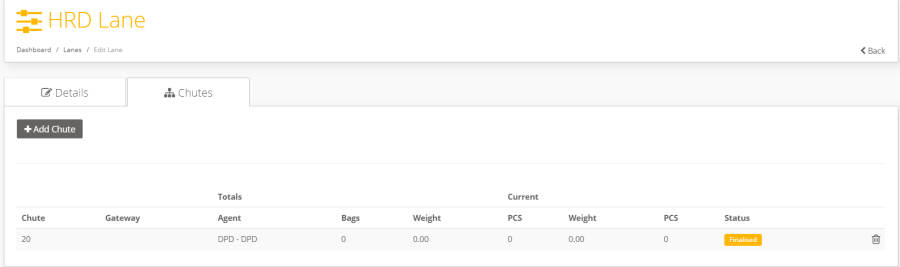
Figure 4: Edit Lane- To edit a lane, select the 'Details' tab
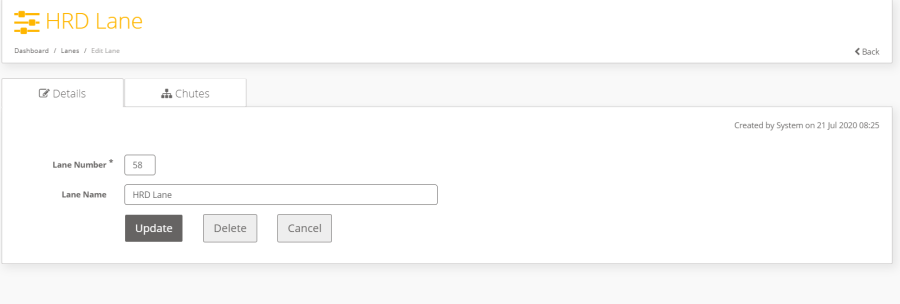
Figure 5: Edit Lane – Details
- Click 'Update' to finalise the changes
- Click 'Cancel' to retain the original details.
- To delete the Lane, Click delete.
- A confirmation pop-up is displayed.
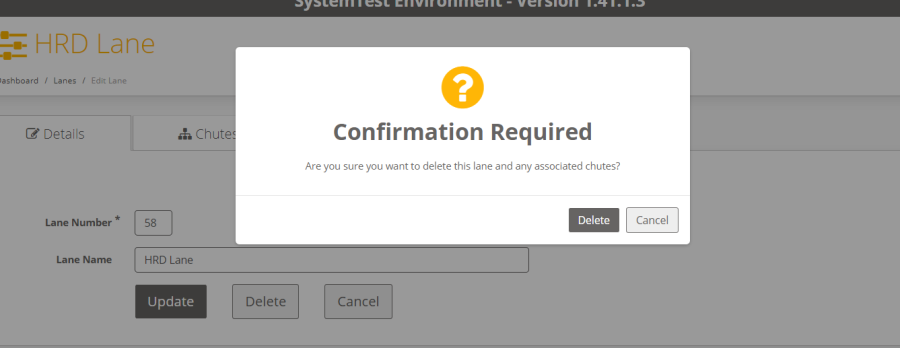
Figure 6: Delete Lane- Select Delete on the pop up to delete the Lane or select Cancel to revert to Details screen.
| Anchor |
|---|
| _Toc515954302 |
|---|
| _Toc515954302 |
|---|
|
Create ChuteTo create a Chute:
- From the Lane page, select Chutes tab and click on Add Chute.
Note: A chute can only be created within a Lane (existing or new)

Figure 7: Add Chute- Add Chute screen is displayed
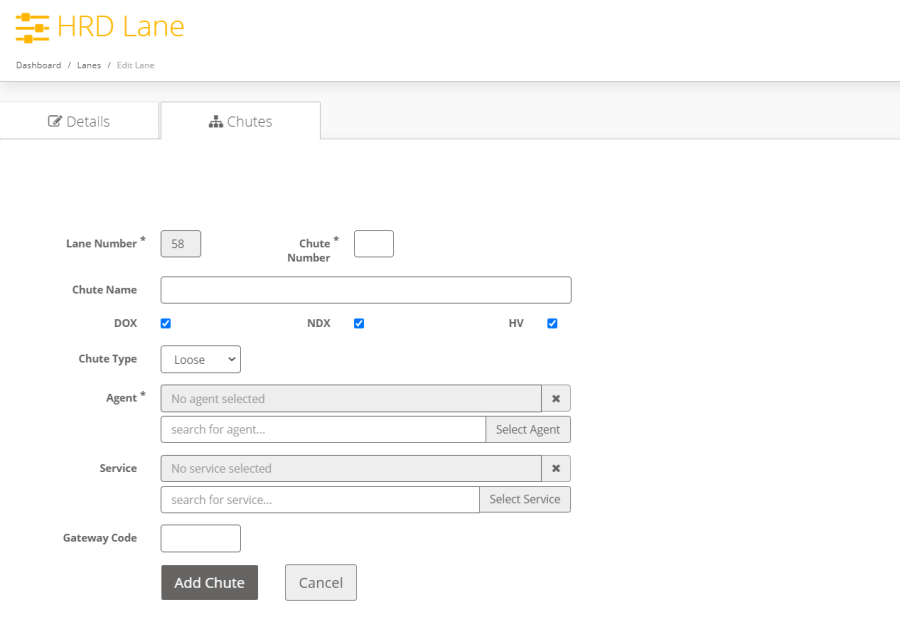
Figure 8: Create ChuteNote: * after the field name on the above screen displays a mandatory field.
Below screen fields are displayed:
- Lane Number:Number of Lane (disabled)
- Chute Number:Number of Chute
- Chute Name:Name of Chute
- DOX:Tick box setting to denote if documents allowed in this Chute
- NDX:Tick box setting to denote if non-documents allowed in this Chute
- HV:Tick box setting to denote if high value items allowed in this Chute
- Chute Type: Bag/Loose
Note: the list allows the user to configure the chute as a bag or a loose chute. A Bag is used when the Shipment is scanned to a Bag and the Bag is added to a Pallet
A Loose chute will not have the close bag option. The Shipment is directly scanned to Pallet.
- Agent:Code and Description of Agent
- Service:Code and Description of Service
- Gateway Code:Code for Gateway
- To select an Agent, leave the Agent field blank and click on 'Select Agent' then a list of Agents will be provided to select from.
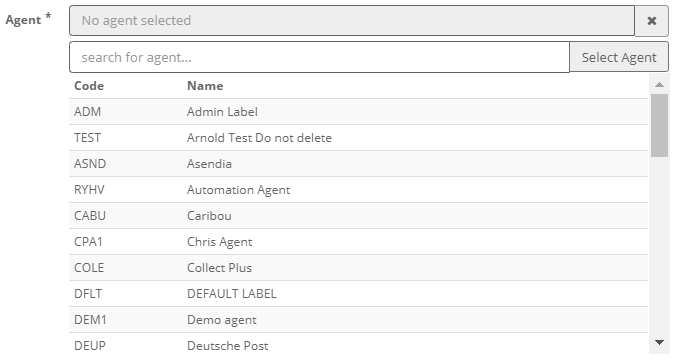
Figure 9: Create Chute - Select AgentSelect one of the Agents from the list provided to populate the Agent field:
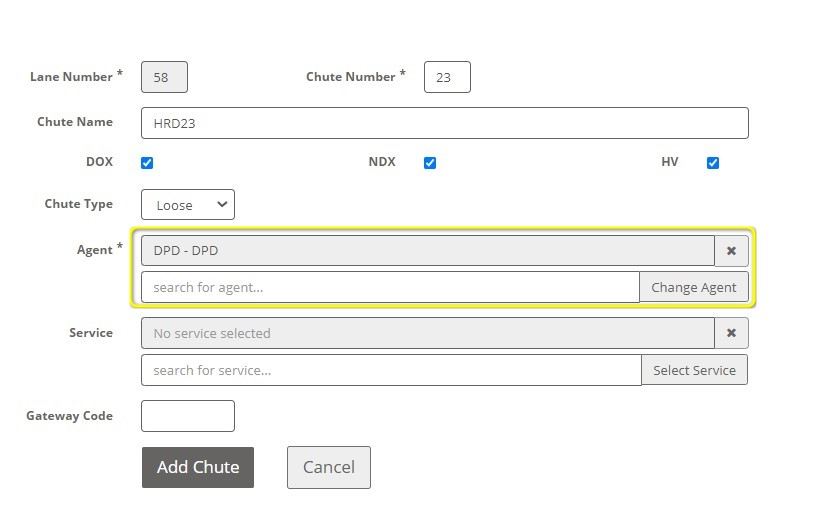
Figure 10: Change Agent- To change the Agent, type the agent name and select Change Agent (filters the list to match), or leave the field blank and Click Change Agent. Select an Agent from the list provided.
- Where a Service is required, type the service's name in the 'search for service…' field and click on 'Select Service' (for filtering) or leave the field blank and click on 'Select Service'.
A list of Services will be provided for the user to selected.
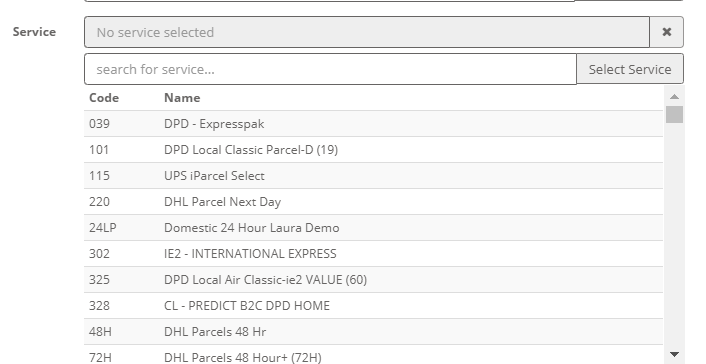
Figure 11: Select Service- Click on a service to populate the Service field as in following example:

Figure 12: Change Service- Once required fields are populated click 'Add Chute' for Chute to be created and listed on the Chute List screen
- Click 'Cancel' if you want to add the chute.
Now that a chute has been created the next step in the process is print the chute label. To print the chute label, see section 4.5 for more details.
| Anchor |
|---|
| _Toc515954303 |
|---|
| _Toc515954303 |
|---|
|
View/Edit Chute- Each row in the Chute tab represents a Chute in which when clicked drills down into more detail about the chosen Chute which can be edited as shown below:
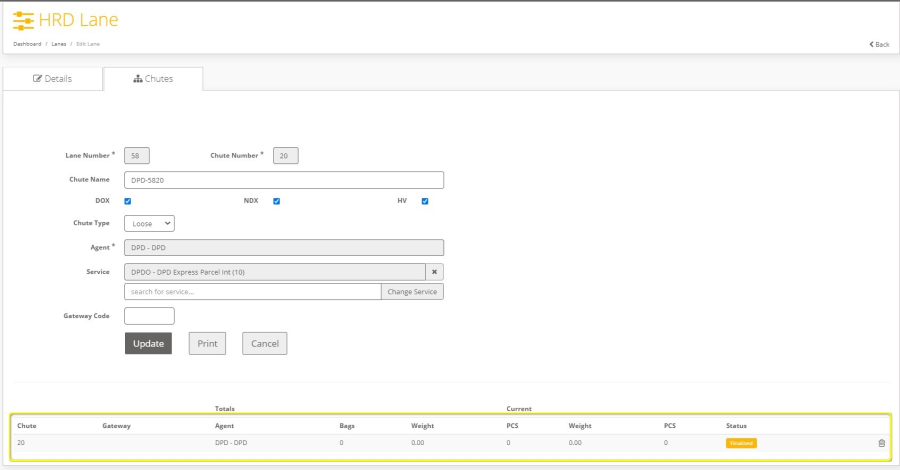
Figure 13: Edit chute- Once edited, click Update to save the changes made and return to the Chute list.
- Click Cancel to retain original Chute details and return to the Chute list.
- Click Print to the Chute Label.
- Label will be generated in PDF format as below
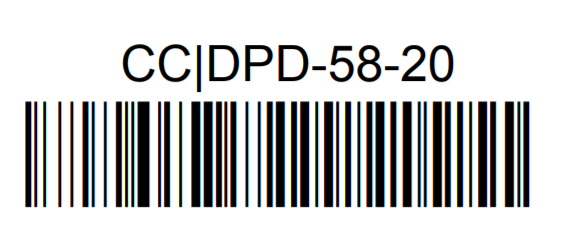
Figure 14: Chute Barcode- CC is the Chute identifier for Intelligent Shipper database
- DPD is the Agent Code
- 58 is the Lane number
- 20 is the Chute number
After printing, place the label by the lane to be scanned.
| Anchor |
|---|
| _Toc515954307 |
|---|
| _Toc515954307 |
|---|
|
Create Pallet- Click 'Pallets' from the menu.
- list view of Pallets appears, this screen will display 100 records per page.
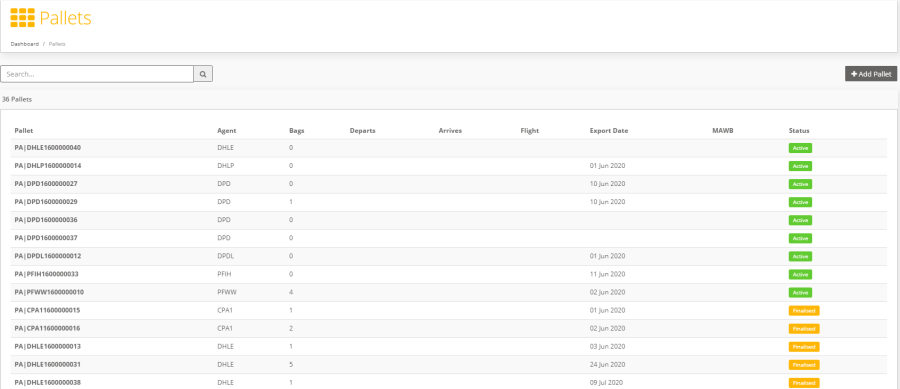
Figure 15: Pallets Screen- Click on Add Pallet to create a Pallet
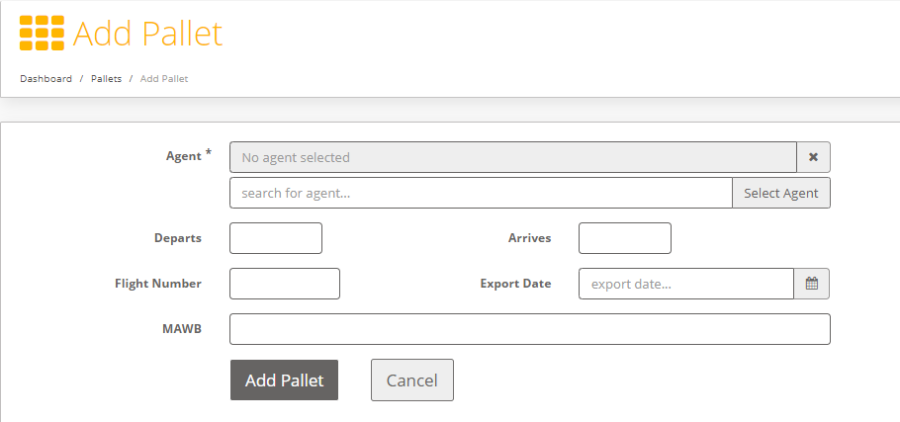
Figure 16: Add PalletBelow are the fields:
- Agent:Agent Code
- Departs: Departure Gateway Code
- Arrives: Arrival Gateway Code
- Flight Number:Number of Flight
- Export Date: Date of Export, default value will be Today's Date
- MAWB: Master Airway Bill Number
- To Select an Agent, type the agent name and select Change Agent (filters the list to match) or leave the field blank and Click Change Agent. Select an Agent from the list provided.
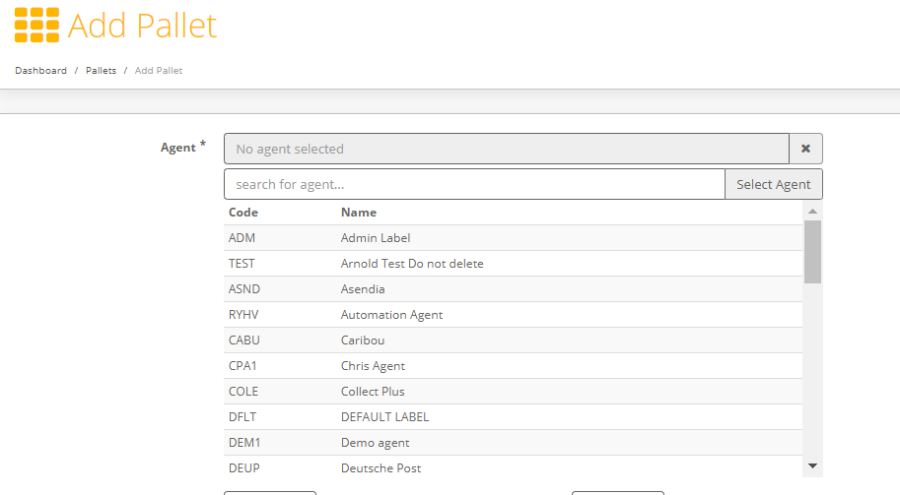
Figure 17: Add Pallet - Select Agent- Select one of the Agents to populate the Agent field
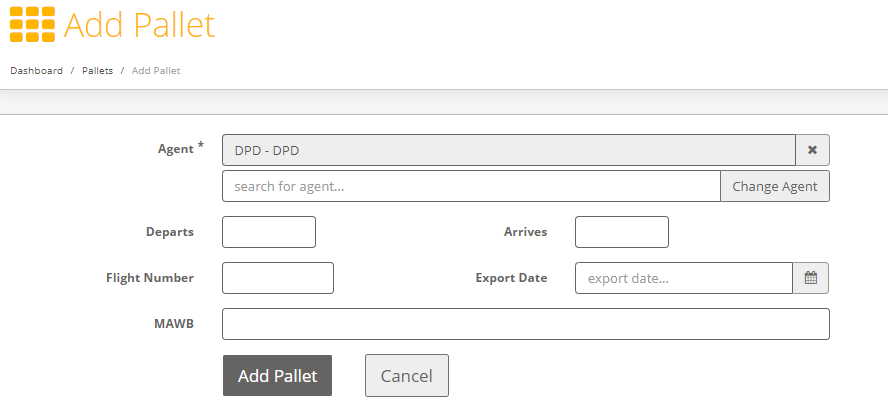
Figure 18: Add Pallet - Change Agent- Change the Agent by either typing the Agent name and clicking 'Change Agent' (filters the list to match), or leaving the field blank and clicking 'Change Agent' for you to choose from the list of Agents available
- The newly added Pallet will be shown as 'Active' in the Pallet list view screen as follows:
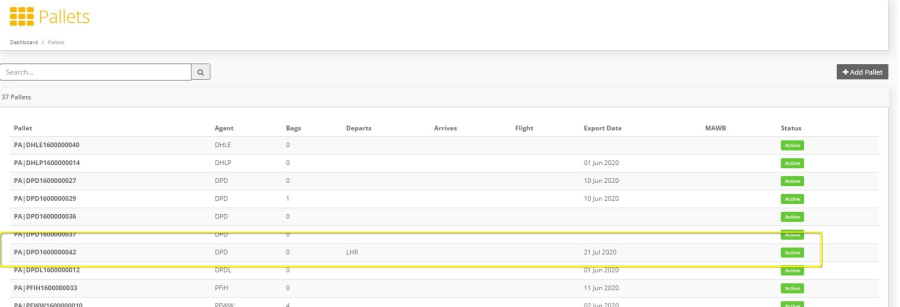
Figure 19: Pallet| Anchor |
|---|
| _Toc515954308 |
|---|
| _Toc515954308 |
|---|
|
View/Edit/Delete Pallet- From Pallet screen, each row represents a Pallet in which when clicked drills down into more details about the Pallet.
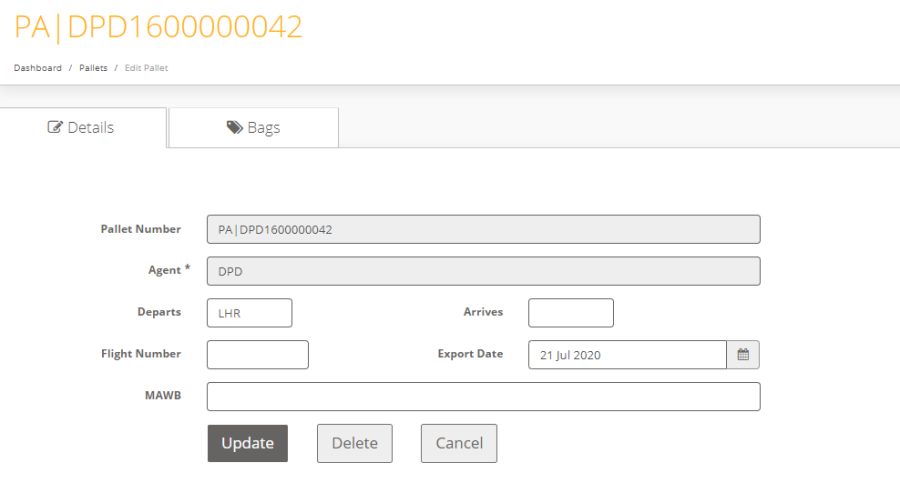
Figure 20: Edit Pallet- Pallet Number : Number of Pallet (disabled)
- Agent : Agent Code : (disabled)
- Departs : Departure Gateway Code, default value will be the logged in user's Depot (Origin)
- Arrives : Arrival Gateway Code
- Flight Number : Number of Flight
- Export Date : Date of Export, default value will be Today's Date
- MAWB : Master Airway Bill NumberOnce fields are populated:
- click 'Update' to store any amendments.
- Click 'Cancel' to retain the previous information without saving changes
- Click delete to delete the Pallet.

Figure 21: Delete Pallet- Confirmation message will be displayed
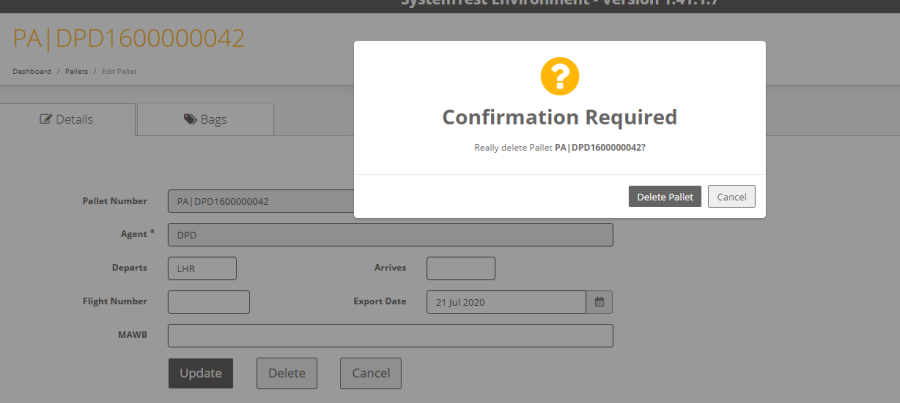
Figure 22: Delete Pallet - Confirmation Message - To delete the Pallet, click 'Delete Pallet' on the confirmation message
- To revert to the 'Details' screen, click 'cancel' on the confirmation message.
| Anchor |
|---|
| _Toc515954310 |
|---|
| _Toc515954310 |
|---|
|
Scanning – Manual ScanManual Scan option is used to manual Chute scan on Intelligent Shipper.
- Click on Scanning>Manual Scan, Select Chute page with a list view of all the Chutes for Scanning is displayed.
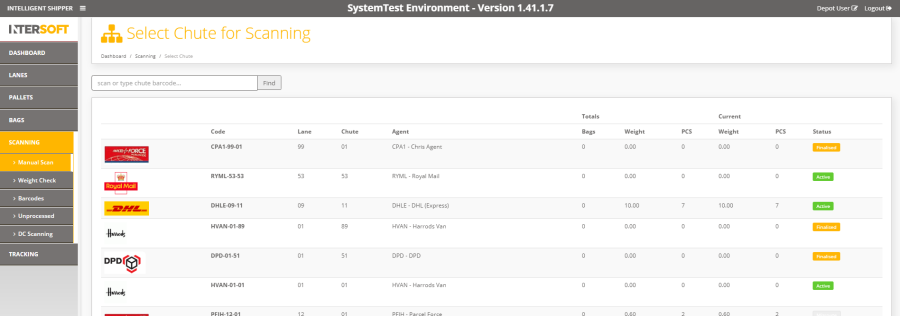
Figure 23: Manual Scan - Chute Scanning- Click on the Chute you created
- Chute Scanning screen is displayed.
Note: Chute scanning screen can also be displayed when the Chute Barcode created in section 5.1 is scanned.
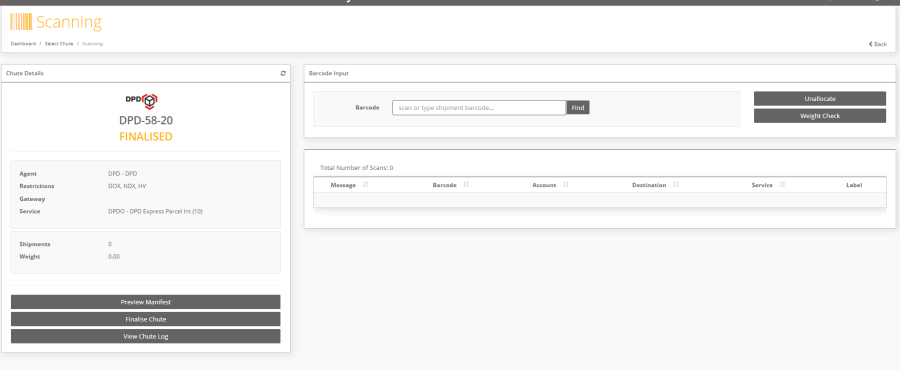
Figure 24: Chute Scanning- Scan or Type the Shipment package tracking number in the Barcode field and Click Find to allocate the Shipment to the Chute. If matched to the Agent, Restrictions, Gateway or Service assigned to the chute then the shipment is scanned to the Chute.
- For single package shipments, the shipment is successfully scanned to the Chute.
The Message column in the scanning history confirms the scan.
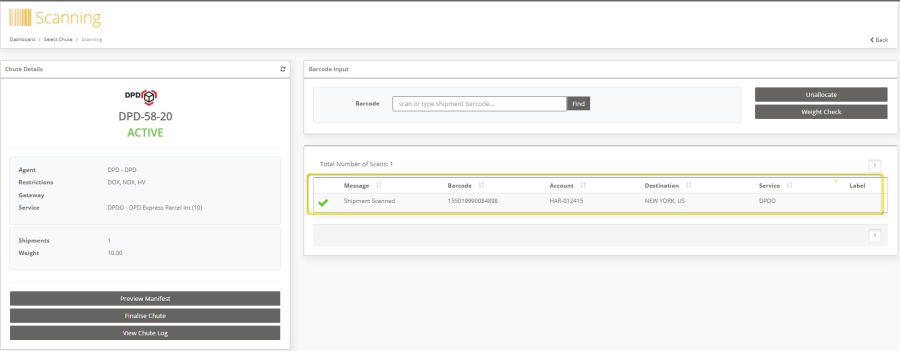
Figure 25: Chute Scan - Single Package Shipment- For multipackage shipments, the Message column in the scanning history displays 'Shipment Scanned (Split bag state)' until the last package of the shipment is successfully scanned to the Chute.
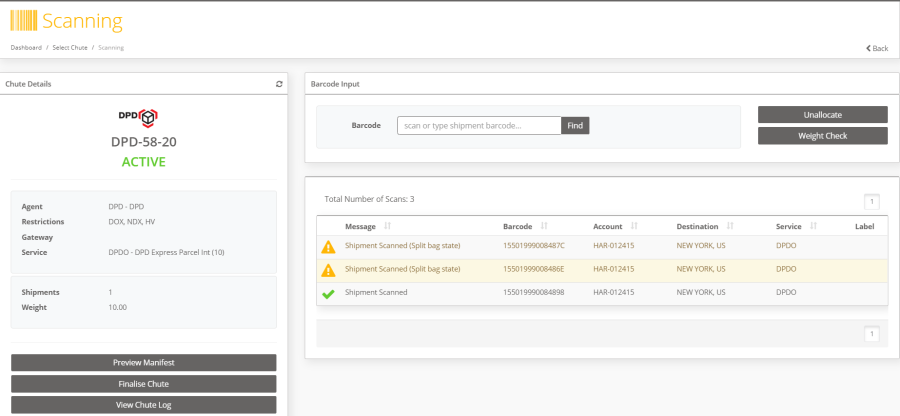
Figure 26: Chute Scan - Multi Package Shipment - Split Bag State- When the last package of the shipment is scanned then the Shipment is successfully allocated to the Chute.
- The Message column in the Scanning History list is updated from 'Shipment Scanned (Split bag state)' to Shipment Scanned.
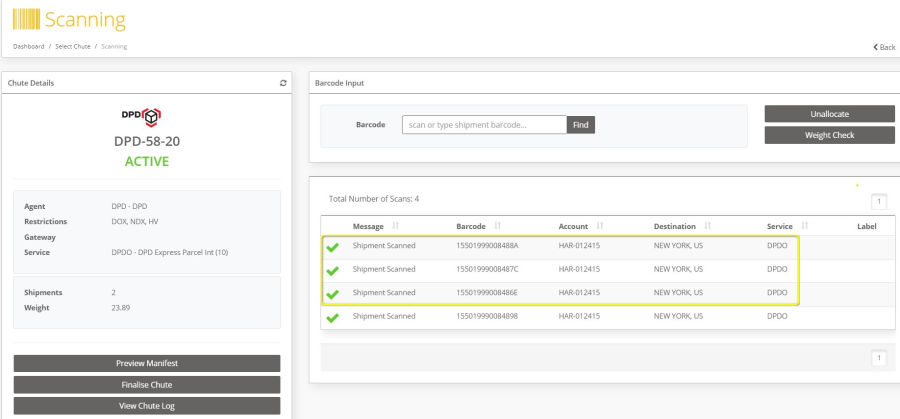
Figure 27: Chute Scan - Multi Package Shipment- To unallocated the Package/Shipment, enter the tracking number in the Barcode field and click the Unallocate button.
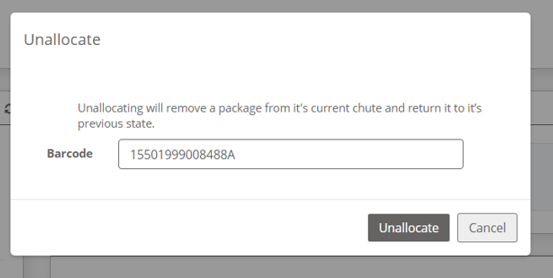
Figure 28: Unallocate a Shipment from chute- For a Single Package Shipment once the package is unallocated then the Shipment is unallocated from the Chute.
- For a Multi Package Shipment, When the first package of the shipment is scanned to be unallocated, then the Package is unallocated, and the Shipment state is changed from Shipment Scanned to SPLIT Bag. Only when the last package for the shipment is scanned to be unallocated then the Shipment is completely unallocated from the Chute.

Figure 29: Unallocate- To Preview the Manifest, click on Preview Manifest option before finalizing the chute.

Figure 30: Preview Manifest- To view the Chute log, Click on Chute Log

Figure 31: Chute logs| Anchor |
|---|
| _Toc515954313 |
|---|
| _Toc515954313 |
|---|
|
Chute Close Out- For a Single Package Shipment, to close the chute containing the scanned shipments click on Finalise Chute
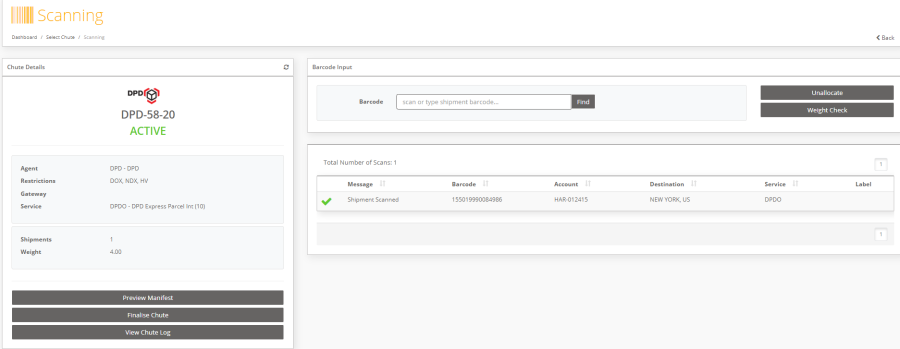
Figure 32: Chute Close out -Single Package Shipment- Where the shipment is a Multi Package Shipment, and not all the packages are scanned to the chute then an error message is displayed to the user.
Note: A chute can only be finalised if it has no shipment in Split Bag status. Where the chute has a shipment in the Split bag status and the user tries to finalise the chute then an error message is displayed. The user must either Unallocate all the packages of the Split shipment or scan the remaining packages in the Spilt shipment to the chute to finalise the chute.
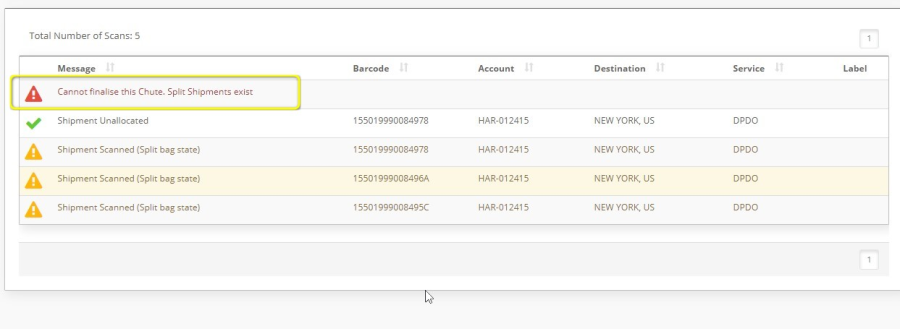
Figure 33: Multi Package Shipment - Split Bag- When all packages are scanned to the Chute then the Chute can be finalised.
- Select Finalise Chute
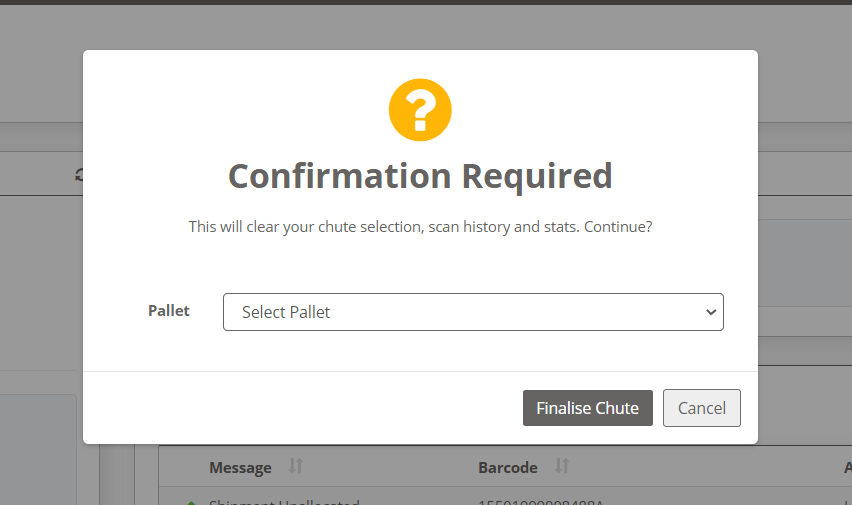
Figure 34: Finalise Chute- A confirmation message is displayed to select the Pallet and finalise the Chute
- Select a Pallet from the Pallet drop down list.
- Select Finalise Chute
- Chute is now finalised. Chute status is now updated from Active to Finalised.
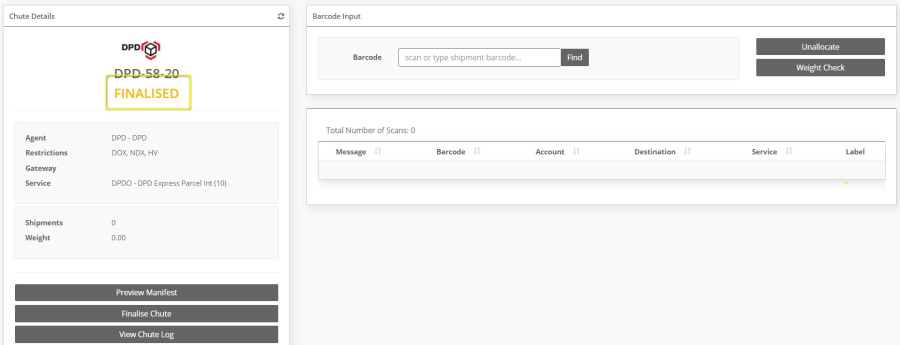
Figure 35: Chute Finalised| Anchor |
|---|
| _Heading_Level_3 |
|---|
| _Heading_Level_3 |
|---|
|
Appendix 1 – Glossary
Term | Definition |
|---|
Lane | route where parcels are transported to be collected for scanning |
Pallet | portable platform for storing |
MAWB | Master Airway Bill Number |