Commercial and in Confidence
The information contained in this document is confidential. No part of this document may be reproduced, disclosed to any third party, or issued in any form or by any means without the express written permission of Intersoft Systems & Programming Ltd.
Intelligent Shipper
Label Print Webhook Setup
Version 2.0
Document Owner | INTERSOFT Systems and Programming Limited |
Version | 2.0 |
Date | 06/08/2020 |
Description | Instructs System Administrator users how to setup a print label webhook, for automated label printing from the Till Pack and DC Scanning screens. |
Author | Mujeeb Mohammad |
Commercial and in Confidence
The information contained in this document is confidential. No part of this document may be reproduced, disclosed to any third party, or issued in any form or by any means without the express written permission of Intersoft Systems & Programming Ltd.
| Anchor | ||||
|---|---|---|---|---|
|
Version History
Version | Amendments | Date | Author |
0.1 | Draft | 17/07/2020 | Mujeeb Mohammad |
0.2 | Feedback updated from Peer review | 24/07/2020 | Mujeeb Mohammad |
1.0 | Final version | 29/07/2020 | Mujeeb Mohammad |
2.0 | Added appendix 1 print label webhook xml | 06/08/2020 | Mujeeb Mohammad |
Review
Name | Title | Date Reviewed | Version Reviewed |
Laura Price | Head of Business Analysis | 23/07/2020 | 0.1 |
Laura Price | Head of Business Analysis | 06/08/2020 | 2.0 |
Referenced Documents
Document Name | Version | Location (e.g. Link to Shared Drive, SharePoint etc.) |
N/A | N/A | N/A |
Contents
1. Document Controls
2. Table of Figures
3. Introduction
4. Webhook - Label Print Set up
5. Edit an Active Webhook
6. Appendix 1 – Glossary
| Anchor | ||||
|---|---|---|---|---|
|
Figure 1 - Label Print Page
Figure 2 - Field descriptions
Figure 3 - Label Print - Webhook fields
Figure 4 - Successful HTTP 200 Response
Figure 5 - HTTP 500 - Unsuccessful Response
Figure 6 - Successful Response - Active checkbox is enabled
Figure 7 - Print Label - Edit
Figure 8 - Print Label - Edit - Confirmation Message
Figure 9 - Label Print Webhook- Fields are editable
...
| Anchor | ||||
|---|---|---|---|---|
|
When a final mile label is created from Till Pack screen or DC Repack screen, the label image can be sent via Webhook to the customer's system. This allows the label to be automatically printed to the configured printer, without a user needing to download or manually print the label. If an active webhook does not exist, then labels cannot be printed automatically from the Till Pack and DC Scanning Screens. The user will need to manually download and print the labels.
This Webhook must be developed by the customer and hosted in their environment, making it available to Intersoft Cloud environment and producing an oAuth2 authentication token.
This user manual will instruct how to setup and activate the webhook in Intelligent Shipper, so that label print requests can be sent to the customer's webhook.
Webhook set up access is available to System Admin users.
| Anchor | ||||
|---|---|---|---|---|
|
| Anchor | ||||
|---|---|---|---|---|
|
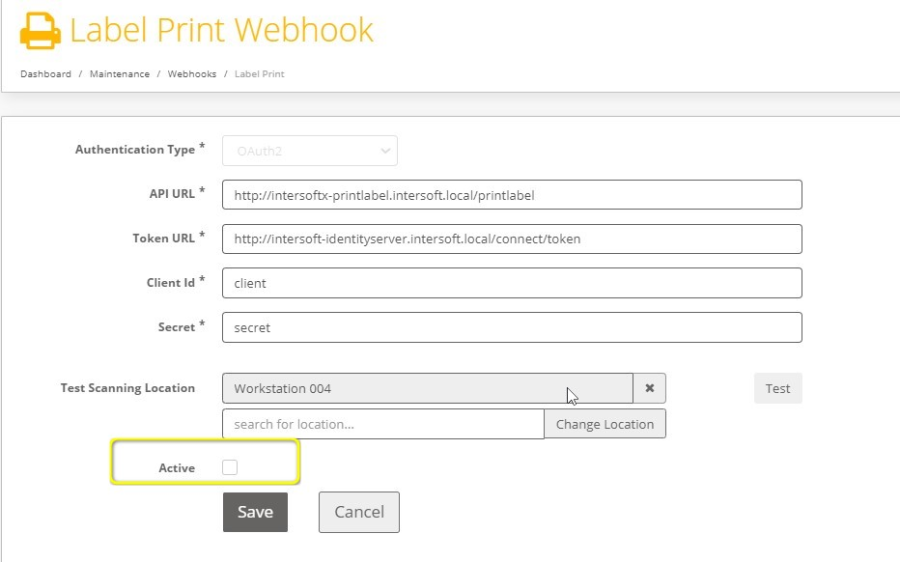
- Access Webhook screen From Intelligent Shipper> Maintenance Menu
- Select Label Print option
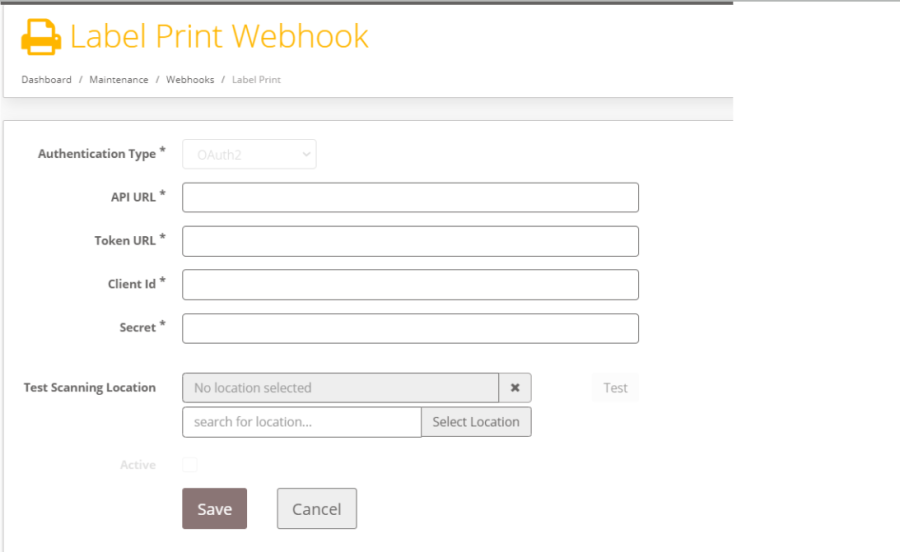
Label Print screen is displayed with the below fields: 
| Anchor | ||||
|---|---|---|---|---|
|
Field | Field Description | Required | Field Length |
API URL | URL of the customer's API the print label webhook request will be sent to | Mandatory | 1000 Characters |
Token URL | Used in the API request to generate tokens for request validation | Mandatory | 1000 Characters |
Client ID | Username used to call the customer's API | Mandatory | 1000 Characters |
Secret | Password used to call the customer's API | Mandatory | 1000 Characters |
Test Scanning location | Valid scanning location from the list of scanning locations setup in the Scanning Locations maintenance screen. Used to test the webhook request. | Optional | Search list |
Test | Validates details input in the above fields and provides a success or failed response by sending a test print label request to the webhook | Button | N/A |
Active | Activates the webhook when ticked | Tick box | N/A |
| Anchor | ||||
|---|---|---|---|---|
|
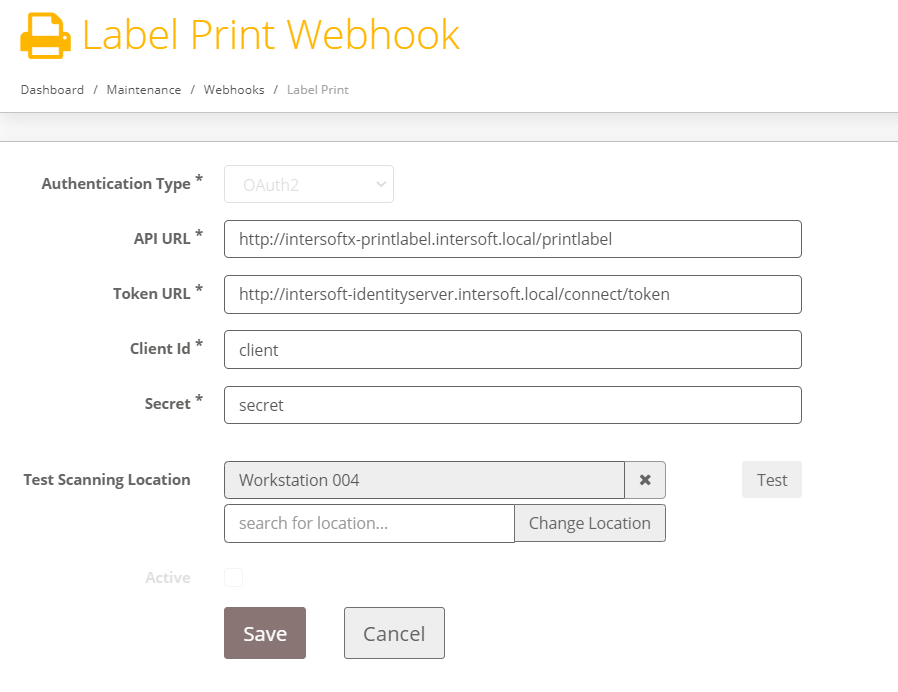
- Authentication type will be populated with OAuth2 by default and will be disabled
- Enter URL for Print Label API.
- URL of the Client API the Print label webhook request will be sent to
- Enter Token URL
- Enter Client ID for the Print Label API
- Enter Secret for the Print Label API
- Enter the Test Scanning Location by either entering the scanning location name and click search to find the specific location or leave the field blank and click search to select from the list of scanning locations displayed.

| Anchor | ||||
|---|---|---|---|---|
|
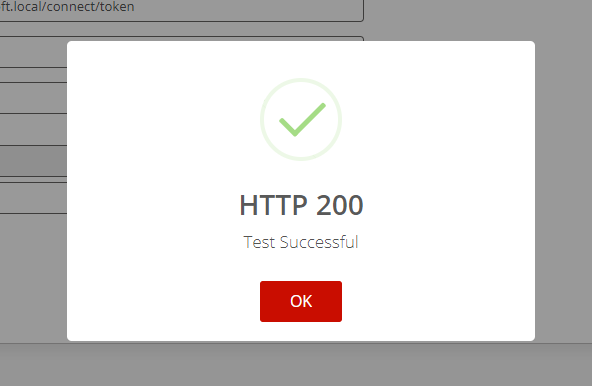
- Click the Test button. This will validate all fields have been populated and validates if the Scanning location entered is a valid and exists in the Scanning Locations maintenance screen. If the validation fails an error messaged returned. If all fields populated are valid then a test Print label request is sent to the webhook to validate the URL and credentials entered. If this is successful, then a HTTP 200 response is displayed in a pop-up window.

| Anchor | ||||
|---|---|---|---|---|
|
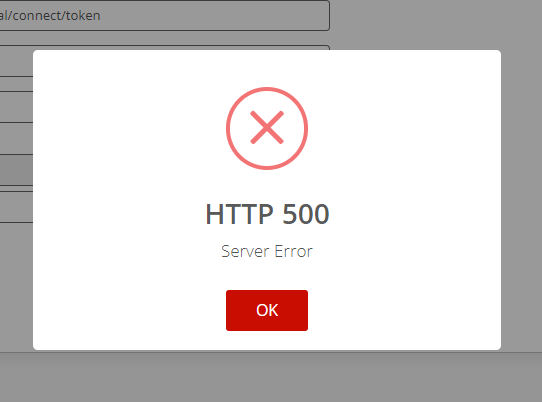
- Where the test Print label has been unsuccessful then a HTTP 500 response with error message is displayed.

| Anchor | ||||
|---|---|---|---|---|
|
| Anchor | ||||
|---|---|---|---|---|
|
| Anchor | ||||
|---|---|---|---|---|
|
| Anchor | ||||
|---|---|---|---|---|
|
| Anchor | ||||
|---|---|---|---|---|
|
| Anchor | ||||
|---|---|---|---|---|
|
| Anchor | ||||
|---|---|---|---|---|
|
| Anchor | ||||
|---|---|---|---|---|
|
| Anchor | ||||
|---|---|---|---|---|
|
| Anchor | ||||
|---|---|---|---|---|
|
| Anchor | ||||
|---|---|---|---|---|
|
| Anchor | ||||
|---|---|---|---|---|
|
| Anchor | ||||
|---|---|---|---|---|
|
| Anchor | ||||
|---|---|---|---|---|
|
| Anchor | ||||
|---|---|---|---|---|
|
| Anchor | ||||
|---|---|---|---|---|
|
| Anchor | ||||
|---|---|---|---|---|
|
| Anchor | ||||
|---|---|---|---|---|
|
...
The Active check box will be enabled once a successful HTTP 200 response is received.Anchor _Level_3_Heading _Level_3_Heading

| Anchor | ||||
|---|---|---|---|---|
|
Note: By default the Active checkbox remains unchecked and disabled until a successful HTTP 200 response is received.
...
This allows the label to be automatically printed to the configured printer, without a user needing to download or manually print the label. If an active webhook does not exist, then labels cannot be printed automatically from the Till Pack and DC Scanning Screens. The user will need to manually download and print the labels
...
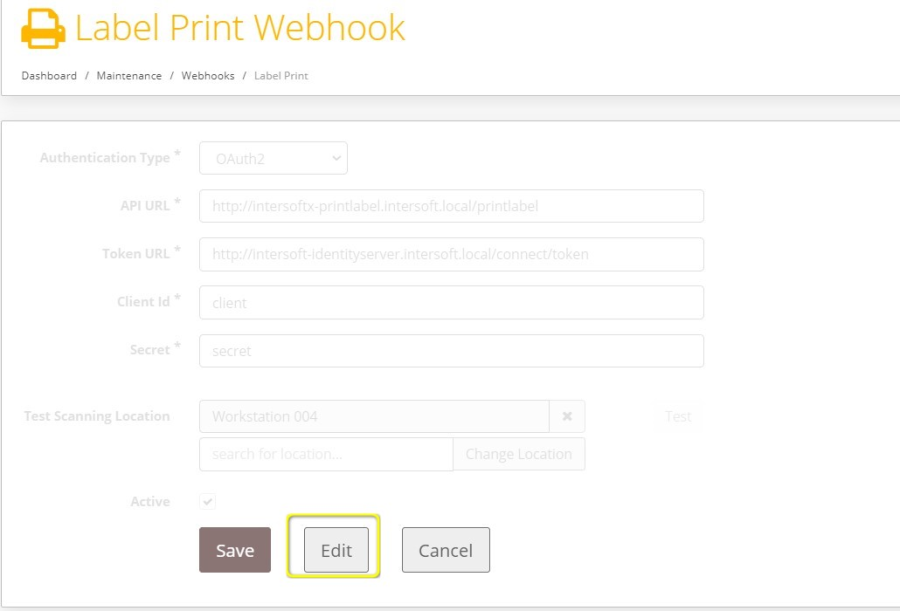
- Check the Active checkbox.
- Click Save
- The Print Label webhook is now active. When labels are be printed from the Till Pack & DC Scanning screens, the label image will be sent in a webhook request to the Client API configured in the Label Print Webhook screen. The webhook request will contain the label printer name in the Scanning Locations maintenance screen for the location the shipment was scanned on.
...
To edit an active webhook:
- Access Webhook option From Intelligent Shipper> Maintenance Menu
- Select Label Print option
- Label Print screen is displayed and all the fields on the page are disabled.
...
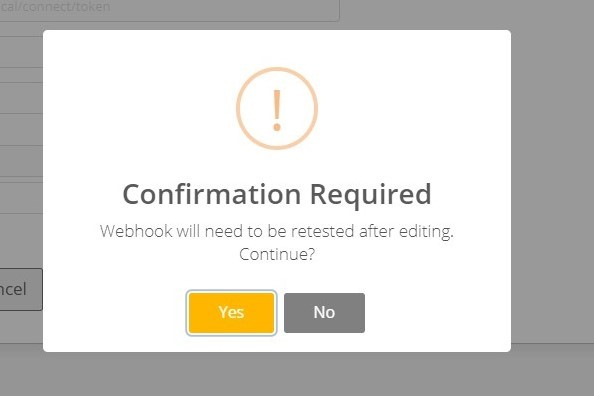
- Click the Edit Button
- A confirmation message is displayed.
...
- Selecting No on the confirmation message will direct you back to Step 3.
- Select Yes to proceed
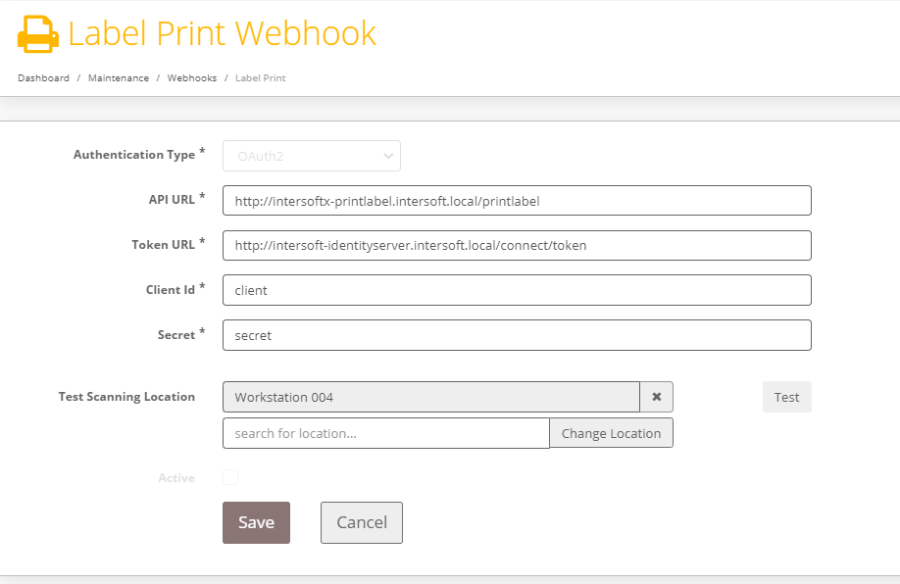
- Print Label page is displayed. The fields will now be editable. The Active check box will be disabled
...
- was scanned on.
| Anchor | ||||
|---|---|---|---|---|
|
To edit an active webhook:
- Access Webhook option From Intelligent Shipper> Maintenance Menu
- Select Label Print option
- Label Print screen is displayed and all the fields on the page are disabled.
| Anchor | ||||
|---|---|---|---|---|
|
- Click the Edit Button
- A confirmation message is displayed.
Note: When editing an existing active webhook, the webhook requires retesting and a successful HTTP Response must be received.
| Anchor | ||||
|---|---|---|---|---|
|
- Selecting No on the confirmation message will direct you back to Step 3.
- Select Yes to proceed
- Print Label page is displayed. The fields will now be editable. The Active check box will be disabled
| Anchor | ||||
|---|---|---|---|---|
|
- Once the required fields have been edited, select the Test button.
- Upon a successful HTTP 200 response, the Active check box is enabled again.
- Activate the Webhook by checking Active checkbox.
- Click Save.
- Webhook is now retested and active
.Anchor _Heading_Level_3 _Heading_Level_3
This allows the label to be automatically printed to the configured printer, without a user needing to download or manually print the label. If an active webhook does not exist, then labels cannot be printed automatically from the Till Pack and DC Scanning Screens. The user will need to manually download and print the labels
| Anchor | ||||
|---|---|---|---|---|
|
Below is an example of the Print Label webhook xml that will be sent to the configured API:
{
"TillBarcode": "00000699973149161013193999",
"Location": {
"LocationName": "Beauty",
"PrinterName": "WSD-2545vfd-df45h-sndb-jgjjhj5255",
},
"Label": {
"Agent": "DHL",
"TrackingNumber": "JD25645455554565",
"B64LabelImage": "SkdCIDYyMDlHMjNBMDA2O(…truncated)",
"CreatedDateTime": "28/10/2019 14:25:12"
}
}
Appendix 1 – Glossary
Term | Definition |
Scanning Location | Workstation location where the Shipment packages are scanned |
Webhook | A webhook is a way for an app to provide other applications with real-time information. A webhook delivers data to other applications as it happens, meaning you get data immediately. |